


Adobe Bridge Tutorial & Uses (+ 7 Alternatives)
Adobe Bridge is a great way to organise your photos, and it's 100% free! Learn its uses in our guide, discover alternatives and compare it to Lightroom.
Learn | Photography Guides | By Greg Cromie
Shotkit may earn a commission on affiliate links. Learn more.
This is a guide to Adobe Bridge, the powerful digital asset management app which is 100% free to download and use.
Despite being a great way to preview, organise, edit and publish your photos, photographers are often confused about Adobe Bridge.
Should you be using it? How exactly do you use it? Is it better than Lightroom for managing photos?
In this Adobe Bridge review/tutorial, we'll answer all the most common questions so you can use Bridge with confidence.
What is Adobe Bridge?
Despite being around for over 15 years, Adobe Bridge is a little-known member of the Adobe Creative Cloud family of applications.
Adobe Bridge CC is an asset management app that works as a companion for all Adobe CC applications, including Photoshop and InDesign.
If you prefer to use Photoshop for your image workflow solution but need a way to manage your files smartly, it may be the tool for you.
It's a simple to use tool that allows you to preview, organise, and publish your images from a single platform. Plus, it has a range of functions that enable you to add metadata, keywords and ratings to keep tabs on your work.
What's more, like Photoshop and Lightroom, Bridge has a clean and intelligent user interface that is very intuitive and user-friendly.
- Is Adobe Bridge still free?
Yes! It's free to use software developed by Adobe – although Adobe doesn't widely publicise it.
It seems that Adobe does very little to promote this free-to-use software that a lot of photographers use as an alternative to Adobe Lightroom.
It makes sense that Adobe would prefer photographers to pay them for the products they create. After all, regardless of what you think about Adobe's price for a CC subscription, the products are excellent.
Adobe Camera RAW is also free to download tool that pairs well with Bridge.
With the two combined, you have a powerful and comprehensive alternative to Lightroom.
Key Features of Adobe Bridge
1. User Interface
Like all Adobe software, a lot of thought has gone into the desktop and user interface design.
However, you can opt for one of the available workspace configurations or customise the page by dragging sections of the interface to different locations.
Adobe Bridge CC has a menu bar across the top and quick access tabs for the six standard functions available – Essentials, Libraries, Filmstrip, Output, Metadata and Keywords.
Depending on which of the six tabs you select, the layout changes to suit the required tools and functions.
Regardless of your choice, the left-hand side of the page always includes two panes that you add functions to by right-clicking. The best part about the interface is that you can set different functions to these two panes for each of the six core tabs.
For example, you can add the Favourites panel where you access the core computer storage drives and folders.
In the second panel, you can access the Filters function or any number of additional tools, including Collections (Smart Collections), Export, Folders, Libraries, Previews and more.
2. File Management
Given that Adobe's Bridge is a file management tool, let's look at the options available from the File dropdown menu. These will give you an idea of the usability and benefits of using this software to manage your content.
With Bridge open, you select a photo that you wish to manage. Use the File menu to then open the image in Photoshop CC, Camera RAW (CR) or any other RAW image software that Bridge detects.
You're also able to Reveal in Finder to locate tricky to find files buried deep in your storage drives.
The File menu allows you to open, copy and move files to different locations.
One of the critical benefits of Bridge is using the File menu to Place an image in one of the Adobe CC applications such as Illustrator, Photoshop or place it within InDesign files.
With an image open in your Bridge screen, you can Place it quickly into Photoshop to apply changes and then return to Bridge to move on to the following image. Or, you can double click an image in Bridge for it to open Photoshop or CR by default.
You can also import your images from a device within the File menu or get them directly from a camera connected to your computer.
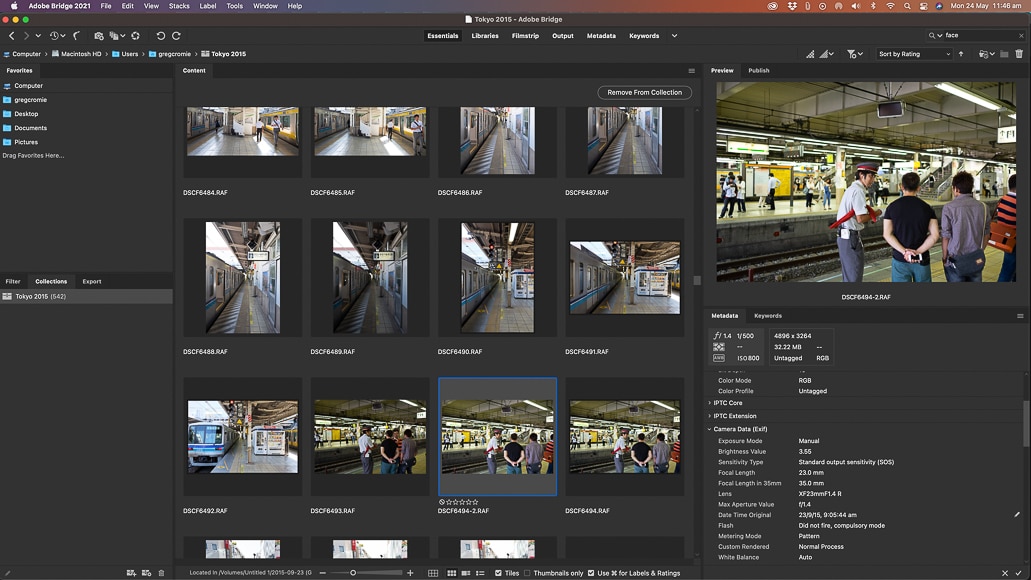
3. Essentials

The Essentials tab is where you'll spend most of your time viewing your images before you decide what to do with them.
In this tab, the workspace structure divides into sections with the standard panes on the left-hand side.
Upon loading the software, the top pane houses the Favourites panel with a list of your computers core operating folders. Below this, the default panels are Filter, Collections and Export.
As covered earlier, you can add and remove additional panels by right-clicking.
The Filter panel is your way of viewing the keywords, dates and other essential information of a single image or a collection of images.
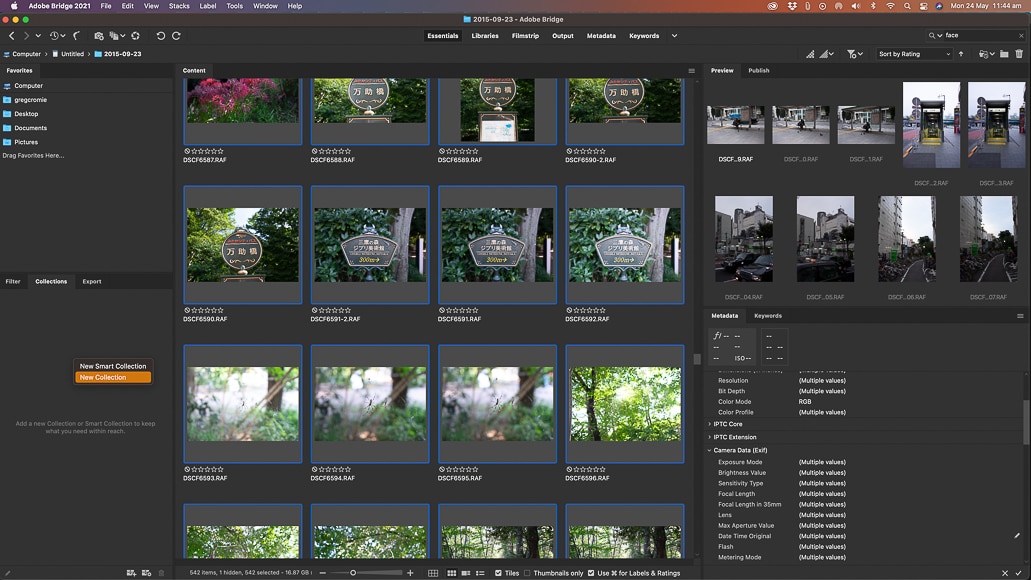
Collections work in the same way as Collections and Smart Collections in Lightroom – these are groups of images that you've compiled and stored in handy folders.
Export is self-explanatory and straightforward to use. You can perform a custom export or a preset export that you design – drag and drop the image or collection on the export preset.
The centre pane in the Essentials workspace shows a thumbnail gallery of the images. A slider at the bottom of the tab allows you to change the size of the previews.
To the right of the workspace, the Preview panel shows a selected image in a larger size making it handy to look at the detail in the image.
Below this is the default Metadata and Keyword tabs – a big part of the function of Bridge.
The tab provides all critical metadata for the selected image, including File Properties and Camera Data – this is the same as EXIF data. The Keywords tab lets you add keyword categories and subcategories with check-boxes to select as you build your collection.
The best bit about the Essentials options is that everything is customisable to suit your workflow or level of skill. It's also a great place to preview your content before moving to the next step.
As I said, you'll spend most of your time here handling all of your image files, collections and smart collections. The other tabs follow a similar layout to Essentials, with all retaining the pair of panes on the left-hand side.
4. Libraries
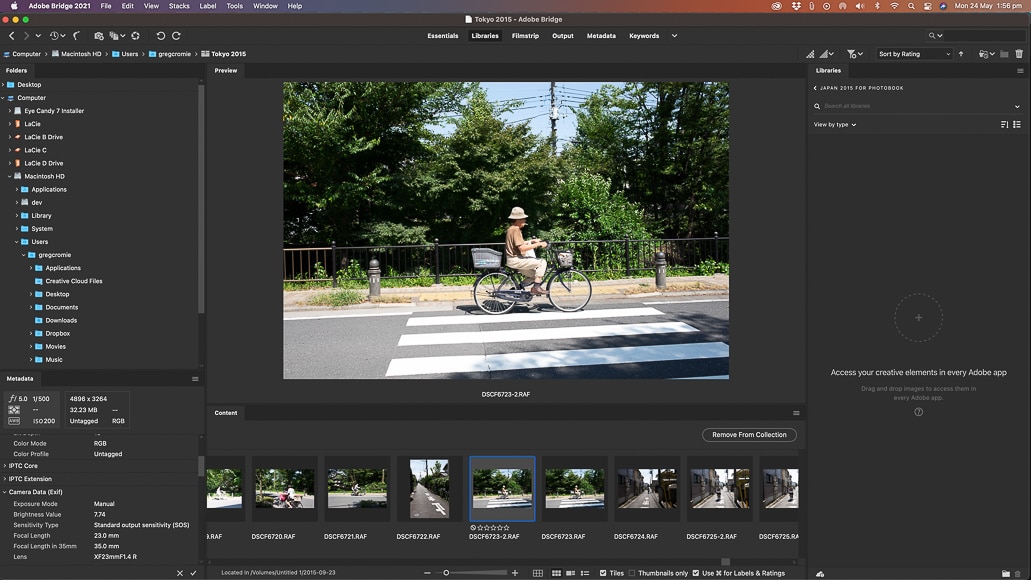
The Bridge Libraries tab provides an expanded view of your computers file system.
Selecting a folder that contains images will show the images in a film strip along the bottom of the workspace. If you choose an image, it will appear in the centre of the screen with all relevant details on the screen.
The Libraries tab aims to display all of the images from the location folder and sort them into Library folders. You can add them to an existing folder or create a new folder.
All you have to do is drag and drop the digital images from the filmstrip into the library folder.
5. Filmstrip

The Filmstrip tab in Bridge operates like a preview tool where you select a folder of images from your computer and then view them all as thumbnails on a filmstrip at the bottom of the screen.
Any selected photo will display at a larger scale at the centre of the screen, with data communicated to the left. It operates similar to the Libraries tab without the ability to move images into folders.
Another great feature is the Loupe tool to get a zoomed-in view of the photo. It works a lot like a magnifying glass that moves around the image.
The Loupe tool is best used in this tab as you can make the most of scaling the preview image to a larger size before zooming in on details.
6. Output
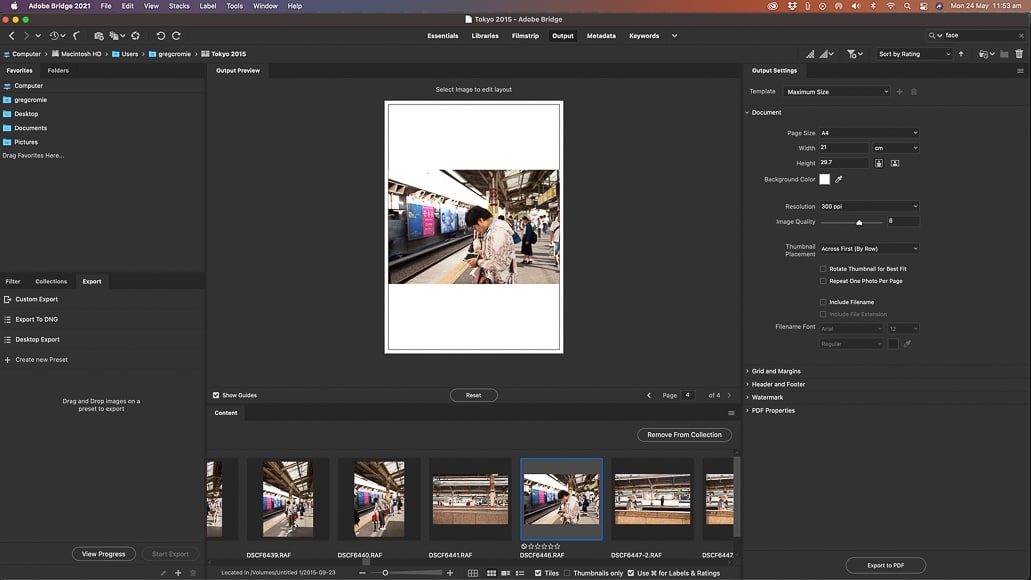
The Output tab is the business end of the Bridge tabs as it helps you decide what to do next with your creative assets.
The images from your selected folder appear along the bottom of the screen. You drag and drop an image onto one of the Export options – these can be preset to include the file format and destination.
However, if you want to create a PDF document with your images, the Output tab is your best option.
The centre of the screen shows a canvas where you can drag images onto several templates. The templates represent a selected paper size and include the options to create collages and even greeting cards.
There are several options to build upon your PDF document to the right of the canvas, including headers, footers, margins, and watermarks. Every change you make to the content of the canvas updates in the preview.
You can even export images from Bridge directly to your Adobe Stock account if you have one set up.
7. Photography Metadata
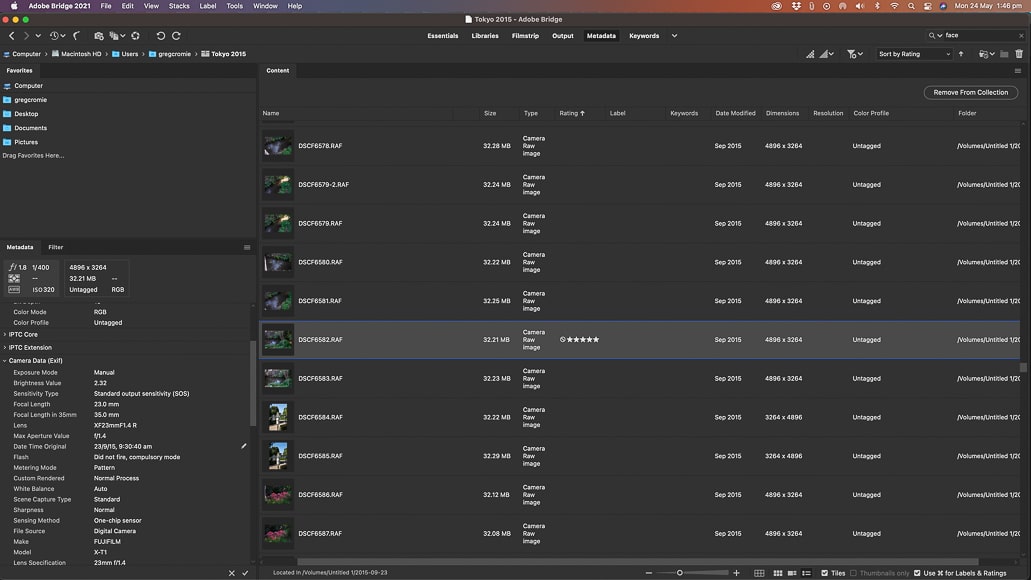
The Metadata tab in Bridge shows all of the images from your selected folder in a list.
The data values display in columns including Name, Date Created, Size, Type, Rating Ranking and Keywords, to name a few. You can add and remove data value columns as you see fit and can change the order of appearance.
Each listing shows a thumbnail of the image and the ability to see a greater level of data on the left-hand panel.
When creating content, the more information you can add, the easier it will be to preview and locate at a later date.
8. Keywords
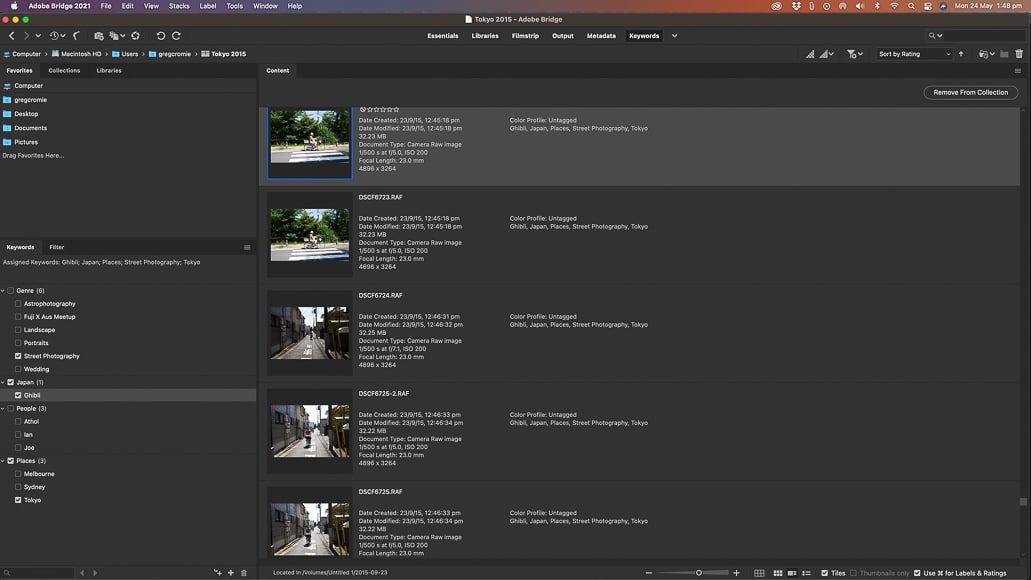
The Bridge Keywords tab looks much the same as the Metadata tab, with each image appearing in a list.
Each image includes vital data along with any keywords assigned to the image.
If you're starting with a fresh batch of images, you can assign keywords to individual images or a batch using the list of keywords on the left-hand pane.
You can add and change the list of available keywords into categories and subcategories to suit the project you're working on.
It's a simple system that's easy to use and simplifies future searches for images. You can also use Bridge to search for JPEG and RAW images when unsure about their location on your Mac or PC.
9. System Requirements
The latest version of Bridge works on both Windows and Mac operating systems provided you meet the minimum system requirements. If your specs are above the minimum, then Bridge will run smoother.
Here's a summary of what you need:
Mac
- Processor -Intel 5thGen or newer CPU – or AMD equivalent.
- Operating System – Microsoft Windows 10 (64-bit) version 1903 or later.
- RAM – 4GB.
- GPU – 2 GB of GPU VRAM. DirectX 9.0-capable system.
- Storage – 2 GB of available hard-disk space for 64-bit installation, plus additional free space required during installation.
- Monitor – 1280 x 800 Resoliution.
Windows
- Processor – Intel 5thGen or newer CPU.
- Operating System – macOS v10.14 or later.
- RAM – 4GB.
- GPU – 2 GB of GPU VRAM. Metal 1.0-capable system
- Storage – 2 GB of available hard-disk space for 64-bit installation, plus additional free space required during installation.
- Monitor – 1280 x 800 Resoliution.
How to Get Started: Adobe Bridge Tutorial
Adobe Bridge is a straightforward desktop application and one that you can develop your file management style with.
Once installed, it will only take a few minutes to explore the tabs and understand what each is for.
As you'll spend most of your time on the Essentials tab, let's follow a step by step process of using its tools as a standalone file management product.
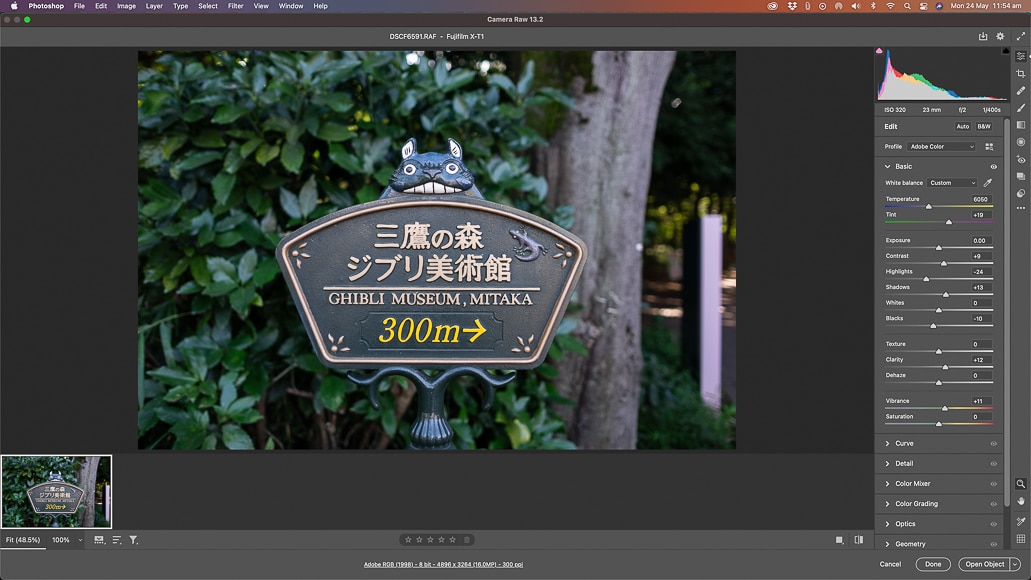
I'll also show you how simple it is to open the image in Camera Raw to perform edits.
In this example, I'll be selecting images from a memory card taken out of my camera.
- If you already have Adobe CC, download and install Bridge from the applications list.
- Otherwise, download Bridge from here.
- Once installed, access the Essentials tab in Bridge.
- Select your computer from the Favourites pane in Bridge to display the hard drive and connected devices.
- Find the SD card and double click or right-click on it and select Open.
- With the image folder open, all of your images will appear as thumbnails in the centre of the screen.
- Select all the images and then right-click on the Collections tab in the left-hand pane and choose New Collection.
- It creates a folder with the selected digital photos – you can name this folder as you see fit.
- Click on a single image to see a larger preview to the right.
- Below the preview image, the Metadata tab will display all the information about the image, including camera, lens and settings.
- Click on the Keywords tab to add keywords to the image.
- You can also add new Keyword categories and subcategories here for future images.
- Apply keywords to each image in your new collection or highlight all images and apply keywords simultaneously.
- To apply changes in Camera Raw, double click on an image from any of the tabs within Bridge.
- CR will load and allow you to use its sliders to make adjustments to the image.
- Once you've finished your workflow, click on Done to return to Bridge.
Adobe Bridge vs Lightroom
By now, you're probably wondering, “What is the difference between Adobe Bridge and Lightroom?” It's a fair question to ask especially given that both feature in the Adobe CC software suite.
- Adobe Lightroom
I've used Adobe Lightroom extensively as my primary tool for applying changes and managing my photos. It's robust, reliable and is the industry leader in photo software for a reason.
Lightroom is a standalone tool that will effectively handle all of your image-handling functions, and as a result, it's the tool of choice for many pro photographers.
Keep in mind that Lightroom is NOT free to use – it's part of the Adobe CC software package that works off a monthly subscription – you can buy Lightroom here.
Lightroom is the pro-grade tool to manage RAW files in a non-destructive way – you can undo any edits. It's also the best desktop tool for handling large numbers of images with batch processes.
- Adobe Bridge
On the flip side, Adobe Bridge is a comprehensive image management tool that doesn't offer editing features on its own.
To alter photos in Bridge, you must also download Adobe's Camera RAW (CR) application as a plugin to fulfil that function.
While the paid Creative Cloud subscription includes Bridge, it's more of an add-on. Bridge is also free to download as a standalone product.
You can import and work on your RAW and JPEG images from a file or straight from the camera. You can also handle the ranking, keyword tagging and organisation of your images quickly before outputting them.
Every step of the way your content appears as a preview image or as a thumbnail.
Bridge is ideal for those that want a free solution to browse their content and, if necessary, apply edits with the Camera Raw plugin.
What are the Alternatives to Adobe Bridge?
There are alternatives to using Bridge as an image management solution. Here are some of the other apps.
- ACDSee – ACDSee offers both a free and paid premium application for photo and video file management. While it provides image editing tools, they're not as powerful or as reliable as Adobe products.
- Google Photos – Bridge only supports images stored within Creative Cloud. If you prefer to use Google Drive to store your photo library, Google Photos is the best application for managing your digital files.
- Photo Mechanic – Photo Mechanic, is available as a free basic version or a paid pro option. It supports the organisation of your photo libraries and the management of all your image files.
- Magix Photo Manager – Magic Photo Manager is a free PC-only application ideal for those wanting to sort and categorise their images and content.
- Flickr – Flickr is a social media platform for photographers to upload, store and showcase their content. The platform has recently come under scrutiny due to its ageing features and reliability.
- Photobucket – Photobucket is an online image storage and hosting service with a turbulent history. Please do your research on the suitability and stability of this application before you use it.
- Corel AfterShot Pro – Corel AfterShot Pro is a great application to help you organise and prepare your images for printing and sharing on social media.
Adobe Bridge FAQs
Can I use Adobe Bridge without Photoshop?
You can install Adobe's Bridge with the latest version of Photoshop and other Creative Cloud apps. Or, you can install it for free as a standalone digital image management application. There are no strings attached to the free download.
Can you edit photos in Adobe Bridge?
As a standalone product, you can't edit images in Adobe Bridge. To apply changes to RAW files or JPEGs, you'll need to install Adobe CR as a plugin for Bridge – this is also free software that's powerful and easy to use.
Does Adobe Bridge have facial recognition?
Adobe Bridge doesn't have facial recognition as a feature. However, Lightroom has a powerful face recognition function to group images of the same people. In the future you may even be able to perform a reverse image search using your photos.
Do I need Adobe Bridge if I have Lightroom?
If you already have Lightroom, you don't need to download Bridge. Lightroom is by far the most powerful and popular photo library management app available.
Does Adobe Photography Plan include Bridge?
The Adobe Photography Plan (otherwise referred to as Creative Cloud) includes the latest versions of Adobe Photoshop, Lightroom and Bridge. Download it from the Available Apps section of the Creative Cloud platform for a complete photo management solution installed on your computer.
Can Adobe Bridge find duplicates?
Duplicate images are a big issue as they take up additional storage space. The search for duplicates can be frustrating as pinpointing their location is like finding a needle in a haystack. Adobe Bridge can find duplications quickly and provides you with the option to delete or move them.
Adobe Bridge Review Final Words
It's surprising and unsurprising that Adobe doesn't promote Adobe Bridge as a remarkable tool for digital image management.
I say it's surprising as it's a very powerful tool that provides a simple user interface with features and functions that would suit even the pickiest pro. It's free to use and pairs seamlessly with all of the Adobe CC apps.
I guess that brings me to the unsurprising part – photographers not knowing about Bridge.
If Adobe invested time and media space in promoting Bridge as much as they do Lightroom, nobody would spend money on something they can access for free. Especially if they also combine Bridge with CR.
But the cat's out of the bag now!
The latest version of Bridge is a brilliant piece of software that would suit anyone seeking a professional-grade tool.
If you're looking for great content software and want to manage your files better, Bridge is for you. If you love to edit your images on your smartphone but want to store them on your computer, use Bridge for an efficient workflow.
Even pro photographers that only use Photoshop will benefit from using it.
Have you heard of or used Adobe Bridge CC as part of your editing or file management workflow? What are your thoughts on this desktop software and how it fits into the Adobe library of apps?
Share your thoughts and questions about Bridge below and join the conversation. Happy Shooting.

Check out these 8 essential tools to help you succeed as a professional photographer.
Includes limited-time discounts.

I’m a Melbourne-based street photographer and blogger. I love to travel to Japan to photograph and document its dynamic people and culture.
3 Comments
Leave a Comment
👋 WELCOME TO SHOTKIT!
🔥 Popular NOW:

I am using a PC. I have PS 2023 and open my RAW photos in Bridge Bridge. Can I open a photo directly to a third party app such as Topaz Photo AI. In Bridge when I click on FILE the dropdown “open with” is greyed out.
Thanks,
George
Hey George – The “Open With” option in Adobe Bridge can be grayed out if the file format of the image isn’t supported by the third-party application you’re trying to open it with. However, since you’re working with RAW photos and you want to use Topaz Photo AI, which supports RAW files, there could be a different issue.
Here are a few possible solutions:
1. Ensure your version of Adobe Bridge is compatible with your version of Topaz Photo AI. You might need to update one or both of the applications.
2. If Topaz Photo AI is not on the “Open With” list, you can add it manually. To do this, select the “Browse” option in the “Open With” menu and locate the executable file (.exe) for Topaz Photo AI. If “Open With” is grayed out, try this process with a different type of image file to see if it’s specifically a problem with your RAW files.
3. If Adobe Bridge is not allowing you to use the “Open With” function, consider opening the image directly from Topaz Photo AI. Most photo editing software allows you to open images directly, so you could navigate to your image location within Topaz Photo AI and open it from there.
Let me know if that helps.
Thanks for checking out my article. Let me know if you have any comments or questions and I will get back to you. Cheers. G