


Shotkit may earn a commission on affiliate links. Learn more.
Having a Lightroom workflow for managing and editing your photographs is the key to producing consistent results, not losing files, and staying organized.
On top of that, an effective Lightroom workflow can also help you save time during your photography post production process.
Whether you're an enthusiast that's just shooting friends and family or a professional that regularly delivers photos to clients, every photographer needs a reliable system in place for managing files from the moment an image is captured.
A Lightroom workflow is a series of steps that gives you a consistent method for taking the files you've created with your camera and producing your finished product, with the ability to backup, organize, and easily find files also being a fundamental part of this process.
This guide will give you some essential tips to get you started and give you a solid foundation on which to build your entire photo editing and management system when using Lightroom.
Popular course reveals the simple tricks to getting incredible results with Lightroom in record time. Give Your Photos The Look They Deserve!
![]()
What to Include in Your Lightroom Workflow
Every photographer works differently and there's no one-size-fits-all Lightroom workflow.
Each of us will find our own systems for organizing, managing, and editing files, but there are elements that underpin the process that you should consider when figuring out what works best for you.
This guide will cover:
- Importing – how to bring photos from your camera and into your Lightroom catalogue
- File naming – establish a system that suits what and how you shoot
- Folder structure – organizing and future-proofing with logic
- Culling, rating, and labelling – how to filter thousands of photos and select your favorites
- Keywords and Collections – taking control of your archive so that you can find images quickly and easily
- Editing – basic adjustments through non-destructive editing
- Presets – apply changes to a large number of photos with just a few clicks
- Keyboard shortcuts – dramatically improve your efficiency
- Exporting – producing different files that are ready for printing, social media, and backing up
- Backing up – ensuring that your work is safe, protected by several layers of redundancy
Along the way, you'll pick up some Lightroom workflow tips that will make your image editing process more efficient. We'll be concentrating on Lightroom Classic, but some of the tips will apply to your Lightroom CC workflow too.
Let's get started setting up Lightroom for success.
1. Importing Images Into Lightroom
Whether you're connecting your camera via a cable or putting a memory card into a card reader, the first stage of bringing your photos into Lightroom is your first opportunity to take control over how your photographs are organized.
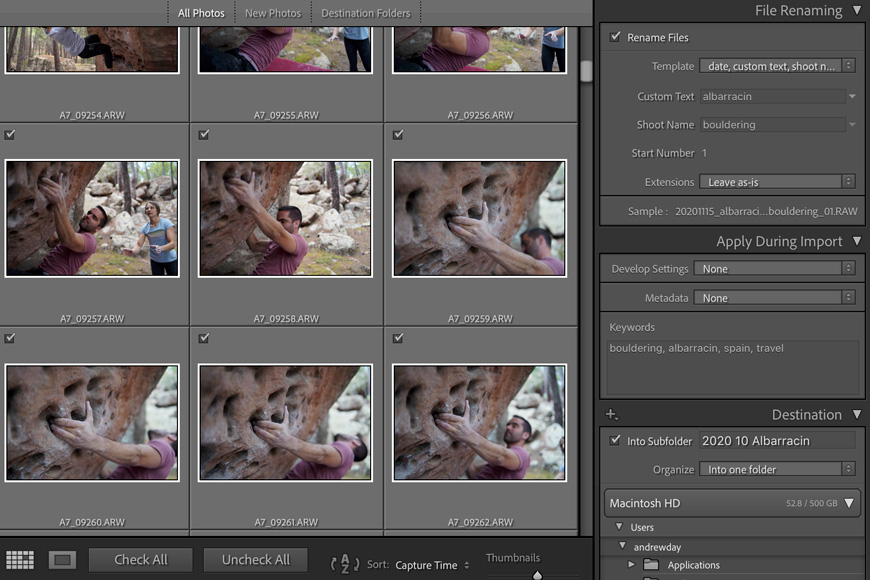
File Renaming
Filenames are rarely visible while you're editing photos in Lightroom, which might give you the impression that having a system for naming your files isn't that important.
However, a good naming system is useful when it comes to backing up your work and future-proofing yourself in the event that you need to move or organize your files using anything other than Lightroom itself. It might also give you a headstart for when you come to export your files.
The naming convention you create when importing can be the foundation for your exports, making it easier to connect exported files with the raw files captured by your camera.
The more you shoot, the better idea you'll get for how to name your files. Date and location could work, as might date and the name of the model or location.
Lightroom comes with a choice of options built-in, but make sure to choose a formula that works for you. You can opt to create your own template using a formula that you can build yourself.
Here's an example:
2020_09_26_Albarracin_rock_climbing_67
Add a sequence number on the end but remember to make it enough digits. If you create a formula that only uses two digits, your system will get confusing if you then import and rename more than 99 files.
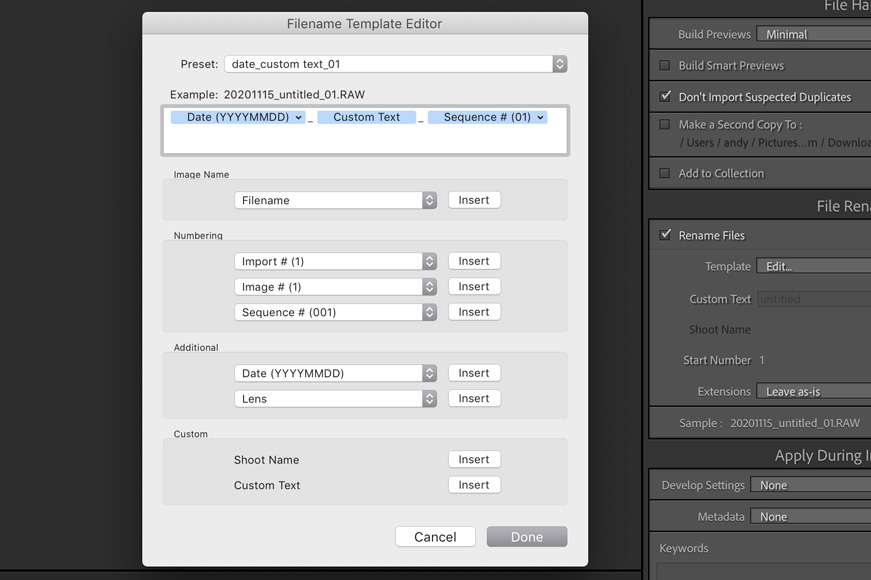
Usefully, Lightroom allows you to quickly type in “Custom Text” and “Shoot Name” each time you import, so these are two very handy variables to include in your filename formula.
- See more tips: How to organise photos in Lightroom
Folder Structure
When importing files into Lightroom, you can place them anywhere on your computer's hard drive but it's best to keep subfolders within one master directory (or a small number of directories, if you prefer). There's more information below on how to create a system.
Pro tip: The import dialogue in Lightroom has a handy “Into Subfolder” option where you can type the name of the new folder where you would like your photos to be imported. This can save you from having to manually create a new folder each time you import.
Back up
Importing photos is also a good moment to add some redundancy to your system. Lightroom has a “Make a Second Copy To” option which means that you can automatically create a copy of your images — to an external hard drive, ideally.
Creating a backup at this stage is a good habit to get into, and it also means that the duplicate files you're creating will have the same names and keywords (see below) as the files that you will be working with.
Having backups with different filenames can be confusing!
Apply a preset
If you know in advance how you'd like your images to look, you can tell Lightroom to apply a preset as it brings the files into your Lightroom catalogue.
In the Apply During Import panel, click on Develop Settings to bring up your list of Lightroom presets (check under User Presets if you can't find ones that you've created yourself).
Add keywords

Adding keywords (i.e., short descriptive terms that describe an image, such as the name of a model or a location) is never a fun task but the time invested during the import process can pay dividends later on, so it's another good habit to get into.
Keywords allow you to search quickly through all of your files in Lightroom and can be really useful when you come to create Smart Collections.
Add to Collection
While Lightroom has the Library module that allows you to browse folders, Collections can be a much more powerful means of organizing your images.
This is explored in more detail below, but depending on how you decide to use Collections (they offer a huge amount of flexibility), you might want to add images into a Collection each time you import.
2. Organizing Images in Lightroom
Improvizing a system for organizing all of your files is fine — if a bit slow — when you have only a few hundred photos to manage.
However, you'll soon need to find better methods for organizing your files, and Lightroom is packed full of tools and processes to help you put a system in place.
Whilst usually a source of confusion for a Lightroom beginner, its powerful Digital Asset Management (DAM) features are what sets Lightroom apart from all the alternatives on the market in 2024.
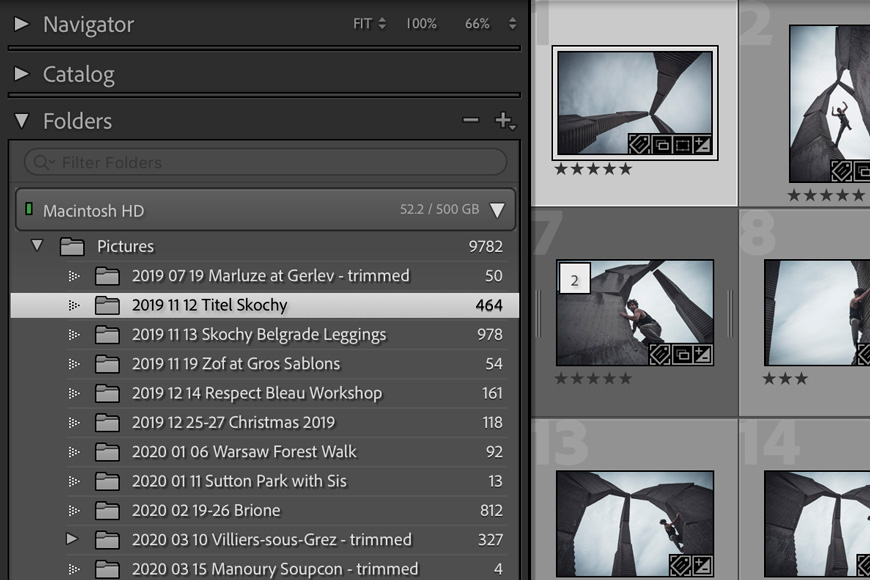
Folders
As with naming your files, you should have a system for naming the folder where you store each new batch of photos. If you're not sure what will work best, try the date followed by the name of the shoot, or perhaps the location.
Whatever you choose, put the year first (the last two digits is enough!), followed by the month and then the day.
With this system, your folders will be listed in order of when the shoot took place.
You can always choose to order them by location later by renaming folders and moving them around. Make sure to do this within Lightroom, however, otherwise Lightroom will not know where to find the files.
When it comes to this part of your Lightroom workflow, it's best to start with a system that you're not quite sure about rather than no system at all!
You should also check out our guide on how to use Lightroom on multiple computers.
Culling
Culling is the process of looking through the photos that you just imported, choosing the best images that you want to edit, and rejecting the rest. Lightroom has several different ways to achieve this and photographers tend to develop their own preferences.
See our guide on how to cull photos quickly.
Flagging
You might want to Flag a good photo as a Pick (keyboard shortcut P), or dismiss a not-so-good photo as a Reject (keyboard shortcut X). If you change your mind you can Unflag a Pick or a Reject by pressing U.
Rating
Lightroom also has a star rating system of 0 to 5 which you can apply by hitting the corresponding number.
For example, your rejected photos could be left with zero stars, while your early preferences could be given three stars. Finally, your absolute favorites that are ready for a detailed edit could be given five stars.
Labelling
If that's not enough, Lightroom also allows you to label files by color: red (keyboard shortcut 6), yellow (7), green (8), blue (9), and purple (no keyboard shortcut).
Filtering
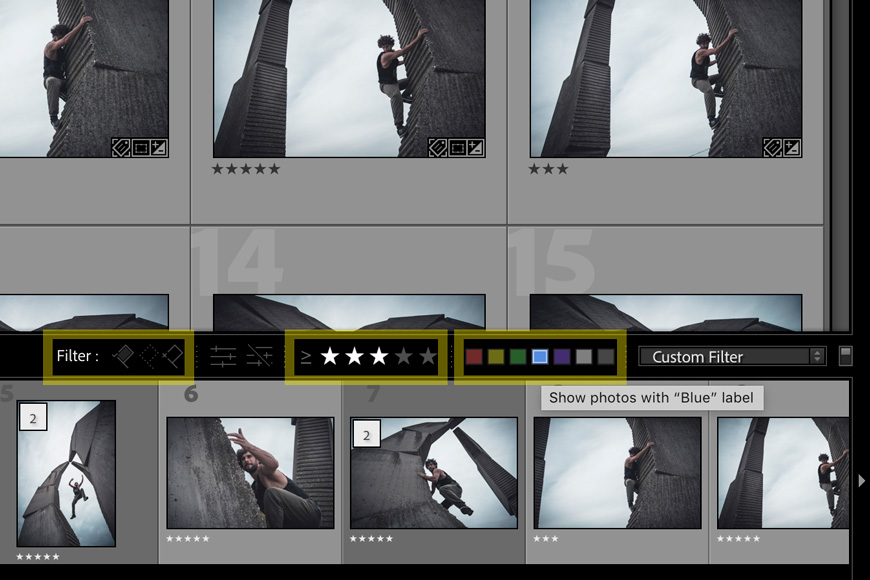
Once you've finished culling your photos, there are several ways to see only your favorites. One option is to move your best photos to a new folder, but there are better ways to achieve this.
The Filmstrip panel at the bottom of Lightroom has several filters that you can apply with a single click according to the flag, rating, or color that you've allocated.
You can tell Lightroom to show you only flagged (i.e., picks), unflagged, or rejected photos. Alternatively, you can tell it to show you only those images that have, say, three stars and above, or equal to exactly four stars.
Alternatively, you can have Lightroom filter according to color.
You can also combine all of these filters, perhaps filtering out all but those images with five stars, flagged, and labelled purple.
You can access more advanced methods of filtering your images by clicking View > Show Filter Bar, or pressing backslash.
From this panel, you can choose to filter images by Text (i.e., metadata information such as keywords), and Attribute (e.g.., camera, lens, shutter speed, GPS location).
Collections
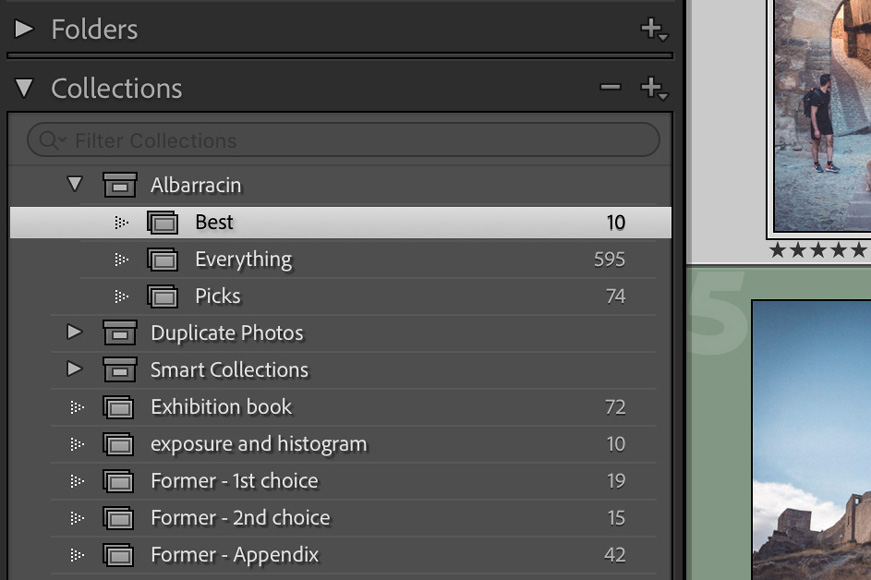
Constantly digging through the list of folders in the Library module can be slow and tedious, always having to remember when and where you shot a certain person on a specific date, and then filtering them to pick out your favorite images, for example.
Fortunately, Lightroom has a much more powerful and sophisticated means of organizing your photos: Collections.
Collections allow you to compile sets of images as though they were songs in a Spotify playlist. For example, instead of having to jump between folders to find photographs of the same model shot on different dates, you could simply put all of your best images of that one model into a Collection.
You might want to create a new Collection each time you filter out your best photos from a shoot.
You can put Collections inside Collection Sets in order to organize them, much like folders and subfolders. You can create as many Collections and Collection Sets as you like.
Even better, you can view Collections from the Develop module meaning that you don't have to keep switching to the Library module and scrolling through a list of images to find what you're looking for.
Smart Collections are even more powerful as Lightroom automatically adds images to a Smart Collection according to a set of rules that you have specified.
For example, your list of rules for a Smart Collection could include the keyword “autumn” and a rating of five stars. Any images within your entire archive that conform to those rules would appear in the Smart Collection.
In addition, any images in your archive that suddenly fit those rules will automatically add themselves to that Smart Collection.
Virtual Copies
If you want to edit one image but export two different results, there's no need to duplicate the original file produced by your camera. Instead, right-click and choose “Create Virtual Copy”.
This creates an imaginary version of the file that can be edited however you like, without affecting the original.
Virtual Copies are useful if you need to edit a file differently for two different purposes (for example, a version for a client, and one for yourself). They can also be handy if you're halfway through editing a photo and suddenly want to take the look and feel in two different directions.
Virtual Copies allow you to be experimental without losing work that you've already achieved.
3. Developing Images in Lightroom
Once you've organized and culled your images, you'll want to start with the photo editing part of your Lightroom workflow.
Lightroom is an incredibly powerful image editor that gives you a huge amount of control over the look and feel of your images. Here's an overview of what can be achieved.
Lightroom has a series of panels in the Develop module and they're arranged — to a degree — in an order that makes a reasonable amount of sense when it comes to making changes to an image.
The beauty of Lightroom is that every change is non-destructive. Whatever changes you make during post-processing, you can always come back and tweak them later on.
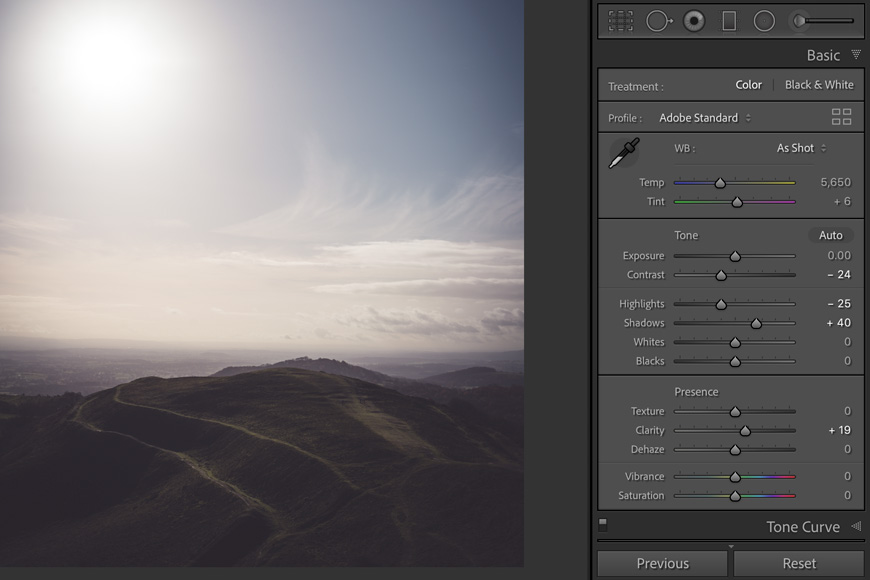
Basics Panel
The Basics Panel is where you can make fundamental adjustments to an image such as Exposure and White Balance.
Throughout Lightroom, you'll find that sliders start in the center with the option to reduce or increase by sliding to the right or left side. Double click a slider to return it to the center.
Several of the sliders gain extra functionality when you hold Alt (Windows) or Option (MacOS). For example, the Blacks slider will show you in black where you are losing data in the darkest parts of the image (this isn't necessarily a bad thing, by the way!).
You can refer to the histogram to see how evenly spread the tones are in your image, and where you might be losing information in the highlights and shadows. This will help you to understand how the various sliders are affecting your image.
If you're not sure where to start, there's a button marked “Auto” just above the Exposure slider. Lightroom will make a judgement on how it thinks an image should be processed and position the sliders accordingly.
Tone Curve, HSL/Color, Color Grading
Post-processing using Lightroom quickly gets complicated beyond the Basics panel and these three panels are where you can start to fine-tune your photographs.
A lot of these tools, graphs, and sliders overlap, and there are often different ways of achieving very similar results.
Color grading is a relatively new feature, and a good reason to upgrade if you're still using Lightroom 6.
You can check out our full guide to color grading here and the basics of using tone curves.
Crop
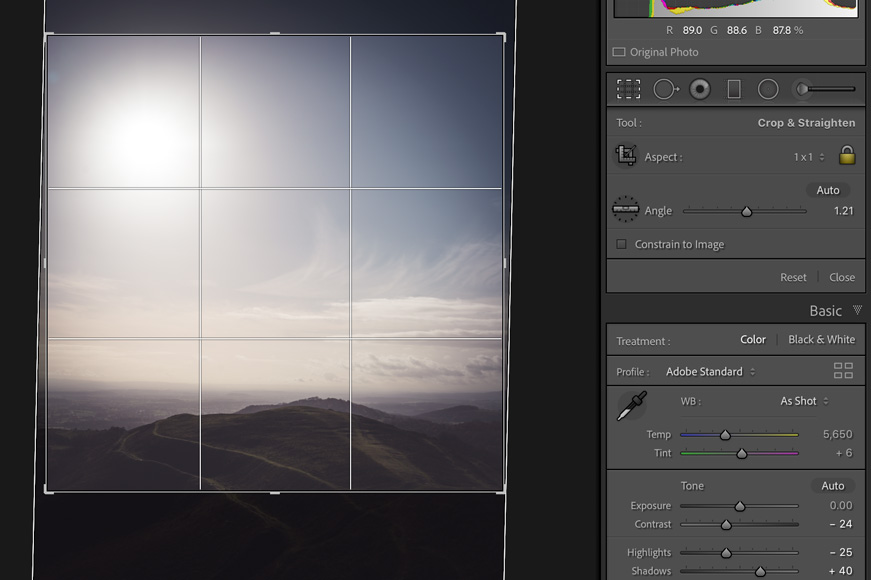
Just underneath the histogram, you'll find six tools, the furthest left being the Crop tool. This allows you to resize your image, as well as dialling in different aspect ratios.
Press R to pull up the Crop tool, and then O to cycle through different overlays to help you refine your composition.
By hovering the mouse to the left or right of the image, you can rotate the image to straighten out your horizon.
Effects
You can also use Lightroom to add vignette and grain effects.
Many photographers love to use a vignette to add a touch of darkness to the outer edges of an image and guide the viewer's eye towards the middle. Vignettes can be addictive, however, so try not to push them too far.
The Grain slider will add some texture to a photograph, giving a feel as if it has been shot on film.
Synchronize

Even if you have multiple images selected in your Filmstrip, changes you make in the Develop module will only affect the current image. This can be a bit confusing, especially if you want to make the same change across a number of images.
Lightroom allows you to synchronize images for more efficient batch processing. In the Filmstrip, choose the image that you want to use as your base.
If required, press Command (MacOS) or Control (Windows) and D to deselect all images and then choose the image with the settings that you want to copy.
Then select all of the images that you want to have synchronized. Press Command or Control to highlight individual images, or hold Shift to select a range.
When you click “Sync…” a dialogue box will appear allowing you to choose which elements of the original image you would like to share across the other images.
This can be a quick and easy addition to your Lightroom workflow, especially if you want to apply a preset (see below) across a number of photos, or tweak one specific element such as exposure or white balance. See more tips for batch editing here.
Presets
Presets are a way of applying an edit using a single click. You can download and install them, or you can create your own.
To make a preset, simply edit a photograph and then click on the plus symbol in the Presets panel, choose which elements you'd like stored in the preset, and give it a name.
Lightroom presets can be a good place from which to start editing an image, and installing and experimenting with other photographers' presets can be a useful way of learning how different parts of the Develop module affect the appearance of an image.
You can download some free presets here to experiment with.
Profiles
Profiles are used to render your photograph from raw camera data to the image you see. In addition to the Adobe RAW, Lightroom offers Camera Matching, Artistic, B&W, Modern and Vintage Profiles from which you can start your image edit.
Profiles are ideal for beginners, and provide a way to quickly replicate the look of the JPEG preview image seen on the back of your camera's LCD – particularly useful when using in-camera film presets, such as with Fujifilm X-series cameras like these.
If you don't see the Profile browser in the Develop module, it's likely you're not using the most up to date version of LR – check our guide for how to upgrade.
Keyboard shortcuts
Learning a number of keyboard shortcuts for Lightroom is crucial for speeding up your workflow. Here are a few to get you started.
- G will take you to the Grid view of the Library module. D will switch to the Develop module.
- Press T to show the Toolbar.
- R brings up the Crop tool.
- W brings up the White Balance tool, but it's also a very useful way of quickly returning to the Basics panel.
- Hit Q for the Spot Removal tool and K for the Adjustment Brush tool. Press H to toggle the pins and off.
- While using the Spot Removal or Adjustment Brush tools, hold Spacebar to click and drag your image around. Tap Spacebar to zoom out.
- Press backslash to bring up a Before/After view. You can change the behavior in the Toolbar (T).
4. Exporting Images From Lightroom
Once you've finished editing your photos, it's time to export them. Because there are so many variables to decide, this can feel a little intimidating at first.
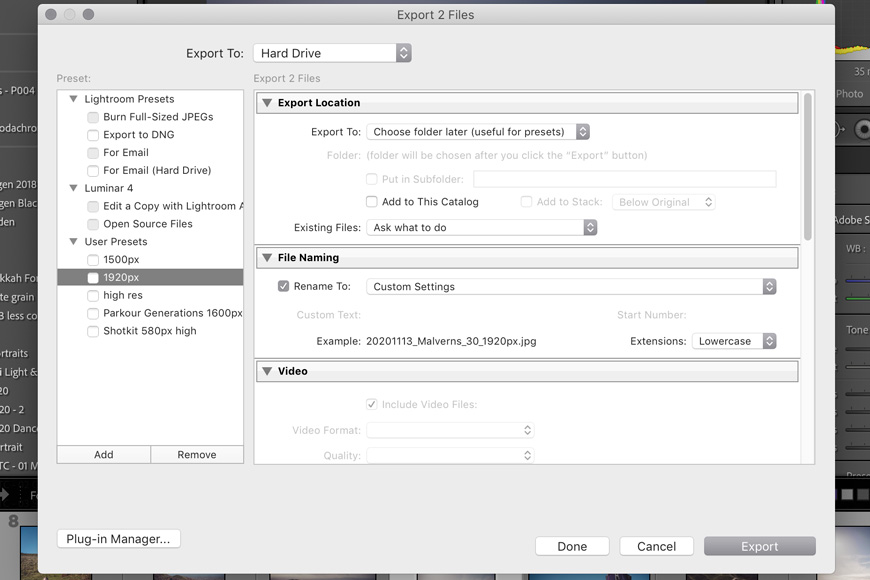
The first step is to understand the basic Export dialogue. With your image — or a number of images — selected, right-click and choose Export > Export…
Lightroom has a number of presets which you can choose, though it's best to create your own as some of the default options are not ideal.
For the vast majority of purposes you'll want to create JPEG image files that are saved to your hard disk drive (check that “Export To” at the top is set to “Hard Drive”).
To avoid complications, make sure that “Add to this Catalog” is unchecked. For now, keep your exported images separate from your Lightroom catalogue.
It's best to keep the original filename so that you have something that refers back to the file produced by your camera. This can be useful later on, especially if you're sending files to a client who then wants you to make changes.
Most photographers use the original filename as a foundation before then adding details such as “1920px” or “high_res” as a suffix.
Start out by creating two presets:
- High-resolution files that are ready for printing. These should be backed up as final versions of your photographs.
- Web-resolution files that are suitable for uploading to your website or social media.
If you plan to use a preset regularly, under Export Location, under “Export To” make sure to select “Choose folder later”. Each time you export your images, Lightroom will now ask you where you would like the files to be saved.
To create a new preset, go through the dialogue, choose your settings, and then hit “Add”.
(You can read more in-depth about export settings here.)
Managing your exported files is almost as complicated as managing your library of files within Lightroom.
It's best to keep them in a separate part of your hard drive away from the original versions of the files that you are editing within Lightroom as it can become confusing.
5. Backing Up Your Images

Credit: Samsung Memory
For every photograph you take, there are two files that you want to have backed up: those produced by your camera (usually raw files), and the edited, exported, high-resolution files (typically jpegs).
A good back-up system keeps these files in three places: a master, a local copy, and a distant copy.
This is where your photographic workflow starts to extend outside of Lightroom as the software itself doesn't offer much automation when it comes to backing up files.
External hard drives are a good solution for both local and distant copies. A good way to understand hard drives is to assume that it's not a question of whether a drive will fail, but when.
Cloud storage is a good option, particularly for exported files. Google Drive and Dropbox are two popular options.
Try to get into a habit of formatting memory cards in between every shoot and avoid being in a situation where you need to format a memory card halfway through a day of photographing.
Final Words
Lightroom can be a daunting piece of software but understanding what goes into a workflow and putting your own systems in place will be a shortcut to feeling like you're in control of your editing and your photography.
With these Lightroom workflow tips, you should have a solid foundation from which to work.
You might find methods that work better for you, and everyone has a slightly different way of doing things, so feel free to leave your own thoughts — and any questions — in the comments below.

Andy Day is a British photographer and writing, living and working in France, specialising in adventure, travel, architectural and landscape photography.
1 Comment
Leave a Comment
👋 WELCOME TO SHOTKIT!
🔥 Popular NOW:

How do I use a workflow to setup my Wacom tablet and Contour Shuttle Pro 2 in Lightroom?