


How To Organize Digital Photos
Get on top of your photo organization. Whether you've got digital photos across all your devices, or shoeboxes full of old prints, this is the guide for you!
Learn | Photography Guides | By Andy Day | Last Updated: September 9, 2025
Shotkit may earn a commission on affiliate links. Learn more.
Whether you're a professional, hobbyist or beginner photographer, this guide will show you how to organize digital photos.
With over 1.43 trillion digital photos taken last year, organizing your photos is an essential task!
Most people take multiple photos on their smartphones each day… but where do they all end up?
Are you paying for cloud storage that you don't need? Are your hard drives full of photo duplicates?
Excellent app to organise, search, edit and share photos on a private & secure personal network. Highly recommended for all photographers.
Do you have thousands of old printed photos sitting around in photo boxes?! Do you need to back up your photos digitally?
Don't worry – learning how to manage your photos may be a tedious topic, but we'll teach you the best way to organize digital photos so you can get a handle on all the mess!
(You should also check out our Mylio review for an exciting new option to organise photos privately.)
So let's learn how to organize digital photos once and for all.
Best Way to Organize Photos
The thought of tackling the chaos of your seemingly huge array of photographs can be daunting, but breaking it down into a series of steps can make it the best way to organise photos.
Part of the paralysis of sorting out your files and organizing digital photos is not knowing where to start. The challenge many face with a sprawling collection of images is figuring out how to organise photos in a manner that's efficient and sustainable.
Don't worry: the list below provides the best way to manage photos and offers a variety of options to finally get your diverse hard drives and devices organized so you can optimize your photo storage.
Many of the tips will require a bit of an investment of time and might be dull, but the hard work now will pay off in the future, ensuring that your files are both safe and easily accessible.
Here we have a few digital photo organization ideas you should consider.
Let's dive deeper into the best way to organize digital photos:
1. Gather All of Your Files into One Location

Credit: Plann
If you're looking for the best way to store and organize digital photos, this first tip is an important one.
Given that the number of devices we use seems to increase by the year, it's easy to find yourself in a situation where your digital images are spread across multiple different locations, making any sense of order almost impossible.
One of the most important initial steps in taking control of your archive is to gather it into one single location.
Not only will this make it easier to manage, but also be far easier to back up. Backups work best when they are consistent and automated, and this process is far simpler once your images have been brought together — and renamed (see below).
This step might mean having to rethink your photo storage. If you currently have your images split between a desktop computer and a laptop, and with insufficient room on either to contain all of your images, it's probably time to invest in an external drive (details coming up!).
Even if you think you might not need all of the additional space offered by an extra drive once you've finished sorting out your duplicates and rejects, you can still make good use of that drive as a backup.
(See also: What Is the Best Way to Backup Photos?)
One of the complications encountered when attempting to unify an archive is that some software programs — operating systems in particular — tend to have already decided that certain folders are the best place for your files.
You either need to do some digging and tweak where files automatically appear or simply remember to move them each time they're added.
2. Create a Folder Structure for Digital Photo Organizing
Having a system for naming your image files and organising them into a folder structure might seem time-consuming and even slightly outdated, but when it comes to managing your files and being able to move them between hard drives or simply back them up, having a system will be invaluable. After all, all other modern digital photo storage and organization solutions all work in the same principle.
You may wish to set up a system before you start gathering your files into the same photo library or location. Alternatively, once you've gathered your files together, you can start organizing.
It's not unusual to find yourself unable to decide what sort of photo organizing system to implement as you're not sure whether to organize by location, date, or camera.
If that sounds familiar, here's the answer: there is no perfect system. The best option is to simply pick one and go with it.
Most likely you'll find that you adapt yourself to whatever system you choose, and the biggest hurdle is getting started.
Organising photos by date will work best for most people as other means of categorising can be confusing, particularly if suddenly your categories start to overlap.
For example, if you have “Travel” and “Family”, what happens in a few years when you get married and go on holiday with your partner or other family members?
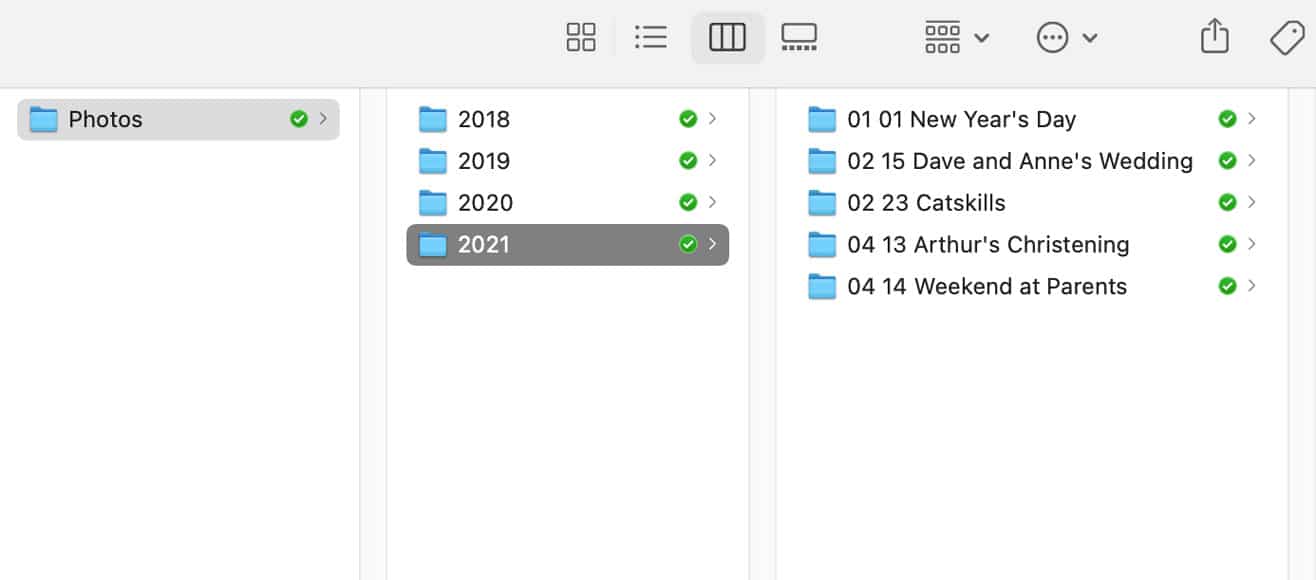
You can see an example of a folder structure organized and based on the date in the image above. Note how the highest folder is the year which is then split up into individual events labelled according to the date: the month first, then the day, and then a description of the event.
If you shoot far more regularly, you might want to add an extra level of photo organization that splits each year into individual months, with events then placed inside each month.
Ultimately, the number of tiers that you have isn't too important. What's useful, though, is being systematic in how you name your folders, and remembering that year, then month, then day means that browsing through your files will be more logical.
For example, if you use the names of the month instead of the number, your file browser will organize these folders alphabetically, putting April and August at the top.
You may find it easier organizing photos using the way I do it – add the name of the month after the number so that your folders begin with “01 January”, “02 February”, etc.
Whatever you choose, remember to use two digits to describe the month — ie., 01 for January, 02 for February — otherwise your file browser might end up listing “1 January” next to “11 November” and “12 December”, which can be annoying.
If you can't figure out the exact date when certain photos were taken, there are two options.
Firstly, you can check the metadata of an individual file. MacOS users can do this by opening a file in Preview and choosing “Tools” and “Show Inspector”. On Windows, simply right-click on a file in Explorer, choose “Properties”, select the “Details” tab and scroll down.
Secondly, give it your best guess and come back to it later once you're sure. The best way to organize pictures isn't always obvious the first time around, after all.
You might find yourself having to figure out what to do with versions of files that you have edited, or perhaps saved at a lower resolution for sharing online.
The approach taken by many photographers is to keep these files completely separate, and even create their own folder structure to accommodate them.
Whatever you choose, at least create a dedicated folder for the edited/exported files in order to keep yourself organized.
3. Decide on a System and Rename Your Files
The best way to organize photos on computers is to have a system in place. An integral part of this is how you name your files.
As you move your photos and files into their new folders, it's best to rename them. This won't necessarily bring any immediate advantages but at some point, you will be grateful for the time spent organizing these images.
The time you spend now putting in good systems will almost certainly save you confusion and frustration in the future, not just in being able to quickly track down files that you need, but also when it comes to backing up your data.
Most cameras implement some fairly impenetrable file naming systems, often starting with DSC or another collection of letters that looks completely random. There's then a series of numbers that never seem to reset.
Due to these automatic file names, our hard drives tend to be a mess. Fortunately, we can impose order on this mess with a bit of intelligent renaming.
As with the folder structure, you will need to figure out a system that works best for what you photograph and how often you shoot. If you shoot on two or more cameras, you'll also need to decide if it's worth noting down the camera in your filename.
That said, a filename doesn't need to contain too many details. As will be discovered below, once your files are organized, you'll be able to use keywords and geotagging to help you find photos quickly or arrange them into galleries.
To make a filename more readable, it used to be standard practice to divide the various parts with a hyphen or an underscore. This was because some software couldn't cope with spaces.
Spaces no longer cause such problems but it's still best to avoid using any other punctuation such as apostrophes. There's still software out there that can get confused, and in theory, some cloud storage platforms might struggle.
Err on the side of caution and leave out anything that isn't a letter or a number.
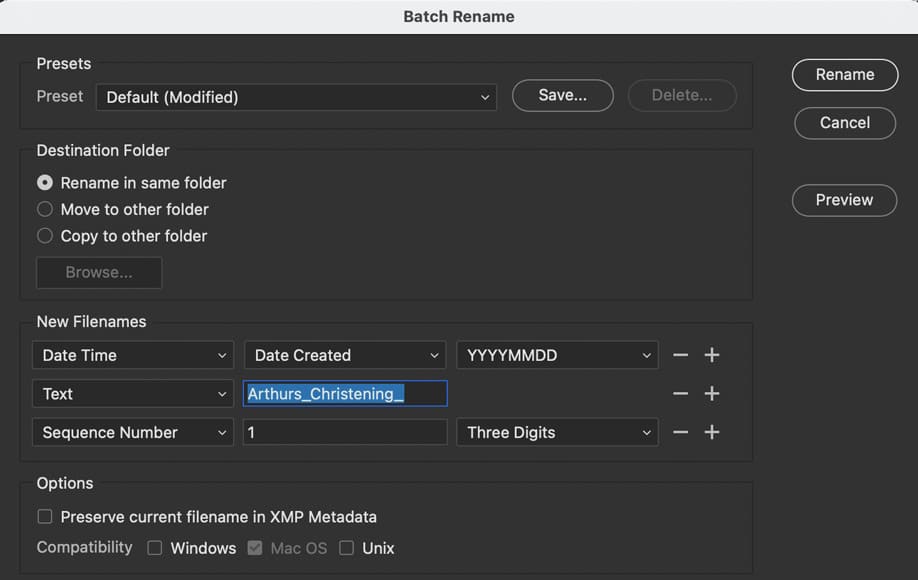
Sample PhotoStorage Naming System
Here's a suggestion for a digital photo storage naming system. It's not necessarily the best way to store digital photos, but it's one solid option.
It uses the date of capture as its foundation as you have the option to create other ways of organising your files through different means later on:
- Year
- Month
- Day
- Event
- Sequence number
- File extension (if you're not used to seeing file extensions, don't worry about this part too much!)
As a result, an individual file may look like this:
2021_05_25_Arthurs_Christening_289.jpg
Note how this system starts with the year first, followed by the month and the day. This will ensure that your files will always be in chronological order when listed alphabetically in a Finder or Explorer window.
Obviously, you don't need to rename each file one by one! Operating systems have file renaming functionality, although it can be quite limited.
For more control, you may prefer to download a small application that has been designed specifically for renaming large numbers of files. There are options available that will even look at the metadata of your image files and figure out the date it was taken so that you don't have to type it in yourself for each batch of files.
Alternatively, software such as Adobe Bridge offers a lot of control and automated features — see below.
When you come to specify the sequence number at the end of the filename, make sure to take into account how many files you are renaming. If there are more than 100 files, it's a good idea to ensure that the sequence number starts with 001 rather than 01 as things can be confusing once you go past 99.
If you're renaming files that have been edited or resized, it's a good idea to differentiate them from their originals as part of the filename. For example:
2021_05_25_Arthurs_Christening_289_instagram.jpg
Once you have established your system and sorted out your filenames, you can start using the same system for when you import your images.
Renaming your files as you copy them from a device or memory card will keep you organized and save you time in the future.
These first three steps can be a little demanding but fortunately, it gets much easier from here on.
4. Check for Photo Duplicates
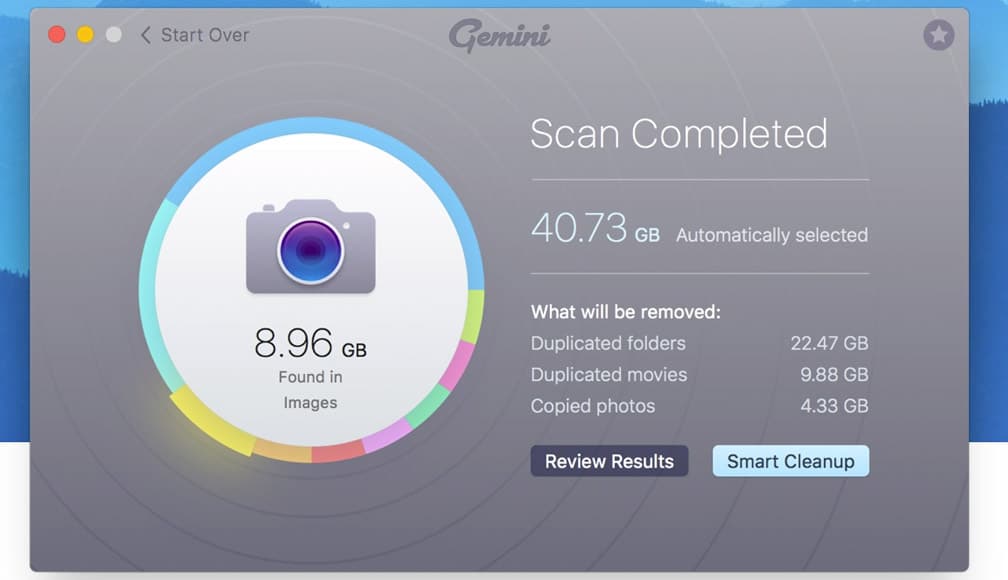
Another essential step in learning how to organize photos on a computer is to make sure you don't have multiple versions of the same image.
Until you have a system in place, it can be very easy to find yourself with copies of files floating around. Fortunately, there's photo organizer software designed to identify duplicates, even if they have different filenames.
Gemini 2 is an excellent option for Mac and will look at every file on your machine, not just your digital photos. It doesn't matter if the image files have different names — Gemini 2 is smart enough to figure out if they are identical.
It's free to try and the cheapest purchase option is just $19.99 with a 30-day money-back guarantee. You can read more about it in our guide to the best duplicate photo finders and cleaners here.
5. Cull Your Unwanted Photos
Now that your photos and files are neatly organized into folders and logically renamed, this is an excellent opportunity to sift through your images and get rid of any files that are no longer necessary.
After all, part of organizing pictures is removing unwanted, redundant, or corrupted photos.
You probably don't need all 30 photos of that sunset after your sister's birthday party last year, so why not free up some disk space and delete all but the best?
Again, Gemini 2 is a good solution for Mac users as it will spot images that look similar, allowing you to sift the not-so-great images from the keepers.
If you want to clear out images but can't quite bring yourself to do it, try copying everything in your newly-organized photo library to an external hard drive first so that you can be sure that you're not going to permanently delete something by accident or that you'll later regret.
This will give you peace of mind and allow you to be more ruthless and stay organized in the future. If you've not looked at the not-so-great images after a year or two, you can cull them from your backup drive as well – see our photo culling tips.
As will be discussed, backing up involves more than just copying to an external drive, however!
6. Convert Your Non-Digital Photographs
© Matt Moloney
Digitizing old prints, negatives and color slides has never been easier. Even snapping an old print using a smartphone will produce a very usable file that doubles as a backup in the event that the original is damaged or lost.
For higher resolution, use a DSLR or mirrorless camera. Just be sure to shoot in as even light as possible — on the floor next to a window on a cloudy day, or next to a sheer curtain.
We recommend avoiding cheap film scanners as many of them are little more than a lightbulb and a depressingly low-resolution camera.
Instead, get excellent results by using a tablet or phone as a lightbox and photographing the negative using a DSLR or mirrorless camera attached to a tripod.
Alternatively, there are many services available where you can send off your film and have it scanned professionally. You can even get old photos restored.
Preserving old photos by storing them properly isn't always easy, so digitizing makes a lot of sense.
7. Use Dedicated Software to Manage Your Digital Photos
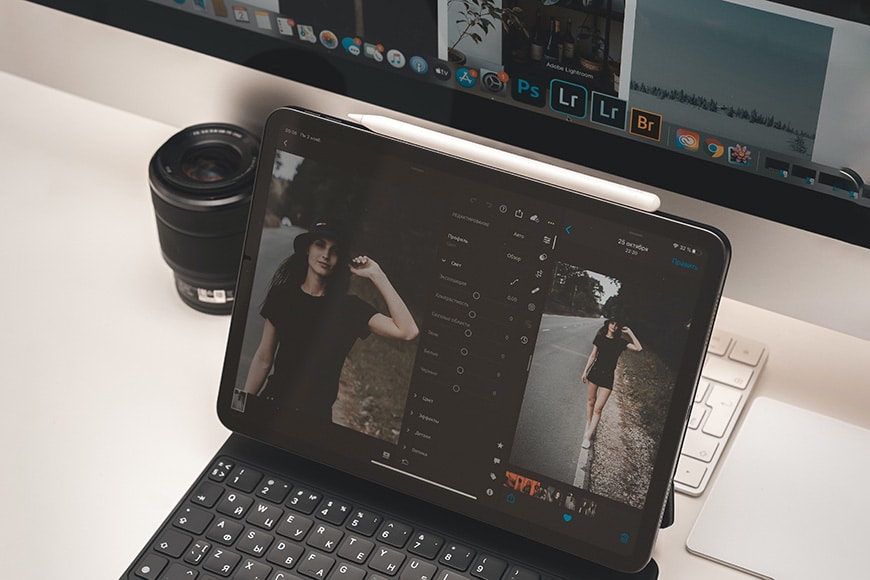
Credit: Dekler Ph
Ok, so now you're no doubt wondering how to manage photos that are spread across all your devices.
Here's how to sort photos more efficiently.
There are countless software packages available for every operating system when it comes to helping you organize photos, at a variety of prices and degrees of sophistication.
Some are little more than elegant file browsers with some useful functionality, while others are fully-fledged, high-end photo editing applications — a.k.a. a DAM, or Digital Asset Manager — that can handle almost every aspect of a professional photographer's workflow.
This makes them essentially photo management software.
If you're asking yourself “What is the best photo organizing software?” here are is a list of our recommendations for software that requires an up-front fee or an ongoing subscription (read on for free alternatives).
- Zoner Studio – Zoner Studio is an all-in-one photo and video editing software for Windows that combines photo organization, RAW editing, practical AI features, retouching, layers, masks, and video tools in a single, easy-to-use program with freedom from catalog lock-ins.
- Lightroom – The choice of professionals around the world, Lightroom is a powerful DAM that can organize photos using various rating systems, labels, keywords, geodata, and facial recognition. It also allows you to create Collections, and Smart Collections (automated collections defined by a set of rules such as the lens used). Lightroom handles a complete workflow, from importing files to exporting them for printing or the web. Lightroom combines powerful features to manage and organise photos effectively.
- Photoshop Elements – We normally associate Photoshop with professional image manipulation but the simplified Elements version is not only better suited for basic photo editing but also comes with a useful file manager that will allow you to organize photos. You can categorize your images according to keywords, geotagging, facial recognition, smart tagging, and events.
- Adobe Bridge – Bridge is a complementary piece of software included when you subscribe to certain Adobe packages. It doesn't quite match Lightroom's intuitive catalog system but it's still a very powerful asset manager that uses labels, ratings, keywords, geodata and more to organize many different types of files. Bridge is another tool in the arsenal for those figuring out how to organise photos efficiently.
- ACDSee Photo Studio Home – ACDSee has various photo software packages available and Photo Studio Home is the entry-level option offering a powerful digital asset manager and some basic photo editing functionality. MacOS users will have to opt for the slightly more expensive Photo Studio for Mac 7 which has the ability to edit raw files.
- Google Photos – Unlike the other options on this list, Google Photos stores all of your images in the cloud. It also takes advantage of Google's powerful search capabilities – not simply using keywords and other data stored in your images, but also Google’s intelligence to identify what’s in your photos. Being web-based, it's not ideal for use on non-mobile devices, but it's a decent alternative to Picasa, which is now defunct.
- Phototheca – Windows users looking for an affordable, lightweight piece of software that offers basic tools to organize photos might want to investigate Phototheca. There's a low up-front fee and while the editing tools included are basic, Phototheca can intelligently build collections as well as use facial recognition.
- Cyberlink Photodirector 365 – Designed specifically for MacOS, Photodirector 365 is a fully-featured software editing package. Its digital asset management tools include AI-powered facial recognition to help organize your photos.
If you're not ready to splash out on software, you might ask “What is the best free photo organizer?” Here are some suggestions:
- Darktable – Available on Windows, Mac, and Linux machines, Darktable combines photo management, organization and image editing software in one package. As open-source software, its list of features is impressive.
- Microsoft Photos – Specifically made for Windows machines, Microsoft Photos is easy to use and is an ideal way to organize photos. In addition, if you have a subscription to one of Microsoft's cloud storage options, your photo files will be backed up automatically. It offers a straightforward way to organise photos and, when linked with Microsoft's cloud storage, ensures automatic backups.
- Apple Photos – Mac users have their own, slick image editing software pre-installed, and it will bring order to your digital photos. With an iCloud subscription, all of your images are backed up.
- FastStone Image Viewer – Available only for Windows, FastStone Image Viewer is a simple piece of software designed to make it easier to browse your files and move them around. It's not quite a digital asset manager but it has a tiny footprint and brings some definite advantages to using Explorer on its own.
Delve deeper into all the best photo editing software in our guide here.
8. Use an External Hard Drive

© Andrew Neel
If you're asking yourself “What is the best device for storing digital photos?” you might want to consider investing in an external hard drive.
Many of us use photo editing laptops in conjunction with tablets and phones, and the internal hard drives are often quite small — far too small for storing tens or even hundreds of gigabytes worth of digital photos.
Fortunately, external hard drives can be very affordable. One terabyte of storage can cost as little as $50 and can store several hundred thousand photos taken with a 12-megapixel camera.
Keep in mind that camera sensors are increasing in resolution every year, and the resulting file sizes are growing accordingly.
With that in mind, while you might think that you'll never fill a hard drive with a quarter of a million photos, in a few years you might be shooting on higher resolution cameras that suddenly need even more storage space.
External hard drives come in all different shapes and sizes, and the most important considerations are how to connect it to your computer and how fast you want to be able to access your images.
Connectivity when it comes to external drives seems to change every few years and it's worth doing the research to check that you're buying the right type for your computer and that it's not going to soon become redundant.
USB 3 (backwards compatible with USB 2) and Thunderbolt are the two most popular choices today.
Essentially there are two types of external drive, with one being slower and more affordable, and the other being faster and more expensive.
Most are powered through the connection to your computer and don't require an additional cable — something you might want to avoid as a matter of convenience, particularly if you plan on travelling with it.
If the hard drive is going to come with you on lots of journeys, it might be worth buying one with a rubberised shell that will offer it some protection in the event of any drops. Also, as with any hard drive, its contents can be encrypted.
- HDDs —simply Hard Disk Drives — are slower and not as expensive as a result. The spinning parts inside mean that there's more potential for them to degrade over time.
- SSDs — Solid State Drives — are faster and have no moving parts, making them slightly more rugged and less susceptible to damage when dropped. They're also generally more than twice as expensive as HDDs but prices continue to fall as technology progresses.
HDDs are sufficient for most users. SSDs tend to be an advantage if you are constantly copying data around or regularly editing large numbers of photos.
SSDs are the best way to store photos for professionals as they are faster and more reliable in the long run.
Whichever you choose, it's worth remembering that it's not a matter of if a hard drive will fail — it's when. SSDs might be faster and more rugged, but even they have a limited lifespan.
Keep reading to find out how to keep your data protected.
9. Back Up Your Data
As mentioned, every hard drive will fail one day so it's crucial that you keep multiple copies of any data that is valuable to you, regardless of the type of file.
Professional photographers will keep multiple copies of their photos and in various different locations to ensure at least two layers of redundancy.
Often, there will be the original external drive, a duplicate of that drive that is kept at home, a duplicate of that drive that is kept elsewhere, and/or a copy that is backed up to the cloud.
A second hard drive is a viable option though it's worth checking that you have enough ports available to ensure that you can connect both hard drives to your computer at the same time.
Once connected, you can use software to clone the original so that you don't have to keep a close eye on which files have already been copied, or confuse yourself when a small number of changes have been made.
Cloud storage adds an extra layer of security and you might be able to take advantage of existing subscriptions to popular services such as iCloud, OneDrive, Google Drive, or Dropbox.
Alternatively, you could try a storage service designed specifically for images such as SmugMug which also offers attractive photo albums, and print and gift ordering options.
Another option is to go with a “set-and-forget” backup service which can duplicate an entire drive — including your external hard drive — to the cloud.
LiveDrive offers an attractive combination of synchronisation and backup services and got our recommendation in this roundup of cloud storage options.
Finally, a unique app called Mylio is the best photo-organizing software for those worried about online privacy, since it brings together all your digital photos from various linked devices, without needing to store anything online.
How to Organize Your Photo Prints

© Michal Jarmoluk
Many of us forget the satisfaction of holding printed photos. Making a habit of regularly creating physical versions of your favourite images can bring a lot of joy.
Compiling your photographs into something that you can sit and flick through can be far more appealing than always staring at them on a screen.
Here's how to take care of your photos and how to organize pictures once they're no longer just sitting on your hard drive.
- Note details on the reverse: Use a photo-safe pencil to note down when and where the photograph was taken, and anyone shown in the shot.
- Store in photo boxes: Transfer your prints to acid-free envelopes and create a filing system in a series of photo boxes.
- Store in traditional photo albums: For easier access, and if your prints are all a regular size, slot your prints into plastic sleeves and label your photo albums. Both boxes and albums benefit from tabs and colorful organization.
- Avoid handling them when possible: Try to avoid touching your prints more than necessary as the acid in your skin can affect the paper. Cotton gloves are a good idea.
- Pay attention to sunlight: Wherever you store your prints, keep them out of direct sunlight. UV light can cause colors to fade.
- Pay attention to temperature and humidity: Prints don't appreciate high temperatures and nor do they like damp conditions. Avoid storing them in attics or basements!
Check out our guide to the best online photo printing services.
FAQ'S
How does PhotoStick organize photos?
PhotoStick organizes photos by scanning media stored on your phone or computer. The storage device will then copy and store all those images on its drive.
How to organize images on iPhone?
If you want to know how to organize photos on iphone, one method is by tapping the phone’s Library and then pressing the More and Filters button.
You can also do it by accessing the Albums tab and click on the Add button to create a new album. Once the new album is named, you can choose the photos you want to add and then press ‘Done.’
What is the easiest way to organize photos?
Start by deleting all duplicate and unwanted images. Then, you can rename those you want to keep. Consider creating properly-named subfolders so you can transfer photos to them according to categories, such as dates taken, occasions, etc.
Finally, save backup files using online storage.
How to organize photos on Android?
The best way to sort photos in Android is through apps. You can organize photos on Android by using the Gallery app’s Sort option. It’ll help you group stored images according to the dates they were taken. Likewise, using Google Photos and other third-party apps can come in handy when sorting photos.
How to organize photos on computer?
The important thing is to have a system that works for you. You can use the tools provided above or come up with your own.
What is the best way to organize photos?
The best way to organize is to organize based on your needs. Ultimately, what dictates how “organized” your photos are is your use case. If it makes your workflow quicker and smoother then you have succeeded.
Final Words
Sorting out a chaotic collection of digital images can be a daunting task, but creating a plan and implementing a system will almost certainly save you a lot of time in the future and potentially prevent you from losing photos that are precious to you.
How are you going with your photo storage and organizing? Do you regularly back up your photos?
If you need any additional suggestions on how to get started, feel free to reach out to us via the comments below.
Excellent app to organise, search, edit and share photos on a private & secure personal network. Highly recommended for all photographers.

Check out these 8 essential tools to help you succeed as a professional photographer.
Includes limited-time discounts.

Andy Day is a British photographer and writing, living and working in France, specialising in adventure, travel, architectural and landscape photography.
17 Comments
Leave a Comment
👋 WELCOME TO SHOTKIT!
🔥 Popular NOW:

What if you don’t use a MAC?
Check this out:
https://shotkit.com/photo-management-software/
Thanks for this article, really comprehensive.
I am in pursue of an “ideal” photo management software. I have listed a lot of requirements on this post on Reddit: https://www.reddit.com/r/selfhosted/comments/183wg5z/looking_for_a_google_photos_replacement_this_is/
Until now I´ve been using my Synology NAS for storage of all my assets, but I need to buy a new NAS so I am waiting for Synology to release a refreshed version of DS1522+. On the meantime I am working on all my stuff, deduplicating, organizing, using Photo Move 2.5 to automatically scan EXIF data and move assets to the respective folder structure very similar to the one you are using: YEAR/YEAR_MONTH/ and then I store all the pics of that month. If I have an event like a Birthday I would add a folder and group all pics and videos of that event in a 3rd level folder.
From mobile until recently I was backing up in original quality to Google Photos (as I had unlimited storage) but now I am cancelling my Google Workspace account (too much money spent on this). So I will be continuing moving my assets with the best app I found on mobile: Photo Sync App. Where I can define rules, and also copy all my mobile pics respecting the above mentioned folder structure.
Google Photos was honestly my daily driver to quickly search for anything. The Face detection and grouping was awesome. Now when I needed to download a Google TakeOut with all my stuff, it has been a nightmare, as Google makes copies of all your images according to all the albums where these pictures are shown. So for example if you have a birthdays from John in June 2000. The pic will appear once on the Year 2000 album. Again on the Birthday John folder, and again where John face is tagged. This is really bad.
But not everything is so bad with Google Photos (lets leave aside the privacy discussion), one very useful thing they do, is that if you enhance information of each file, for example add tags, places, faces, all this information is downloaded with the Google Takeout backup in a side car JSON file together with the image. Then you could merge the JSON file with several tools available already today into the EXIF data of the image.
And this is what I am looking for, I have a lot of assets, if I am going to go and tag, face tag, location tag, etc. a lot of pictures, I would like that all this information is saved on the images themselves. This way if I decide to move to another library in the future, all the information on the EXIF data of the image itself can be re-used without having to repeat all the manual work. Most systems do not touch the original (and some people agree this is the way it should be), but at least I want to have a side car file with all the details in a recognized format so it can be reused if needed.
I´ve been exploring PhotoStructure and the project looks promising, but unfortunately its being developed by just one person (Matt) who is great and I strongly believe is doing a great job, thats why I decided to help by sponsoring his project. But its PS is still missing several quite common specs that can be found in other tools, so not sure how long it will take.
Another very interesting project its called Immich, an open source project which is offering a similar to Google Photos web based interface, but leveraging local storage and not the cloud. This project is looking awesome, but due to the high number of constant changes due to the project picking up pace quite a lot in the last year, I am not sure how reliable or stable it is yet. But looks very promising.
The last time I checked, Synology Photos and iCloud Photos do not play well with a high number of files, so I want to avoid those.
A platform I liked quite a lot was SmugMug, as they offer unlimited storage for pictures, but unfortunately limit videos to up to 3 GB or 20 minutes and Full HD resolution, leaving out all my 4K Drone and Insta 360 camera footage. Also they have been permanently increasing prices over the years.
I checked quite some other tools, but some of them are not really convincing. So still on the long search for maybe a tool that doesnt exist yet.
Sorry for the long comment. If you are reading this, here, have a cookie ;)
Hey Fernando, thanks for the detailed insight into your photo management journey! It’s interesting how you’ve navigated from Google Photos to using tools like Photo Move 2.5 and Photo Sync App. Balancing the technical aspects with practical needs like tagging and file management is no small feat. Your support for projects like PhotoStructure and Immich shows a real dedication to finding the ideal solution. Keep it up, and thanks for the virtual cookie! 🍪😊
You may also try this open source platform:
https://sourceforge.net/projects/npdb-p/files/
Andy,
Sorry, but telling people to put all there photos in a single place is not really the answer.
The best ever organizer was Picasa 3. It would find all of your images and make a tree of them sorted by date or simply the file structure.
Sad that we lost that program.
Hey, which batch rename program did you use on bullet 3 (Decide on a System and Rename Your Files)
Thanks
I’m going to play the devil’s for a moment regarding how to organize digital images. At some point, you want to find the pictures of some event or events. The problem is that you don’t recall the year they were taken, or any other details such as spelling. Or maybe, you want to see all of the images of ice skating you have taken. How do you find them all?
May I propose am alternative – one folder for all images. Rely on the file name, which must conform to your naming convention. Hopefully your file manager will use tool tips to show the complete name in a formatted text box. Searching becomes easier. Even better if the search tool can read meta data.
Your thoughts?
Dave
Good luck to manage hundred of thousands of files in one single folder, making basically any computer struggle even with the listing of the files. :/
This is exactly what I needed you were so clear and easy to understand the process….I’m tech illiterate lol Ty
I know this is an older article, but if anyone else come across it like I did, I want to give some good advice. I have dozens of old photos of my mothers. I bought a epson fastfoto ff-680w. It’s a bit pricey, but AMAZING. High speed feeder, duplex, photo correction. The software allows you to sort by year/month/description. You can send them straight to Dropbox or Google Drive. Can’t say enough good things about it!
Very nice! We reviewed the top scanners recently, Jay, but didn’t test that one – will have to take a look soon! Thanks for the tip.
Wow, great article! I am just getting ready to start organizing my photos and this article is just what I needed. Thank you so much.
This article is great and full of information that I am going to use going forward. However, I would love a bit more clarity if you are able to help me out.
I have photos currently stored on three different laptops (Mac and PC) as well as on CD/DVD disks. I would like to combine them all into one location with cohesive labelling across all photos/videos. Instead of downloading everything to one computer, can I download everything to an SSD and organize them from there? OR do I need to use a program like Adobe Bridge, load all photos to my computer, organize them and then once organized transfer them all off the computer onto the SSD or cloud based storage location? I’m trying to avoid having my computer bogged down.
Any advice would be greatly appreciated. Thank you in advance. 😊
Hey Jennifer! I like your ‘download everything to an SSD’ approach. The SSD will be the fastest option if you have a lot of photos, so organizing them from there is a good idea. If you choose to keep them on there once organised, it’s good practice to create a cloud backup too. Here are some options: https://shotkit.com/online-photo-storage/
Great article. Many thanks. This really helped with my digital photo collection.
I’ve never regretted choosing YEAR_MONTH_DAY as my system for file naming and folder structure. Life became a LOT easier once I implemented it. Let us know how you get on. 😊