


Understanding the Circle of Confusion in Photography
What is the Circle of Confusion in photography and how can learning about it help you? We break it down in this easy-to-follow guide!
Shotkit may earn a commission on affiliate links. Learn more.
The Circle of Confusion (CoC) occurs during the process of focusing in a camera. It's aptly named as explaining it can become quite technical and rather confusing!
The Circle of Confusion influences the “sharpness” of images. As some subjects demand sharpness and some photographers try for ultra-sharp images, it's useful to have an understanding of how it works.
This guide will help to lift some of the confusion by explaining the Circle of Confusion in easy stages.
We'll then give several examples of how it may affect images in practice.
What is the Circle of Confusion in Photography?
It may sound like something to be avoided, but the Circle of Confusion is nothing to worry about! Knowing a bit about what goes on inside the camera helps make you a more sensitive and aware photographer.
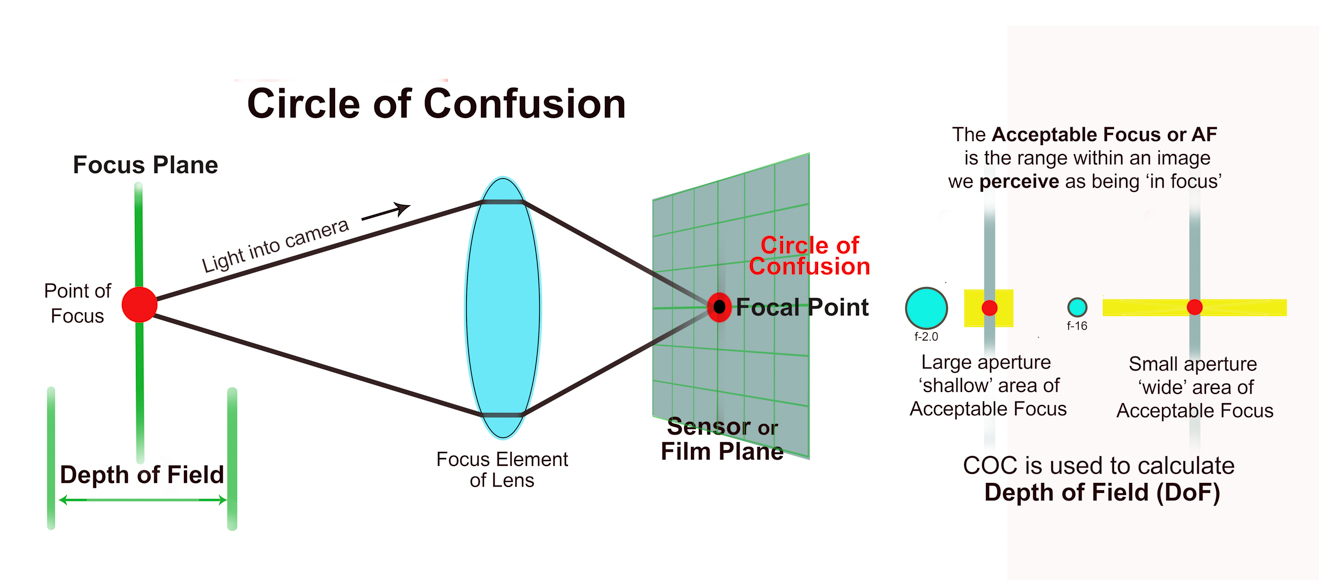
The Circle of Confusion occurs when a point of light from an image enters the camera through the lens and lands on the sensor at the back of the camera. It's a measurement of a point of light that falls on the focal plane (i.e. camera sensor) that's often referred to as the focal point.
When we move the focus ring to focus the image, the focus point moves in front of and behind the sensor. To get it “right” we often turn the focus ring to the right and then to the left several times until we're satisfied that the image we see is “in focus”.
But what's happening inside the camera? As the diagram below shows, the light beams enter the camera through the lens and converge in a point.
By turning the lens ring holding the focus element, this point – the focus point – moves backwards and forwards until it rests on the camera sensor and we can be satisfied: “It’s in focus!”
© Patrick Mateer
In theory, the beams of light pass through the lens and land as a perfectly focused point on the sensor or film plane. This is the black dot in the diagram.
However, in practice it lands as a small blur spots of light; and when we say small, we're talking about measurements such as 0.018 mm – so very small!
- Related: How to Read a Lens Spot Diagram
This is the red spot in the diagram and is called the “Circle of Confusion” – which in precise optical terms isn’t a dot or totally in focus. But we're talking variations of micro-millimetres so for all intents and purposes we accept this as being in “sharp” focus.
It's also the case that an area in front and behind the focal plane extends the area of the subject that we perceive as being in focus. In the diagram, this is shown in yellow.
Looking side-on, you see that the yellow areas are different for a large aperture and for a small aperture.
All the areas in red and yellow are seen by the human eye as being in focus, even though they aren’t perfectly so. This is what photographers call the “Acceptable Focus” or the “Permissible Circle of Confusion”.
In simple terms, this is the area of an image that appears to be in focus.
Depth of Field and the Circle of Confusion
When you set the lens aperture, you increase or decrease the size of the Circle of Confusion resulting in a larger or smaller area in front of and behind the focal plane being in focus.
Looking beyond the camera to a scene, this phenomenon – our eyes perceiving things to be in focus – is called “depth of field”. Small apertures such as f/16 give a large depth of field. Large apertures such as f/2 give a shallow depth of field.
Most lenses have a calibration on the aperture ring indicating the change in depth of field as you move from one aperture to the next. Just remember – a small aperture gives a large depth of field and a large aperture gives a small depth of field.
If this is all new, it’s another case of going out and test-shooting a range of apertures of the same scene and comparing the results.
Hyperfocal Distance, Depth of Field and the Circle of Confusion
The hyperfocal distance is the precise focus distance at which depth of field is maximised for a given aperture and focal length combination.
It's much used in landscape photography to gain a full “through the scene” sense of sharpness.
Setting the aperture to f/16 and the focus ring to infinity isn’t always the best solution to having a sharp landscape. Choosing a focal plane closer to you and a lower f-stop might actually increase the depth of field and the area in the landscape that appears sharp.
Another general point is that it's sometimes best to switch from automatic settings for focus and aperture. In automatic mode, the camera will make focus and exposure decisions based on points in the scene it “sees” as significant, or averaging readings across the scene.
Spot metering will help, but sometimes manual working is best – using a camera with live view, focus peaking and zooming into an image to check focus can really help. Try it.
To study the subject further you can consult a depth of field chart. But they are not one-size-fits-all; importantly, different cameras and lenses have different tables.
Depth of field tables use the tiny Circle of Confusion measurement as one element in the formula with which they calculate their outcomes.
Most camera lenses come with a table in those little sheets of folded paper in the box you probably didn’t read at the time.
There are also “DOF Calculators” free to use online, so you can consult these at home or through apps on your mobile.
Your choice of lens
One reason why expensive lenses are, well, expensive is that the focus element in them produces a smaller Circle of Confusion at the focal point and therefore a sharper image.
In practice, we get the best lens we can and carry on, feeling a bit better knowing that even the best lenses in the world are not optically perfect.
Example Images Showing the Circle of Confusion
In this section, we look at three different situations – portraits, a cityscape, and a close-up – and consider how the Circle of Confusion and DoF can affect them.
Shallow depth of field and Circle Of Confusion

Credit: Hollie Mateer
Choosing a low f-number like f/2.0 gives a shallow depth of field. In a close-up like this portrait, the depth of field becomes so narrow that not only the background, but also most of head and face are out of focus.
The focus was set on one eye – standard practice in portraiture – which resulted in small areas of high detail being picked out in the hair and the red headpiece.
The specialist lens used – the stunning Nikon 0.95 Noct 58mm – is of such high quality that the in-focus areas of the image are exceptionally sharp, giving the image a hyper-real quality.
Picking the subject out from the foreground and background

Credit: Hollie Mateer
This is a good example of how to narrow the Circle of Confusion but still retain interest beyond the subject. This image uses a zoom (a 70-200mm) at f/2.8 and the subject – a bride – has turned her face into the focus area.
The foreground and background are thrown out of focus due to the depth of field, an effect increased by the spatial compression of the zoom lens.
The bride is framed by the foliage which doesn’t completely lose its shape in the pattern of leaves, or over reduce the tonal and colour ranges.
Choose your focal plane for sharp landscapes
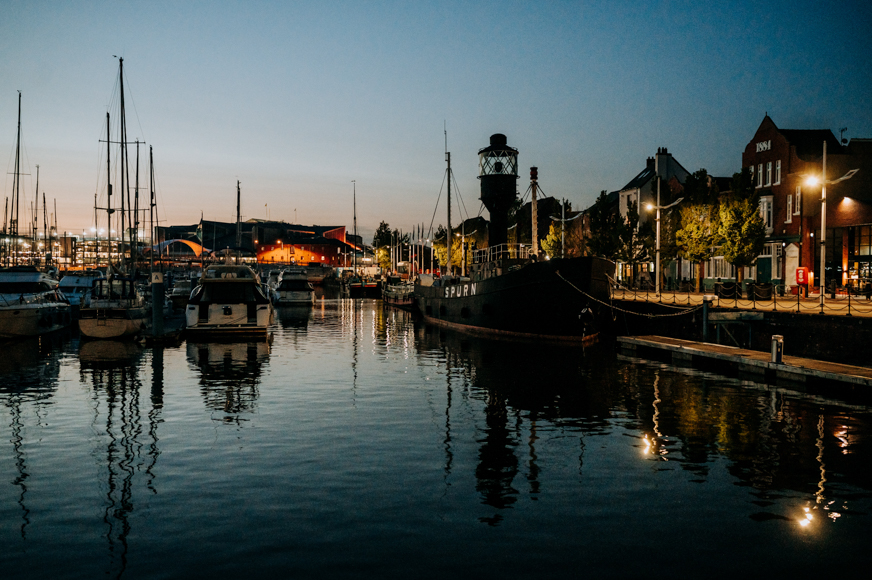
Credit: Patrick Mateer
This image, shot during the early evening, is a good example of responding to a location and choosing a focal plane between the camera and the horizon. It shows a “simple”, picturesque subject – boats docked in a harbour at dusk.
For a landscape type image – or cityscape as this really is – the traditional approach would be to stop down, to f/6.3 or higher, and set the focus on infinity. In this case, it was shot with a relatively shallow depth of field – f/2.5 – yet still retains a sharp, in-focus image.
The focal plane was set well in front of the line of the quayside. The straight-on position without foreground objects also helps to make the overall in-focus look.
If you zoom in you will, of course, see the foreground and background is a little softer, but in full view, the whole image looks sharp.
Bokeh and the Circle of Confusion

Credit: Patrick Mateer
“Bokeh” has become one of the most popular techniques used in photography. The word bokeh comes from the Japanese language and literally means “blur”.
In this image, a close-up view captures a foot in movement and the drops of water flung off as it crosses onto a moored boat.
The lights reflected in the water, which is some distance below, are just out of the Circle of Confusion range and have become a pattern of white blobs against the intense darkness of the water.
A black and white conversion is perfect to enhance the contrasts and luminance of the picture.
Nature photographers make great use of bokeh to separate, for instance, a flower, bird or butterfly from its background and provide more visual information about the subject for the viewer.
A Word on sharpening tools in Photoshop and other software
Digital manipulation apps like Photoshop provide tools to sharpen an image. They won’t, of course, turn an out-of-focus image into a focused one but can be used with care to increase the perception of sharpness for the viewer.
This is done by exaggerating the contrast – the lights and darks – along with what the app recognises as an edge, which gives an impression of increased sharpness in the image to the viewer.
Push it too far and it will over-compensate, and the image will begin to look unnatural. It’s a case of “a little goes a long way”, especially for print outcomes, though images for web presentation will take a bit more sharpening.
FAQs About The Circle Of Confusion
What factors influence the circle of confusion?
By far the biggest influences upon the circle of confusion are aperture and focusing distance. These two main factors determine how large the circle of confusion will appear on the camera's sensor.
What is a blur circle in visual optics?
A blur circle is an image created by a lens system on its focal surface. The precision of the lens and how sharp the focus is will impact the size of the blur circle.
How is depth of field calculated?
Depth of field is calculated through understanding the focal length, aperture, distance to the subject, and the size of the circle of confusion.
In practical terms, understanding how to use depth of field takes trial and error to understand how aperture, focal length, and the distance to the subject impact an image.
What is the circle of confusion diameter limit?
The circle of confusion diameter limit is also referred to as the CoC Limit or the CoC Criterion.
It is defined as the largest possible blur spot perceived by the human eye from a typical viewing point.
Final Words About Circles of Confusion
Learning about the science of the camera and lenses helps you gain a feel for your equipment and techniques.
Hopefully, some of the confusion you may have had over the Circle of Confusion has cleared a little. You should have a greater understanding of depth of field and the idea of “acceptably sharp” and how you can use these variables.
So, leave the confusion behind and then go out and experiment. Techniques are always a means to end: as the travel photographer Peter Adams remarked, “Great photography is about depth of feeling, not depth of field.”
Thanks for reading – and if you have any questions at all, please leave them as a comment below and I'll be sure to get back to you.

Check out these 8 essential tools to help you succeed as a professional photographer.
Includes limited-time discounts.

Patrick Mateer is an award-winning photographer who lives in Yorkshire, England with his wife (wedding photographer Hollie Mateer) and two children.
1 Comment
Leave a Comment

👋 WELCOME TO SHOTKIT!
🔥 Popular NOW:

Thanks for sharing this article, really enjoyed writing it. Anyone who has any questions, please leave them as a comment and I’ll get back to you.