


Guide to Shallow Depth of Field Photography
What is a shallow depth of field, how can you create one, and how can it improve your photography? Find out ALL you need to know right here!
Learn | Photography Guides | By Ana Mireles
Shotkit may earn a commission on affiliate links. Learn more.
Have you ever noticed how the subject seems to ‘pop' in certain photos? Or maybe wondered how photographers create beautiful bokeh backgrounds?
That's achieved by using a small depth of field (DOF), which means that only the main part of the image is in focus and the rest is blurred out.
The great thing about stepping out of the auto mode of your camera is that you get control over your photography.
Even by using aperture priority mode, you can choose the f-number to decide if you want the depth of field to be shallow or deep.
This article will explain all the elements you need to create a small depth of field and improve your photography skills.
Let's get started!
What Is Shallow Depth of Field?
When you take a photograph, you choose a focal point. Everything that’s on the same plane will be in focus. The depth of field (DOF) determines how much of what’s in front and behind that plane will be in focus too.
Keep in mind that there’s not an abrupt separation where the depth of field starts and finishes. The blur effect is gradual. The further away something is from the focal plane, the more blurry it will get.
When an image has only a small portion in focus, it’s because it has a shallow depth of field. Shallow, short, and narrow are all acceptable terms for the same thing, so you can find them used interchangeably.
Normally, the point of focus lies in the first third of the depth of field. This means that the sharp area in front of the focal point will be shorter than the part behind it.
Although it’s used to create these effects, a shallow depth of field is not the same as a blurred background or bokeh.
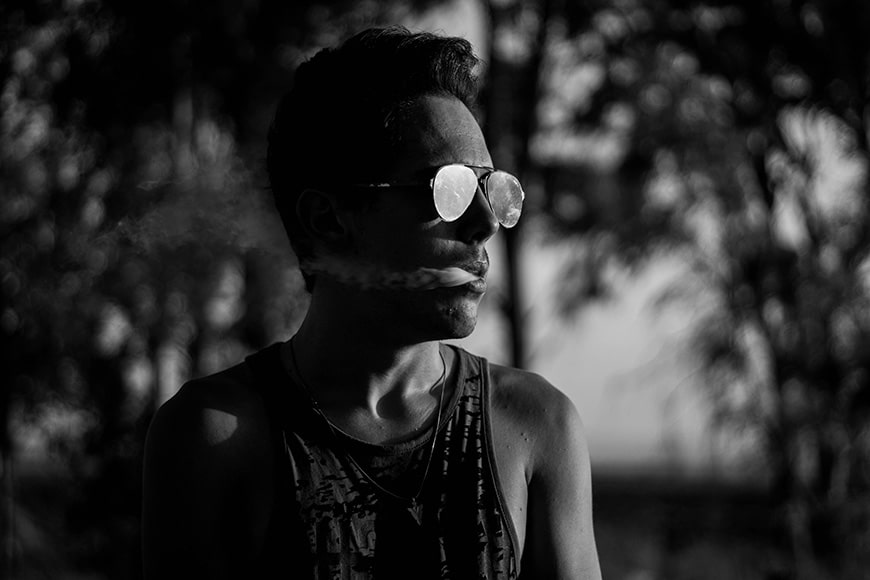
With a shallow depth of field, you can only have one part of the subject in focus, such as the eyes in headshot photography. This will guide the viewer’s eye to the most important part of the image.
If the shallow depth of field keeps only the subject in focus, then you can talk about a blurred background. This is used to separate different planes creating the idea of depth in a two-dimensional image.
This can be used to make unnecessary elements less distracting. For example, let's say you're photographing an animal at the zoo and you don't want the wire fence to steal too much attention away. In that situation, you can use a shallow DOF to focus on the animal and blur the fence.
You can also use it to blur a busy background that would otherwise make the image confusing for the viewer.
When lights get blurred and refracted by the lens, it creates a bokeh effect. Normally this is rendered as circles but you can use modifiers to create different shapes. This is just a creative element in the image.
Some types of photography use a shallow depth of field more than others. Portrait photography, for example, relies heavily on shallow depth of field to make the subject stand out.
As you can see, keeping a shallow depth of field around your focal point is used in many ways. Now let's see how you can achieve it.
What aperture gives shallow depth of field?
A large aperture (i.e., a smaller f-stop number) gives the shallowest depth of field. For example, f/1.4 or f/2.8. However, if your lens is not that ‘fast', be sure to keep it as wide as you can.
Normally, a small aperture (larger f-stop number) will give you a deeper depth of field. However – as I’ll explain later in the article – a shallow depth of field is not only about the f-number.
Other factors need to be taken into account. For example, if you need to use a small aperture because you have a slow shutter speed, you can change to a longer focal length.
Keep in mind that the aperture is part of the exposure triangle. So, if you move an f-stop you need to compensate it with the shutter speed or the ISO.
Alternatively, you can use the aperture priority mode. This is a semi-automatic mode that compensates whenever you move an f-stop.
You can learn more about using aperture priority mode here in our guide.
What Is the Difference Between Shallow Depth of Field and Deep Depth of Field?


The difference between a shallow and a deep depth of field is how much of your photo is in focus.
With a shallow depth of field, only a small portion of it will be sharp. This will help your viewer focus on the most important part of the image.
With a deeper depth of field, you’ll have much more of the scene or even all of it in focus. This is especially useful for landscape photography and some types of product photography.
How Do I Take a Shallow Depth of Field Photo?

Credit: Jay Wennington
The depth of field is not determined by only one factor – it’s a combination of multiple things and how you balance them.
For example, if I photograph a subject that's four meters away from me with a 28mm wide-angle lens and an aperture of f/2.8, everything that sits between 3.12 m and 5.58 m away will be sharp. Effectively my DOF is 2.47 m long.
However, if I get closer to the subject the depth of field gets narrower, even if I close an f-stop. Following the example from before, at two meters with an f-stop of f/5.6, I have a shallower depth of field of 1.22 meters. That would leave in focus everything that sits in between 1.56 m and 2.78 m.
Now let's say that I step away instead of getting closer. The depth of field becomes deep again, but I can change to a longer lens to try to match the framing and this will narrow the DOF.
For example, a 50mm standard lens with an f/2.8 f-stop and six meters between the camera and the subject narrows the field of depth to 1.63 meters.
These calculations were done for a full-frame camera. Remember that you have to apply the crop factor if you are using a different format camera.
As you can see, everything you change has an impact on the depth of field. Fortunately, you can use a DOF calculator app to help you out with all of these.
I use the DOF & Hyperfocal Distance Calculator from Photo Tools, but there are many apps and websites on the market that you can choose from.
Keep in mind that the best way to understand it is by taking pictures. I recommend you take a notebook with you and write down everything you do.
Don't just rely on the Exif data because that will only tell you which lens and aperture you used. You should also consider how far away you were from the subject and the distance between the subject and the background.
In time everything will come naturally and you’ll get to know how your gear performs in different situations. In the meantime, let's see a bit more about how things work.
4 Ways to Control Depth of Field in Photography
1. Aperture

Credit: Warren Wong
Aperture refers to the size of the opening of the diaphragm on your lens. The bigger it is, the more light passes through and vice-versa.
The exposure is achieved by setting the aperture, shutter speed, and ISO. The right balance of these three factors results in a well-exposed photograph.
However, each of them has an impact on the final look of your image beyond the amount of light, which is why it’s important to step out of the Auto mode and take control of your settings.
In the case of the aperture, the effect is the difference in depth of field. A small f-number means a wide aperture. This results in a lot of light and a shallow depth of field.
This is the most known factor for creating a narrow DOF, but it’s not the only one.
Let's do another quick example. Let's say I photograph a subject that’s four meters away from me with a 28mm wide-angle lens and an aperture of f/2.8. Everything that’s within 3.12 m and 5.58m away will be sharp, resulting in a depth of field that's 2.47 m wide.
Now, let’s say I get closer and position myself two meters away. I keep the same lens but this time I close the aperture to f/5.6.
I'd now have in focus everything that's between 1.56 and 2.78 meters away, resulting in a depth of field of 1.22 m.
As you can see, I achieved a narrower depth of field despite the fact that I was using a larger aperture. This is because I changed the distance between the sensor plane and the focal point, which is the next factor to consider.
Discover more about what is aperture here.
2. Distance between photographer and subject
Credit: Itay Kabalo
The distance between the camera and the subject refers to the separation between the sensor and the focus plane.
These two planes are parallel (unless you change this with camera movements or a tilt-shift lens). This means that everything that’s on the same plane as your focus point will be sharp.
As a general rule, a short distance between the photographer and subject will result in a shallow depth of field.
Although, as I mentioned in the aperture section, this rule can be overturned depending on the other factors.
For example: photographing a subject that’s four meters away with a focal length of 28mm and aperture f/8 will have in focus all the elements that fit between 2.21 m and 21.12 m. This means I have a depth of field of 18.91 m.
If I shorten the distance by even one meter, the depth of field gets dramatically shallower to 5.76 m. Another meter gets me to a DOF of 1.92 m, and so on.
If instead of getting closer I position myself at a six-meter distance but change my lens to a 50mm (while maintaining the f/8 aperture), I reach a depth of field of 5.35 m.
This means that stepping two meters away gets me a similar result as getting one meter closer. This is because I changed to a longer lens.
3. Focal Length

Credit: Hian Oliveira
The rule of thumb says that a longer focal length gives you a narrower depth of field than a short one. However, a macro wide-angle lens has a small depth of field too – but that has more to do with the short distance between you and your subject.
This has to do with the physical size of the lens and how great a distance there is from the sensor to the point where light intersects when coming through the lens. It’s also influenced by the enlargement of the subject.
So, the same subject photographed at the same distance (four meters, for example) with the same aperture (f/8) will have a depth of field 2.47 m wide with a 28mm lens but a DOF as shallow as .24 m if I use an 85mm lens.
Even if I step away to keep the framing and composition, a telephoto lens gives an appearance of shallower depth of field due to the magnification of the subject.
See more types of camera lenses here.
4. Camera Sensor Size

Credit: Brooke Cagle
Each camera has a different size sensor. A full-frame camera has a sensor that is equivalent to the 135 films. That means a size format of 36×24 mm.
When you crop that size to make a smaller camera sensor, you need to apply a crop factor to the focal length and the aperture.
For example, the four-thirds system measures 17.3 x 13 mm, which is about half of the full-frame. That means that it has a 2x crop factor.
An APS-C sensor fits in between full frame and micro 4/3 with a 1.6x crop factor on Canon and a 1.5x on Nikon, and so on.
When you attach a lens to the camera, the sensor will capture a different portion of the image circle according to its size.
That's why you need to apply the crop factor to the focal length and therefore a 50mm normal lens in a full-frame camera becomes a 100mm telephoto on a micro 4/3.
It’s not the actual focal length that changes, it’s the angle of view that’s captured by the sensor that gets smaller.
Also, the amount of light that a sensor gathers is different, so you have to apply the crop factor to the aperture too.
So, if our hypothetical 50mm lens had a maximum aperture of f/1.8, it becomes a 100mm lens with a maximum aperture of f/3.5 on a micro 4/3 camera.
Therefore, the sensor size has an indirect influence on the depth of field due to the previously explained factors of aperture, focal length, and subject-to-camera distance.
Extra tip:
If you’re not achieving the result you want with these settings you can try separating your subjects.
This won’t change the actual depth of field but it will make things fall out of the sharp area achieving a similar visual result.
How to ‘Fake’ a Shallow Depth of Field on Your Phone
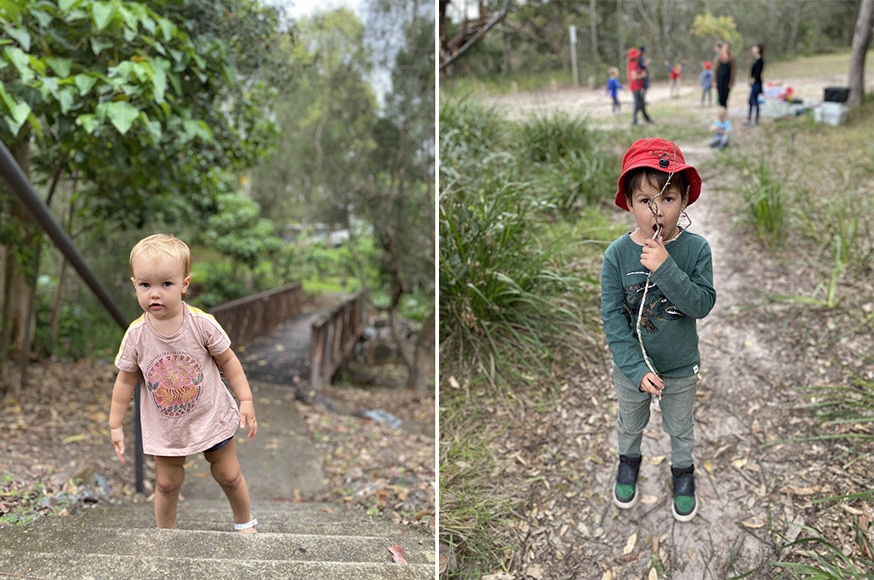
Shot on iPhone using Portrait Mode to create a ‘fake' shallow DOF.
As we’ve seen above, there are different factors that create a shallow depth of field. Shooting with the camera on your phone has a disadvantage in most of them.
For example, phone cameras come with a fixed aperture. So, what can you do to achieve a shallow depth of field on your phone?
First of all, you can change the distance between yourself and your subject. This will dramatically change the depth of field.
Also, you can move your subject to put some more distance between them and the background or the other elements.
These solutions of course don’t work with every subject or every scene. Fortunately, smartphone manufacturers have found a way to help you ‘fake’ a shallow depth of field – it's known as computational photography (guide).
It works differently depending on your phone though.
- iPhone
iPhones have a portrait mode that allows you to easily create a shallow depth of field effect.
Launch the camera app and scroll through the menu to find Portrait mode. Note that iPhone SE and iPhone XR only allow the portrait mode when they detect a face.
Then, if you’re using iPhone X or any model after that, you can choose the lighting effect that you want. The choices are Natural Light, Studio Light, Contour Light, Stage Light, Stage Mono, or High-Key Light Mono.
You can see a live preview of the effect on the screen. Once you decide, you’re ready to take your picture. Some iPhone models let you choose between 1x and 2x, you just have to tap on each one to change.
Note that Portrait mode for selfies is only possible starting on the iPhone X.
You can adjust or cancel the portrait mode afterwards in the library, just tap Edit to open the menu. Then, if you want to remove the effect just tap Portrait on the top of the screen. To put it back on, simply tap again.
If, instead, you want to adjust it, tap on Depth Control and use the slider to change the effect. You can do the same with Portrait Lighting.
- Android
Unfortunately, Android phones are not as sophisticated as iPhones regarding the portrait mode. Just open the camera app and choose the Portrait mode.
The good news is that you can install apps that can enhance this effect – for example, FabFocus.
Otherwise, you can use a photo editor app to blur the background of your photo. There are many options when it comes to choosing the best photo editor, but I find that Lightroom is very good.
You can read more about faking bokeh effects using AI here.
Challenges of Shooting at a Shallow Depth of Field

Credit: Tung Minh
If you're ready to try some photos with shallow DOF, there are some things that you should keep in mind.
- Not all images benefit from having a shallow depth of field.
Landscape photography is usually better with a deep depth of field. Check out the work of famous landscape photographers and you’ll notice that most of the scene (if not all of it) is in sharp focus.
- Think about the context
One of the most difficult things to determine is how shallow to make your shallow depth of field. This is the case when the background needs to give context to the story you're telling, as is often required in travel photography or documentary.
What you can do in these cases is to use a slightly deeper DOF: this way the background is not so sharp as to steal attention from the main subject, but it’s still clear enough to understand what it is.
You can achieve this by closing the aperture an f-stop or two.
- Consider moving subjects
You have to keep an eye on the focus point when your depth of field is very narrow because it's easy to miss the focus. This is especially true if you’re shooting handheld and/or have a live subject.
For example, if you’re doing a closeup portrait you’d want to have the focus in the eyes. The problem is that the slightest movement could result in a sharp nose and blurry eyes.
Also, consider that having a completely stiff model can create unnatural expressions or positions. Close the lens diaphragm an f-stop to have more leeway. Alternatively, you can put more distance between you and the subject.
Macro is another type of photography that’s susceptible to missed focus. So, it's always advisable to do it with a tripod, like one of these.
Shallow Depth of Field Photography FAQs
What is the shallowest depth of field?
Some of the fastest camera lenses have a maximum aperture of f/0.85, f/0.95 or f/1, but they are normally too big or too expensive for regular photographers. Some popular Canon lenses offer a maximum apture of f/1.2, which produce the shallowest depth of field of any of their autofocus lenses.
What does narrow depth of field mean?
Narrow depth of field is the same as shallow depth of field, in that only a small portion of the image is in focus.
What lens gives shallow depth of field?
Either a long telephoto lens or one with a large maximum aperture – usually f/2.8 or larger.
Does shutter speed affect depth of field?
No, it doesn't. Out of the 3 elements of the exposure triangle, only aperture can affects DOF.
How do you get the best depth of field in photography?
Move closer to your subject, use a telephoto or fast regular lens; shoot at its maximum aperture, and ensure there's adequate distance between the subject and the background.
Final Words
I know it may sound complicated, but I promise that once you take out your camera and start experimenting, everything will make more sense.
In summary: to achieve a shallow depth of field use a longer lens, set it at the widest aperture that you can, and stay as close to your subject as possible.
From there you can experiment with different focal lengths and moving closer or further away from your subject.
Also, do some bracketing by moving an f-stop up or down – remember to compensate with the shutter speed though.
I'm sure that with these exercises you'll keep improving your understanding about depth of field in photography.
If you have any doubts, reach out by posting your questions in the comments section, or join our private Facebook Group.

Check out these 8 essential tools to help you succeed as a professional photographer.
Includes limited-time discounts.

Ana Mireles is a Mexican researcher that specializes in photography and communications for the arts and culture sector.
👋 WELCOME TO SHOTKIT!
🔥 Popular NOW:
