


How to Use a Gray Card for White Balance & Exposure
Unlock the secrets of using a gray card for precise white balance and exposure, ensuring your photos have accurate colors and optimal lighting every time.
Learn | By Ana Mireles
Shotkit may earn a commission on affiliate links. Learn more.
A gray card is a must-have accessory for any photographer.
If you don't know how to use a gray card, this is the article for you. I'll start by telling you what is a gray card and why it's important.
Also, I'll show you how to use a gray card to create a custom white balance and achieve the correct exposure.
Are you intrigued? Let's get started!
The Science Behind the Gray Card

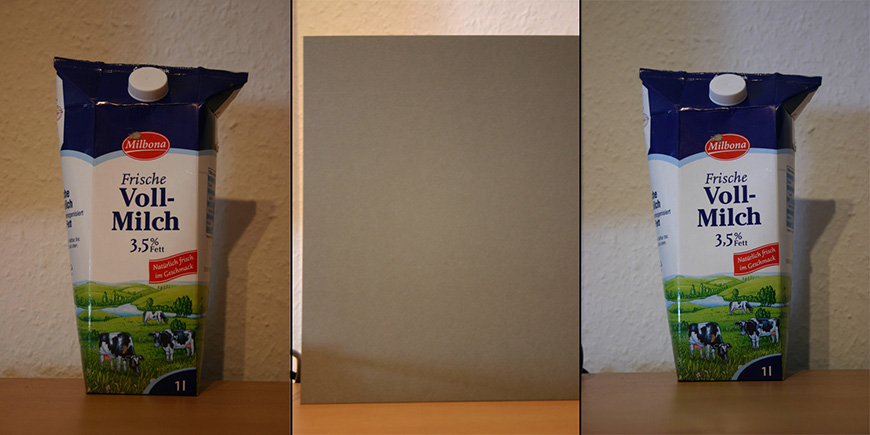
Credit: Foto: Jonn Leffmann, CC BY 3.0, via Wikimedia Commons
What is a Gray Card?
A gray card is exactly what it sounds like. It's a gray cardboard or plastic card used in photography to measure light and white balance.
The gray card may be of any size and material – but it definitely can't be of any shade of gray. Instead, it has to be 18% grey. Usually, it also has a white side that can also be used to set white balance – but not for an accurate exposure reading.
Let's forget about the percentages for a moment. What this means in easier terms is that it should be the exact tone of gray that sits midway between total black and total white. This is why sometimes 18% gray is also referred to as middle gray.
Back to the 18% – without getting too technical. The 18% is a reflectance factor that helps the camera's meter get an accurate reading and achieve the right exposure and a neutral tone.
I'll get into the why and the how in the following sections – so, keep on reading.
Why Use a Gray Card?
Credit: Christian H., Public domain, via Wikimedia Commons
As you probably know, there are two types of light – incident and reflective light. Incident light is the one that comes out of the light source and falls on the scene or subject.
This is the one that you read using a manual or external light meter. This meter reading is the more accurate to get proper exposure.
After the light hits the subject, it's reflected from it, and it's the one that reaches our eyes and the camera. So, the in-camera light meter is used to read the reflective light.
This meter reading is less accurate because each object reflects light differently depending on its color, material, etc.
Also, the in-camera meter can be less reliable if you're using an exposure mode that makes an average from the light on the entire scene. For example, you might have seen a photo where the subject is underexposed if it was in front of the bright sky. This is because camera meters get ‘fooled' by all the light in the sky and think they need less exposure.
This is why many photographers prefer to use an incident meter. However, you can use the in-camera meter and still get a perfect exposure.
What you need is a gray card and set your camera for spot metering. This way, it will have a reference point that reflects the light in a way that's unchanged from the incident light.
Another reason why you want to use a gray card is the color balance. On top of the amount and intensity of the light, you also need to check its color temperature. This is measured in Kelvin degrees.
For example, natural sunlight is what we call white on a sunny day at noon, but it gets different tones of blue if it's cloudy or if it is before sunrise. Then, after sunrise, it acquires warmer tones such as yellow or orange.
The same happens with artificial lights. Tungsten bulbs have a yellow hue, while fluorescent lights give a green tone to your images. Things get even more complicated if there's a mix of light sources.
Relying only on the camera's white balance can result in images with an unwanted color cast. Whether you use the auto white balance or one of the presets, it isn't always accurate.
It's true that you can correct this in post-production, but this isn't always easy. Trying to color correct a portrait is difficult because the skin tone, for example, is a sensitive issue that you shouldn't leave to personal interpretation.
This is where the gray card can be of help. This can be a neutral reference point for you to correct the camera's white balance in post-production. Or you can use it to create a custom white balance and get the right settings in-camera.
Benefits of Using a Gray Card
This is why you should always use a gray card.
- You can be sure that you're photos are exposed correctly regardless of the lighting conditions.
- You'll get consistency across all the images in your photo shoots.
- You'll save a lot of post-production time.
- You can take your photography to the next level and achieve professional-quality results.
What is the Best Gray Card for Photography?
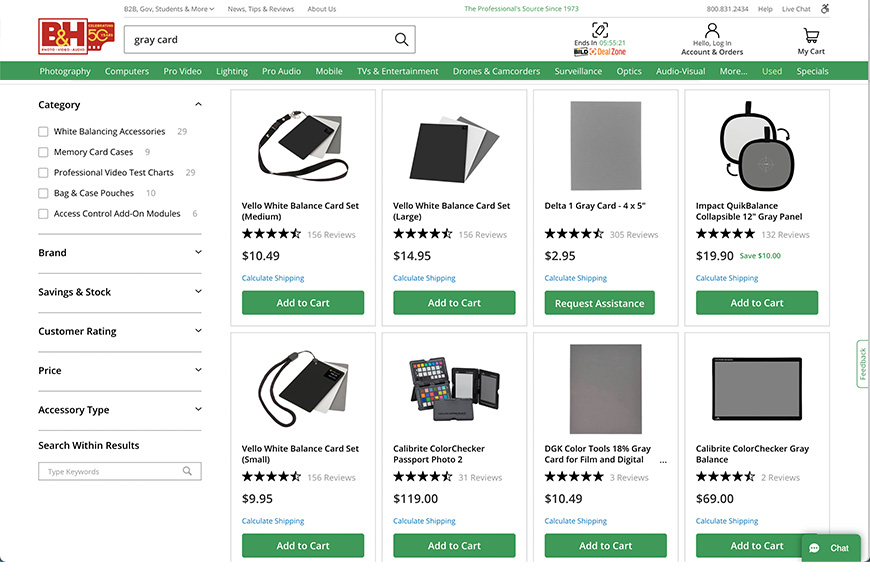
Credit: B&H
You'll definitely want to have a gray card on your camera bag, but which one should you get? There are tons of gray cards on the market and sometimes is not easy to choose.
Here are some of the best gray cards I've found, and a list of factors to consider when you're buying one. This way, you can get the gray card that's best for you.
Calibrite ColorChecker Passport Photo 2 – While you don't need a color checker to set the exposure or the white balance, the Calibrite ColorChecker includes one of the most accurate gray cards on the market. It is one of the most expensive options, though.
Manfrotto EZYBalance Collapsable 12″ or 30″ – Being collapsable, the Manfrotto gray card is perfect for carrying on any camera bag and it is very durable. The quality is what you would expect from an industry-standard name like Manfrotto. You can choose the size that's better for your type of photography.
Kodak R27 – The package comes with two gray cards – one 8″x 10″ and another 4″ x 5″. On the gray side, they have 18% reflectance and on the white side 90% reflectance. They're affordable and lightweight, and the variety of sizes makes it a great choice for most photographers.
Color Confidence 1250 Total Balance Grey Card – Color Confidence is a leading brand in photographic accessories and color management.
Neewer Gray Card – Neewer has established itself as a reliable, quality brand with affordable prices. This is what you can expect from its grey cards. They're sold in pairs, sized 8″ x 10″.
Factors to consider when choosing a Gray Card
Size – you should consider the size of the gray card in relation to the subjects you usually photograph. If you do portraits, a 30″ gray card is great, but if you photograph jewellery – then 30″ is too big. Another consideration you should have is portability and storage space. This depends on whether you work in the studio or go on location.
Material – this relates to durability. For example, grey cards made of cardboard are easier to damage if you're taking them on location.
Reflectance and accuracy – Very inexpensive gray cards from brands that you've never heard of aren't always the most accurate. While not everyone has a big budget, it is important to choose quality products – otherwise, you're just as well not using a gray card at all. Good quality grey cards from brands like Neewer or Kodak are affordable and reliable.
How to Use a Gray Card
As I mentioned before, there are two reasons why you'd want to use a gray card. One of them is to adjust the exposure, and the other is for the white balance.
Here's how to use a gray card for each purpose.
For White Balance
You can use a grey card to set a custom white balance. All you need is a camera that supports custom white balance – which is most of the DSLR and mirrorless, and a grey card.
You need to find the correct exposure for the scene that you're shooting. Then, put the gray card in a way that it receives the same lighting as your subject.
Then, turn on your camera and go to the White Balance settings. Then, scroll the options until you find the one that says Custom or Set.
Next, take a photo of only the gray card and the camera will tell you the correct white balance. You can now adjust the white balance setting, and you're good to go.
If you're in a lighting situation that you'll face regularly, you can assign these settings to one of the custom white balance options of your camera.
The steps may be slightly different from one camera manufacturer to another. For example, Canon users need to take a test shot of the gray card. Then, go into the menu and find Custom White Balance and select the gray card image as reference for the camera to adjust the white balance settings.
You can search for Custom White Balance on your user's manual or Google your camera's model to find the exact steps.
For Exposure
Imagine you make a portrait of a person wearing a white t-shirt in front of a white wall. Then, imagine you change their shirt for a black one, and you place a dark backdrop behind them.
Even if they're taken under the same light, the first portrait will be underexposed and the second one will be overexposed.
To prevent this from happening, you simply need to ask them to hold a gray card so you can set the correct exposure settings.
You'll need your camera in manual mode. Make sure the grey card covers the entire frame – if not, switch to spot metering mode and put the gray card in the centre of the frame.
Then, press the shutter button halfway and adjust the shutter speed, aperture, and ISO until you find the correct exposure.
Now you're ready to start shooting. You'll need to do this again if the lighting conditions change.
Advanced Techniques and Tips
Here are some extra tips for you to use the gray card like a pro.
Using Gray Cards in Complex Lighting
Some scenes have light sources with different color temperatures. Imagine a desk close to a window which has a little sunlight coming in and a desktop lamp with a tungsten bulb. Anything you place there will have mixed lighting.
The best way to handle these situations is by setting a custom white balance in camera. Don't leave the color correction to post-production because you'll have the hardest time.
Make sure the gray card is lighted by all the light sources – just like your subject would.
If you prefer, you can use a gray card for each light source and correct them individually in post-processing.
Gray Cards in Post-Processing
If you don't want to use the Custom WB of your camera, you can still use the gray card to fix any color cast in your image in post-processing. Simply include the gray card in one of the photographs.
The process is similar in all programs. Simply find the White Balance setting and click on the eyedropper tool. Then, click on the gray card in the photo.
This will tell the program which one is the correct white setting. Now, you can sync all your photos to the same value.
Common Mistakes Using Gray Cards and How to Avoid Them
If you're not getting the best results using the gray card, these are a few things that may be causing problems.
- You're not filling the frame with the gray card. Make sure there aren't any other elements in the picture that could mislead the camera's meter or white balance reader.
- Make sure the gray card is close to the subject. Pay attention to the position as well as the angle at which it faces the light source.
- Don't confuse a gray card with a color checker – not even for white balance correction. A gray card is useful to find the middle gray, not to set the color profile of the image.
- Remember to use the gray card and adjust the exposure and white balance if the lighting changes.
- Don't rely solely on post-processing. Try to get the proper exposure and white balance in-camera as much as possible. Then, use the editing just to fine-tune the image.
- Always use the grey card after you've placed the filters on your lens.
- Don't always aim to get a white-neutral light evenly exposed. You should always get control over the creative look of your photo. You might want your image to look warmer or cooler, you may wish to experiment with high-key lighting, etc.

Check out these 8 essential tools to help you succeed as a professional photographer.
Includes limited-time discounts.

Ana Mireles is a Mexican researcher that specializes in photography and communications for the arts and culture sector.
👋 WELCOME TO SHOTKIT!
🔥 Popular NOW:
