


How to Use Filters on Instagram (+ 9 Most Popular)
Everything you need to know about using filters on Instagram, including how/when to use them, how to make your own, and the 9 most popular Instagram filters.
Instagram Guides | Learn | By Ana Mireles
Shotkit may earn a commission on affiliate links. Learn more.
Using Instagram filters is a great way to showcase your personality on your feed and Stories.
The great news is that you don't have to use a separate app to do it; you can do this directly on Instagram using its filters and camera effects.
In this article, I'll tell you all you need to know. Let's get started.
How to Apply Filters to Photos and Videos on Instagram
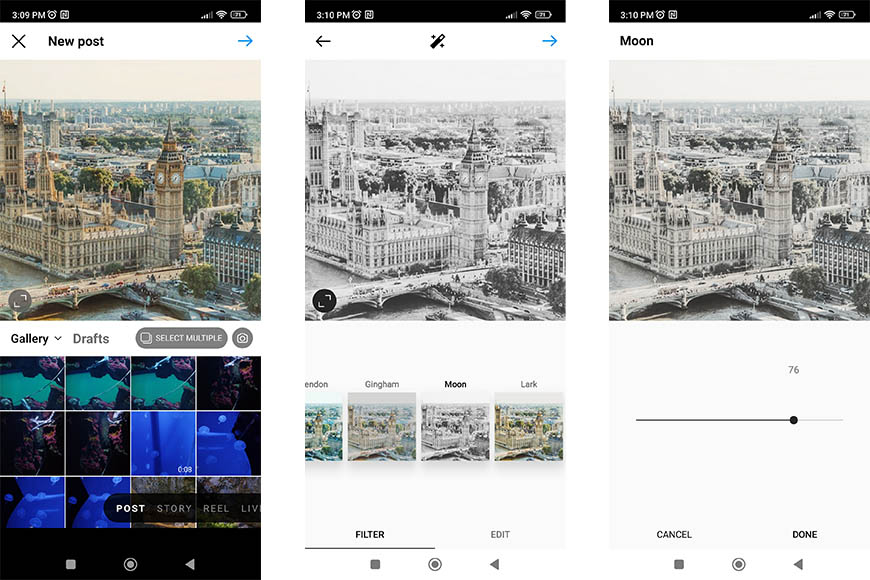
Instagram users can apply a filter to a photo or a video before they post it.
If you want to add an Instagram filter to an Instagram post:
- Launch Instagram.
- Tap on the plus sign on the bottom menu bar.
- Choose a photo or a video from your gallery.
- Tap on the arrow you'll find in the top right corner.
- Choose one of the Instagram filters shown underneath your photo. You can swipe left to scroll and see all of them.
- Tap on an Instagram filter to see how it looks.
- You can tap on the filter again to adjust the intensity.
- Once you're happy with your chosen filter, tap on the arrow on the top right.
- Add a caption, location, and other information you want to finish the post and tap the check icon to publish it.
If you want to add a filter to photos on Instagram Stories:
- Open the app.
- Tap on the + on the menu bar at the bottom of the screen.
- Tap on the word STORY.
- By default, this will launch the camera feature. To use a photo from your gallery, tap on the photo thumbnail in the bottom left corner of the screen.
- Tap on the photo you want to use to create your Story.
- Swipe left or right to change filters.
- Once you like a filter, you can continue to create Instagram Stories as usual by adding text, music, GIFs, etc.
- Once you're done, tap on Your Story to create a story, or tap on the arrow for other sharing options.
How do I find the “Hidden” Filters?
Previous versions of Instagram didn't show all the available filters on the scrolling menu underneath the photo while you were creating a new post.
Instead, Instagram would show some of them by default. But you could customize these shortcuts by accessing the Manage Filters section. These were called the “hidden filters” simply because you wouldn't see them immediately.
However, this feature isn't available anymore.
How Do You Get Filters on Instagram?
The Instagram filters available for your posts are all underneath your photo while creating a new post.
However, with Instagram Stories, you can get more filters than the ones shown in the filters menu. This is how you can access the most popular Instagram filters.
Once you launch the app, tap the plus sign at the bottom of the screen.
Then, choose Story to start creating Instagram Stories. This will activate the camera – you can use the frontal one or the one on the rear – the filters work for both.
Next to the shutter button o the bottom of the screen, you'll see the first filters. Start scrolling them until you reach the end of the menu.
The last icon is a magnifying glass – tap on it. This will open the menu with all the effects created by Instagram users.
First, you'll see a selection of the most popular Instagram filters. You can explore the different categories to see more options.
You can see a preview of how it looks by tapping on each filter. Once you like a filter, tap on the screen outside the filters menu, or tap on the handle and swipe it down.
Now, continue to create your Instagram Story and share it once it's ready.
How to Search for Filters on Instagram?
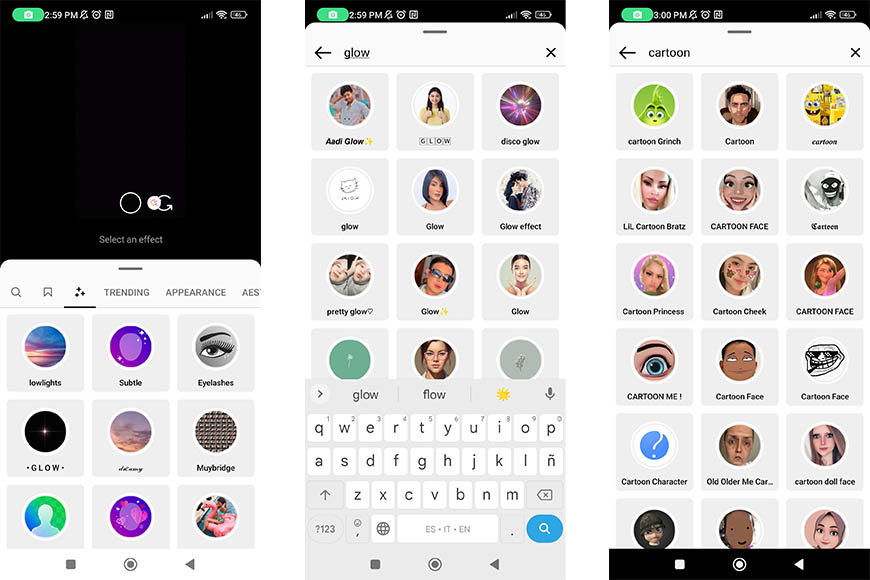
As mentioned in the previous section, you can get more filters when creating an Instagram Story. Simply follow the steps mentioned above to reach the Explore Filters section.
Once you're there, you'll find a search tool on the left side of the categories menu. Simply tap on it and type what you're looking for.
If you don't know precisely what to search for, you can also browse the trending category if you want a popular filter or use one of the categories.
How Do I Use the Face Filters on Instagram?
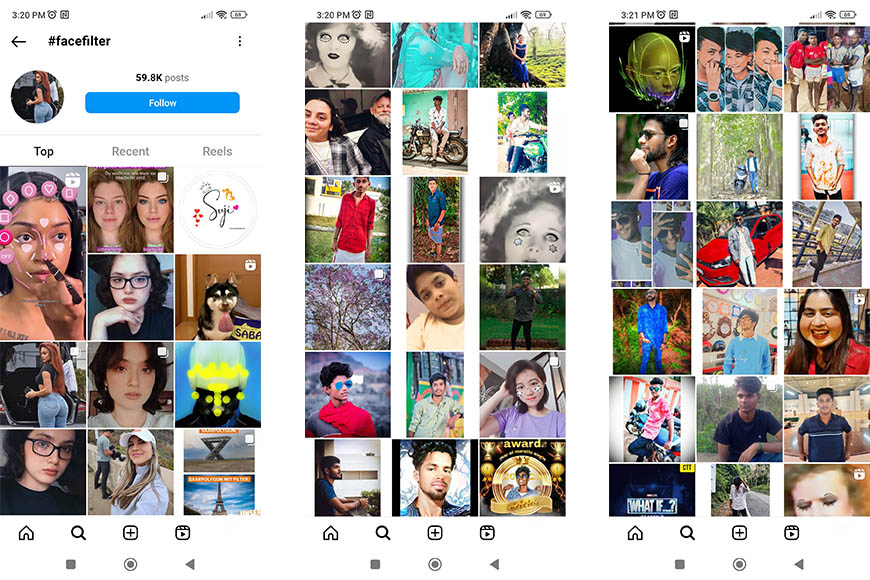
A face filter is a special effect that works with augmented reality. When you're using one, it will recognize your features and movements and adapt the effect.
Instagram introduced face filters in 2017. Back then, you could add animal ears, glasses, math equations swirling around someone's head, etc.
Today, there are so many face filters, and they are so advanced that you can do almost anything. You can elongate and curve your eyelashes, turn yourself into a 3D cartoon, apply make-up, turn into a Disney character, and more!
Face filters are available while using the built-in camera when you're doing Instagram Stories. Next to the shutter button, you'll see icons for some of the most used Instagram filters. Usually, you'll find some face filters here as they are very popular.
However, you can look for more filters and search for specific topics using the Explore Filters section. You can find it by scrolling all the suggested filters until you reach an icon with a magnifying glass.
There are usually face filters in most categories. For example, in the Humor section, you can find OhMyFace or Angry Anime Face, while in the Appearance one, you'll find filters to color your hair or apply eye shadow.
To find specific effects, you can use the Search tool. You can type something generic like Face Filters or specific like eyelashes or skin tone.
9 Most Popular Instagram Filters
These are some of the most popular Instagram filters for your photos.
Lo-Fi

The Lo-Fi Instagram filter increases the contrast by intensifying shadows and brightening the highlights. It also adds a blue tone to the greens.
This is one of my favorite Instagram filters for urban photos or cityscapes.
X Pro II
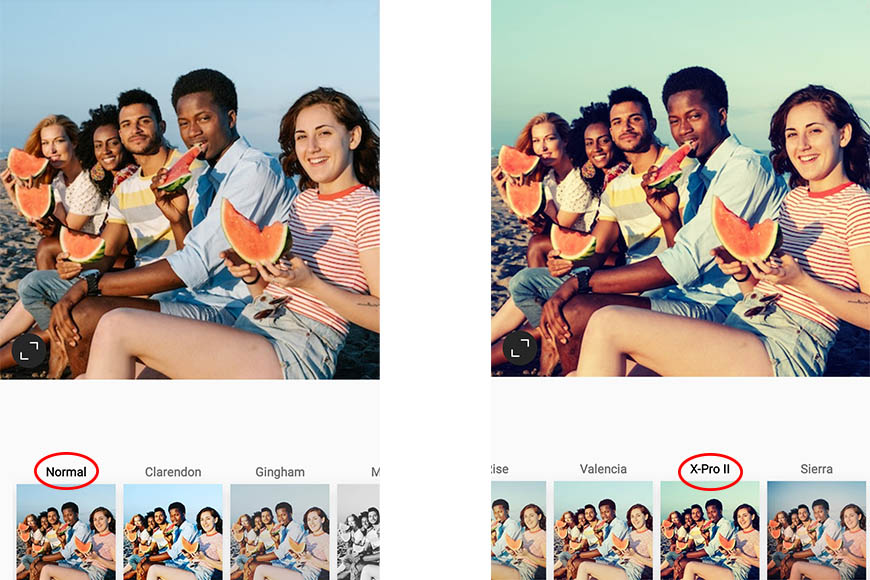
The X Pro II Instagram filter adjusts the saturation of your photos and adds a green hue to them. It's one of the Instagram filters you can use to experiment with cool vintage editing.
Juno
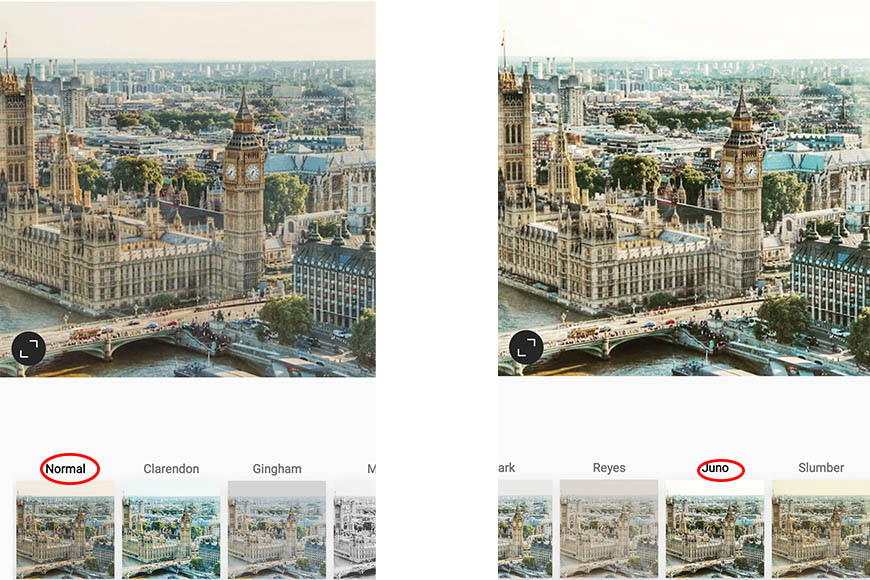
Juno is one of the most popular Instagram filters for all types of editing. This filter increases the contrast and saturation.
So, the Juno Instagram filter is helpful if you want to enhance an otherwise bland picture. However, if your photo is already contrasted, you should adjust the exposure first. Otherwise, you'll blow the highlights and lose detail in the shadows.
Clarendon
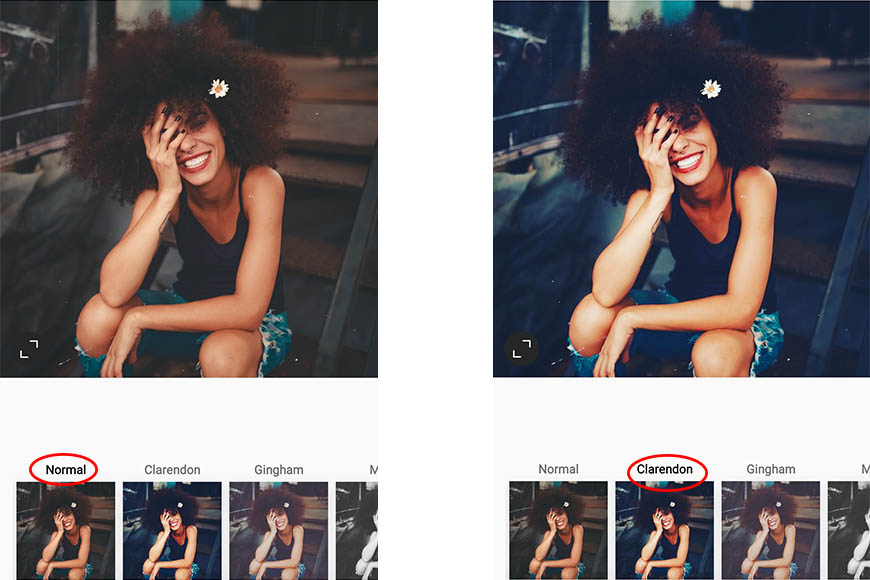
Clarendon is a popular Instagram filter for portraits – whether they are fashion shots or a simple selfie.
It does increase the contrast quite a bit, so be careful. Remember that on top of the filter; you can use the editing tools and adjust the filter's intensity.
This filter is great if you like using cool tones in your posts.
Gingham

If you want to give your images a vintage effect, this Instagram filter is the right one.
The Gingham filter lowers the saturation and adds a white vignette to the image giving an overall look of a fading photo.
You can combine this filter and some color in post-processing to complete the vintage mood.
Ludwig
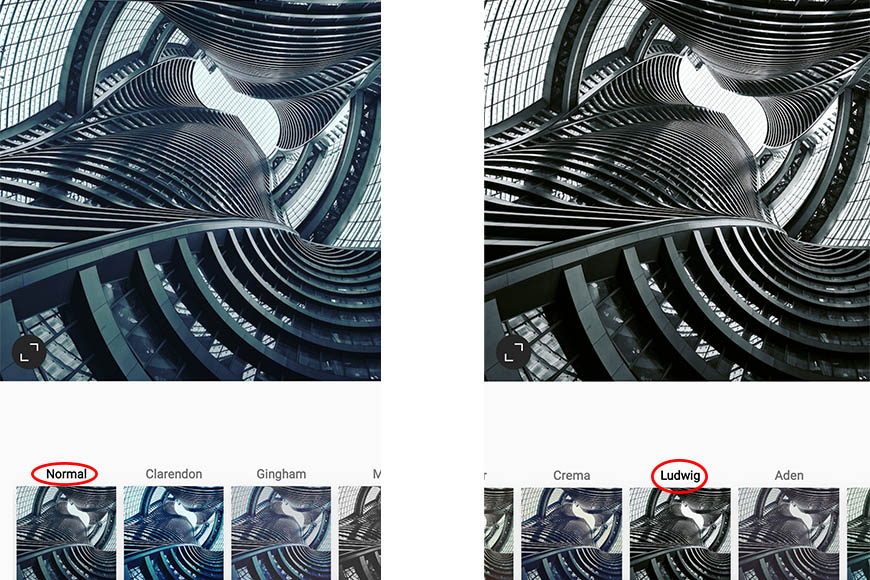
Ludwig is the perfect Instagram filter for architectural images. In fact, it was named after the architect Ludwig Mies van der Rohe.
Using this filter, you enhance the reds and lower the saturation and luminance of the other colors. This is why it's also the perfect filter for black-and-white posts.
Nashville

The Nashville Instagram filter is perfect for friends' photos, selfies, food shots, etc. It increases the exposure a bit and adds a warm color to your posts.
You can use this filter as the last step of your editing process if you want a consistent look in your Instagram layout. This gives you the advantage of having a recognisable style.
Inkwell
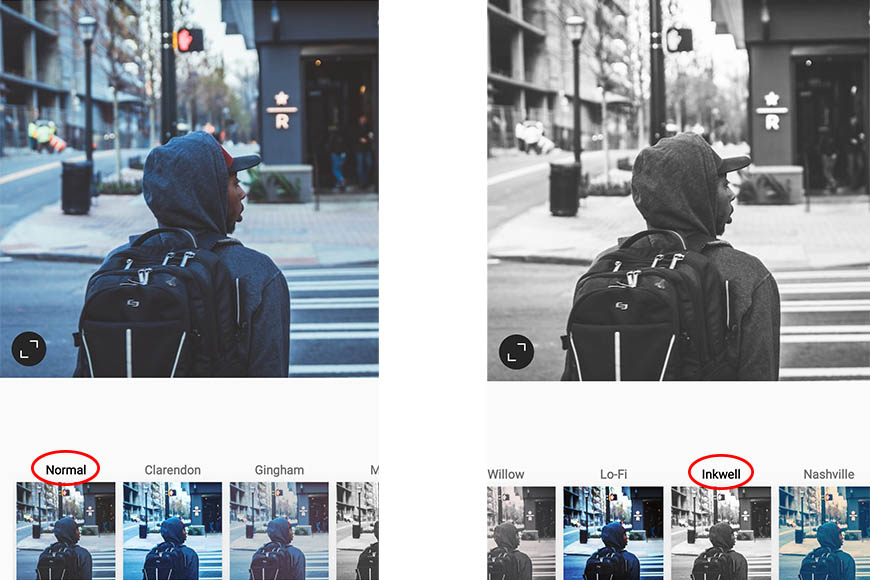
If you like black-and-white photography, this is the best Instagram filter for you. Whether you photograph still life, architecture, or landscapes, you can use this filter as part of your post-processing.
The Inkwell filter turns your color photos into contrasted black and white. It's also suitable for portraits if you want to separate the subject from the background. Just ensure the sky isn't too bright, or you'll overexpose it.
Moon
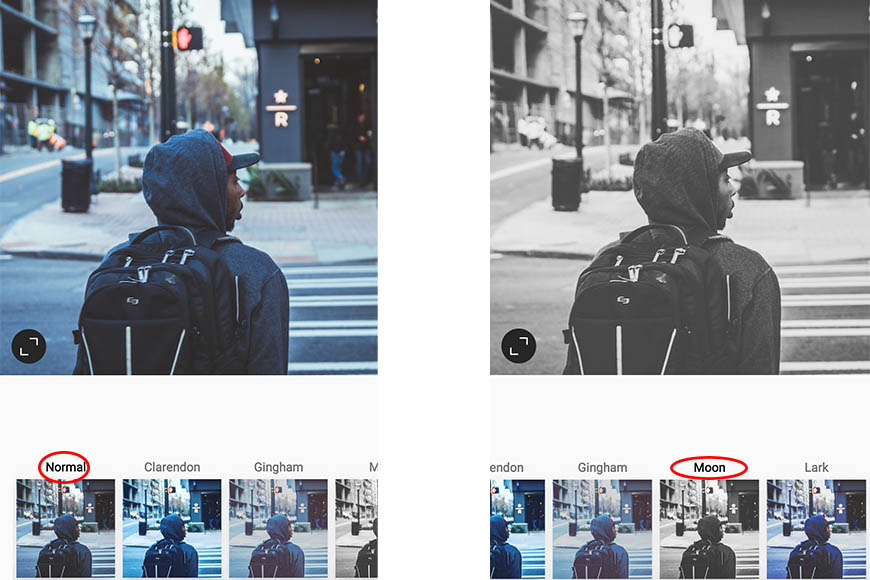
Luna is another Instagram filter that turns your photos to black and white. However, the advantage of this one over Inkwell is that it doesn't adds contrast. So, it makes stunning monochrome portraits.
The Luna filter brightens your image and gives you a more muted grayscale version.
How to Choose the Best Instagram Filters for Your Photos
There isn't just one Instagram filter that's best for a picture – it all depends on your taste and style.
Some filters were created for a specific type of photo, but that doesn't mean they only work with those.
The best way to choose the Instagram filter is by experimenting. Fortunately, the Instagram app allows you to try all the filters before you upload your photo.
You can also modify the intensity of the effect on each photo. You also have the ability to edit your pictures before and after applying a filter.
How to Create Custom Filters on Instagram
You can't upload or save a custom filter on an Instagram post. You can, however, customise the ones already available. This is how you can do it.
- Select a filter to apply to your post.
- Tap a second time on the filter to open the adjustment screen.
- Use the slider to decrease the intensity – by default, it's set to 100.
- Tap on Done to apply the changes.
- Tap on Edit.
- Use the editing tools to adjust the final look of your photo.
Using Instagram Stories or Reels, you can upload your camera effects and filters. For example, you can do this using Spark AR Studio.
See also: How to add filters to iPhone photos
- Once you've finished creating your filter, go to File > Export & Upload.
- Check that your file meets Instagram's requirements.
- Select Publish New Effect.
- Click Upload – this will take you to the publishing website.
- Here, choose Instagram, name and keyword your effects, etc.
- Click on Save.
- Go to the Demo Video section and choose Open in Instagram.
- Copy the text link.
- Launch Instagram and test the effects.
- Submit.
How Can You Apply a Filter to an Instagram Story?
- Open the Instagram app and tap the camera icon in the top-left corner of the screen to access the camera.
- Take a photo or record a video by pressing and holding the capture button. You can also swipe up or down to access your camera roll and select a photo or video from there.
- Once you have your photo or video, you can swipe left or right to browse through the available filters. The filters are located at the bottom of the screen.
- Tap on a filter to preview it on your photo or video. You can also adjust the intensity of the filter by using the slider on the left side of the screen.
- If you want to add additional effects, you can swipe left or right to access other features like text, stickers, or drawing tools.
- When you're happy with your Story, tap the Your Story icon in the bottom-left corner of the screen to share it with your followers.
You can download some free Instagram Story templates too.
Instagram Filter FAQs
Is there an app for Instagram filters?
Almost any photo app you download is good for creating a filter. You have to edit your images there before you upload them to Instagram to do your Stories, Reels or posts. Some of the most popular are VSCO, Lightroom, and Snapseed.
What filters do celebrities use on Instagram?
Many celebrities use trending effects on their Stories as this will get more views. They can also use a popular filter since they can be followed with hashtags.
However, many create their own. Some of the most famous are Rain on Me by Lady Gaga, The Truth Hurts Effect by Lizzo, and Me by Taylor Swift.
Why can't I find filters on Instagram?
All versions of Instagram support filters. If you can't see them, try closing the app and relaunching it. If this doesn't work, uninstall it and install it again.

Check out these 8 essential tools to help you succeed as a professional photographer.
Includes limited-time discounts.

Ana Mireles is a Mexican researcher that specializes in photography and communications for the arts and culture sector.

👋 WELCOME TO SHOTKIT!
🔥 Popular NOW:
