


Guide to Vintage Photography (Old School Photo Ideas!)
Create cool, nostalgic, retro-style photos with this guide to vintage photography! Best tips for styling, post-production effects and more.
Learn | Photography Guides | By Ana Mireles
Shotkit may earn a commission on affiliate links. Learn more.
Vintage, retro, old-style… more than ever, the past is dominating every trend. We learned how to bake our own bread at home. Vinyl sales exceeded CD sales for the first time in 34 years. And Netflix is bursting with TV series set in the nostalgic past.
Photography is no exception to this tendency. Every photo editing app has a selection of vintage filters, and these looks are the ones that get the most likes on social media.
On top of that, analog / film photography started gaining strength again and even Kodak put some classics like Ektachrome and Kodachrome back in production.
So, if you haven’t done it already, you should give vintage photography a try using some of these tips.
And if you've already adopted this photography style, read on just the same – they may just help you to up your game to the next level.
What is Vintage Photography?
The photographic term vintage photography has been used in many ways and it’s a bit open to interpretation.
The way I see it, a vintage photograph is made with a technique from a previous time, for example using an analog camera and shooting with 35mm film.
Vintage photographic style, on the other hand, is using contemporary means to emulate the look of an old process or material.
In this article, I’ll give you some tips on how to make vintage-style images and from there you can experiment to reach your own conclusions.
How can I make my photos look vintage?
Creating vintage or vintage-style photos comes down to two key elements. One part is the aesthetic look (the colors, texture, etc.), and the other is the content of the photo (the concept, scenery, styling, and so on).
Here I’ll give you some tips to improve both of them, but if you just want to make some quick adjustments there are some amazing things that you can do right from your phone.
Snapseed is a free photo-editing app that has some great Vintage filters for the color cast and vignettes. You can complement them with the Grainy Film or Grunge photoshoot filters to add some texture.
If you’re an Adobe fan, then you can use Photoshop Express (which is also free, by the way). There you can use any of the presets to add a color cast or mimic a tint. Then you can add Light-Leaks, Bokeh, and even Paper textures that give a vintage photography effect.
- Read more: Why do photographers add grain to photos?
12 Vintage Photography Tips
If smartphone vintage styles tickle your curiosity and you want to turn vintage photography into an art form, try some of these tips to continue improving and exploring vintage photography.
1. Add noise

Credit: Valeria Boltneva
Unlike digital photography where you can change the ISO value for each photo, films had a fixed ISO. In other words, you had to use the ISO that you had loaded in the camera.
In the same way that using a higher ISO will cause noise in digital photography, in the film it would create grain.
So, a 400 ISO film would have a more noticeable grain than a 100 ISO. Then, this could be increased by different factors.
For example, since you couldn’t change the ISO, you could adjust the sensitivity in a developing process called pulling or pushing; this created grain.
Also, different types of developers created different grain. For example, non-solvent developers will create sharper and more contrasted photos but they will have more visible grain – see our tutorial on how to develop black and white film.
In short, vintage photography often had a noticeable grain. This can be ‘faked’ by adding digital noise in Photoshop or other programs.
2. Fake dust and scratches
Credit: Boly
In the process of developing, printing and scanning, a film photograph can get blurred, damaged, and very often would get dust in it.
So if you want to give the viewer the sense that your photograph was made a long time ago, physically manipulated, and then scanned for them to be seeing it now, you can add dust and scratches.
This can be done with Lightroom presets or adding texture to your images in Photoshop.
See also our guide to the best photo scanner if you're looking for a way to get your old photos into your computer for editing.
3. Manipulate the colors
Credit: Caleb George
With retro film cameras (see guide), each film had a specific color cast that was very characteristic. Also, color film photography doesn't last as well as black and white, which is why in time it starts to lose some saturation or get biassed.
You can achieve this type of look by lowering the saturation of your images. There are also many presets and actions for Lightroom and Photoshop that do it automatically.
4. Add borders
Credit: Rodolfo Clix
Vintage prints have all sorts of borders. From the brackets of the film if it was made as a contact sheet, to extra paper for aesthetic looks or to fix into photo albums.
Polaroids had the frame that contained the chemicals that allowed for it to be developed when you pulled it out of the camera.
So, there’s a wide variety of frames that can give a vintage look to your photos.
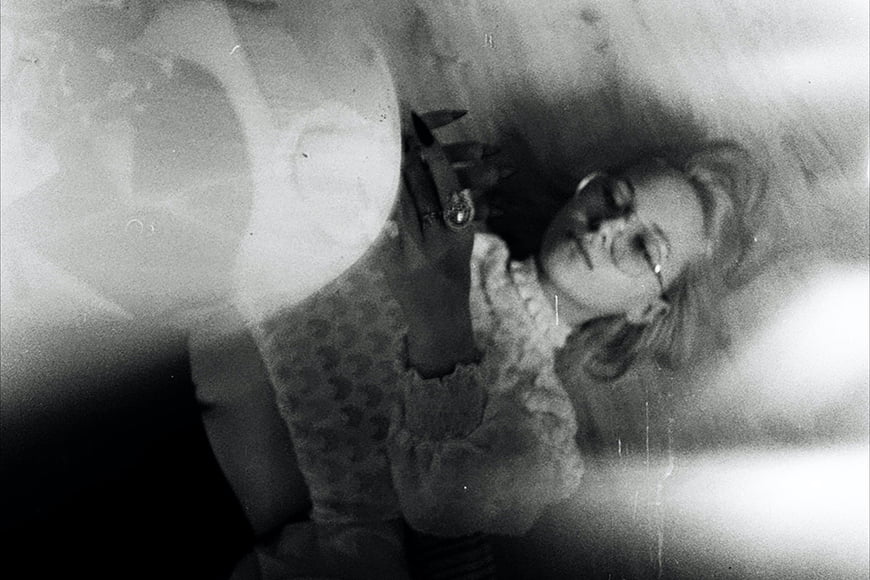
5. Mimic darkroom techniques in post-production
Credit: Scott Evans
You might think that editing or manipulating images is something that came around with Photoshop, but it’s the other way around. Many Photoshop plugins, tools and filters come from the analog era.
There are several techniques and effects that photographers used to do in the darkroom and you can recreate them digitally with different software.
Some of them are included as presets; others are more complex and you’ll have to do them step by step.
Just to give you an example, you can mimic cross processing. In film photography, this was done by using developing chemicals that didn’t correspond to the type of film.
You could develop a negative film, which needed a C-41 process with the E-6 that was supposed to be for slide film and vice versa.
This would create a special look in the colors of the image like the example image shown here.
A similar look can be achieved in Photoshop or Photoshop Elements by adding a Curves adjustment layer and then choosing the preset Cross Process.
6. Use special software
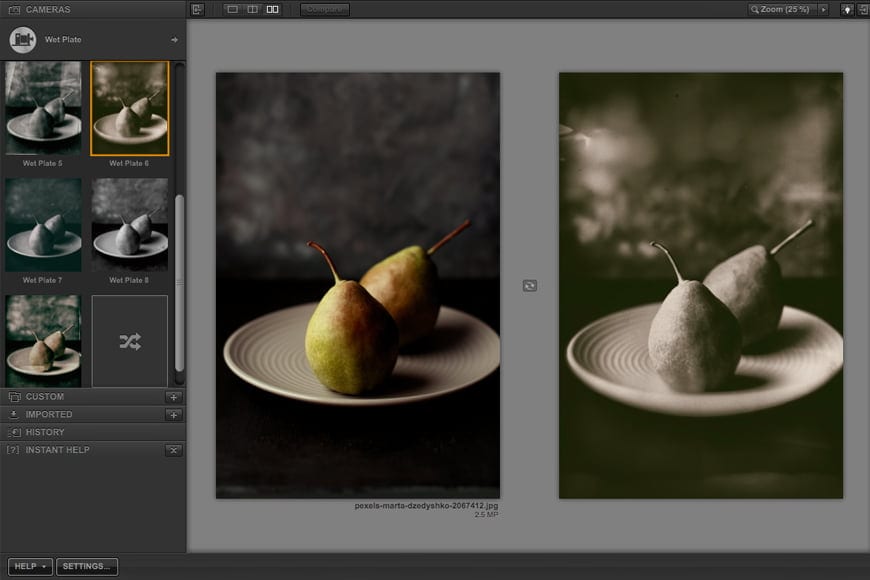
Credit: Marta Dzedyshko
Aside from Instagram filters or Lightroom presets, if you want to get serious about vintage photography there's software that will give you many more options.
My favorite is the Analog Effex Pro 2 from the Nik collection. With it, you can choose from different types of cameras, films, and techniques that you want to use to create the look.
There are some amazing presets or you can do everything customized by you with an amazing amount of control.
Most editing apps these days also have a Sepia filter, which can give your photos that nostalgic vintage vibe. Check out our guide for how to add the sepia effects.
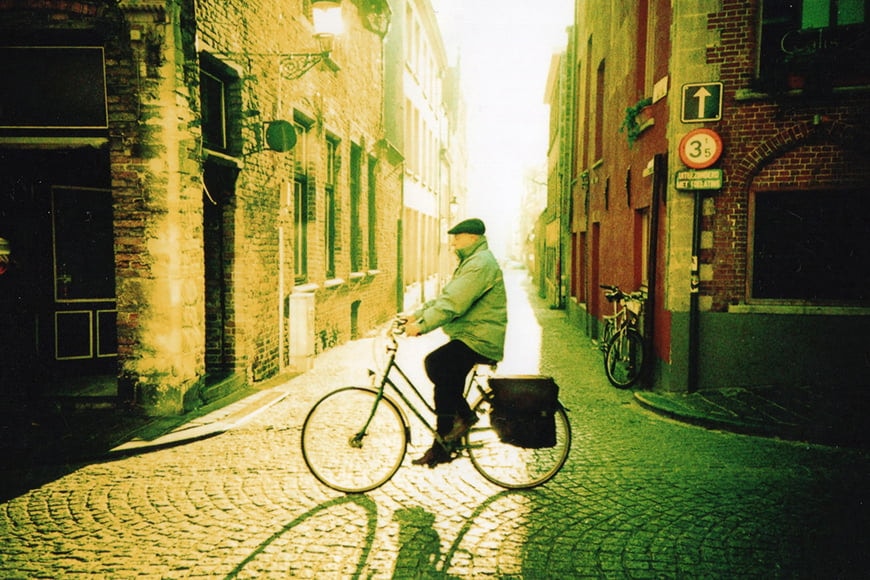
7. Choose a historical period
Credit: Giovanni Calia
Historic and cultural situations had an impact on photography as well. It wasn’t just about what was in fashion but also what was available at the time, technically speaking.
Or even what was allowed, if you consider extreme situations like war or dictatorships. So, another way to do vintage photography is to choose a period to emulate. There's a lot of information that you can find just by searching on Google.
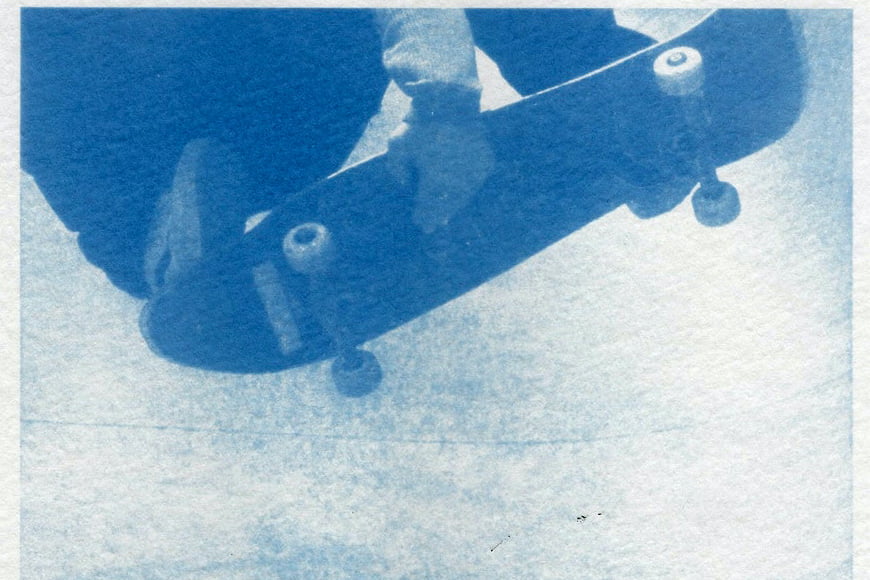
Let see an example. The cyanotype was a very popular printing technique in Victorian England. It’s really appealing as it produces images in a beautiful blue-cyan tone like the one you see in the example image.
This is still possible to do if you want to get into the darkroom, but even if you want to stick to digital, there are ways to get that same look in post-production.
8. Photograph vintage subjects

Credit: Skitterphoto
For more realistic results, you need the style to be coherent with the subjects that you’re photographing.
If you're portraying a person working on a laptop, it won’t make much sense to add a retro look. If instead, they're using a typewriter then your image will be much more compelling.
There are all sorts of ways to find vintage subjects. You can visit flea-markets or thrift shops for the props.
Use historical centers as locations or find abandoned places – just make sure they are safe and legal to visit.
Also, cast and style your subjects appropriately. Doing this, you’ll find the experience all the more enjoyable.
9. Match the style
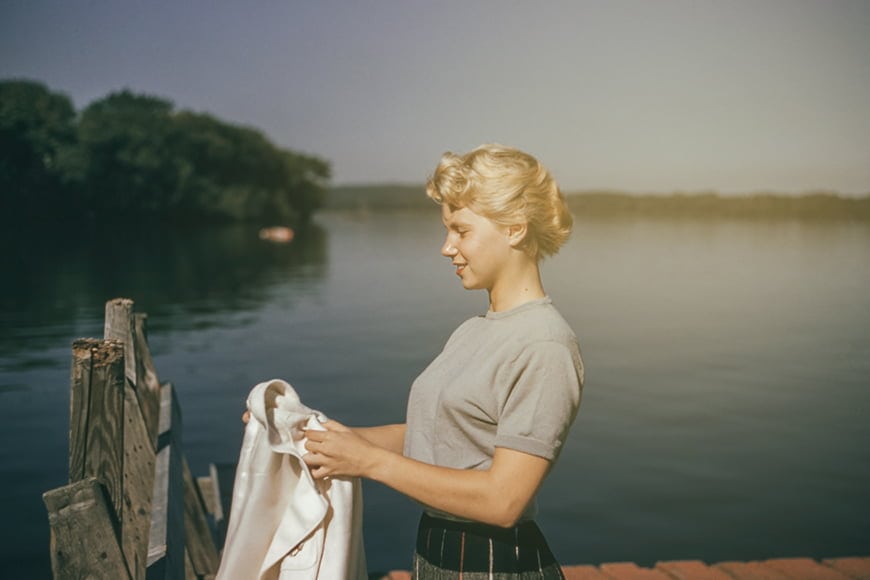
Photos from vintage cameras often feature washes of light. | Credit: Les Anderson
Photography is not the only thing that changed in time. Colors, fashion, styling, and many other elements are different too in each period.
For example, if you’re doing a portrait, you need to include the beauty and fashion trends of the time you’re recreating.
There's a difference between the hourglass figure of Marilyn Monroe, who was considered the iconic beauty in the 1950s, and Kate Moss and the ultra-thin trend that followed the fashion models since the ’90s.
You need to put the same attention to hairstyles, makeup, clothing, and even posing. In general, to make a professional vintage-style photoshoot there are many things to consider.
One good idea is to look for famous images of that time period and study their style. Then, try to match it as best as you can.
10. No chimping
Film cameras had the advantage of spontaneity. | Credit: Muhammadtaha Ibrahim Ma’aji
With vintage photography, there was no way of knowing how the photograph came out until you had developed it (except for Polaroid and instant films of course).
Because there were no previews, you couldn’t see at the moment if the photos were right or wrong. You couldn't delete them either.
Thanks to this, often you would find unexpected results when you finally got your prints. Sometimes it was bad news because the image wasn’t exposed correctly or had some other mistake.
Other times, you’d find pleasant surprises – like you'd captured a wonderfully spontaneous expression on your subject, or a flattering light leak.
So, one way to recreate the vintage concept in your pictures is to avoid chimping. Turn off the preview option on your camera and just start shooting.
When you finally see the images at the end of the day you’ll see how the photos came out and choose the ones you want to edit and print.
You can then add a vintage photography look in post-production and you’ll see how you’ll end up with very convincing results.
11. Try film photography

Credit: Donatello Trisolino
There’s no better way to do a vintage photo than actually using vintage cameras. So, load some film, and go out to shoot.
Not only will it improve your photographic skills but you’ll get the looks you want from the source. You can develop and print at home if you’re feeling particularly inspired and you have the space to do it.
If not, there are many labs that can still process your images. They can be found locally or you can mail the film to them and receive the negatives and prints back to your house.
Then of course you’ll need to think about the content of the image, the styling of the subject, and matching the style. Check out the previous tips for some advice about that.
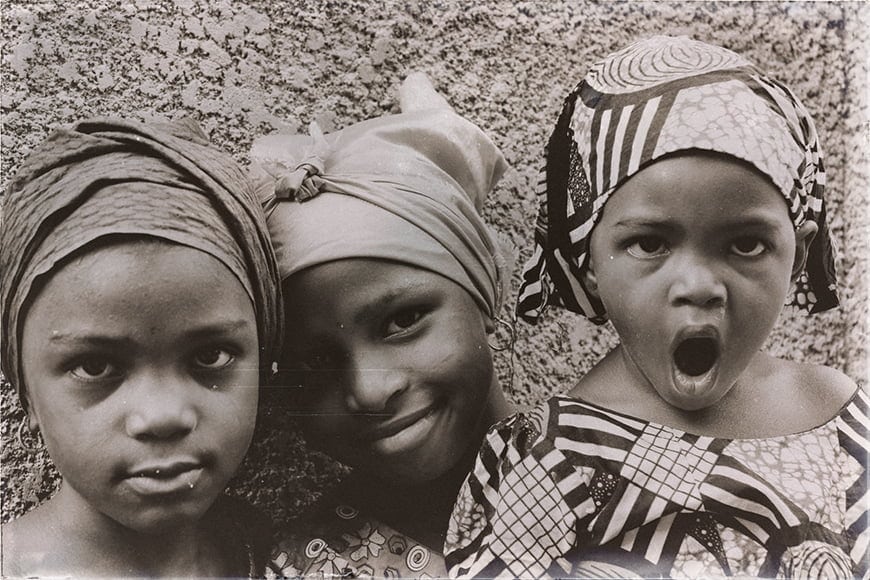
12. Increase your visual culture

Credit: Cesar Hiar
If you want to create good and professional vintage photography, you need to know how it was originally. Photography has almost 200 years of history. There have been all sorts of techniques, genres, and styles.
The best way to improve your vintage photographs is to get inspired by the real thing. You can go to museums, archives, libraries, and any other source you can find.
Study the famous photographers from the period you’re trying to emulate and learn what made their style an art form.
Once you have a clear idea of the results you need to obtain, it will be much easier to find a way to do it.
Vintage Photography FAQs
How do you take good vintage photos?
Start by getting to know and understand vintage techniques so you can replicate them. Make the themes and styling of the shoot match the vintage effects, and keep your photos a little soft rather than super crisp and clear. Check out more tips above.
How can I change my photos to look vintage?
You can replicate a vintage feel using post-processing techniques (changing the colors, adding film grain and light leaks, etc). For an even easier option, many apps nowadays offer filters or presets that allow you to apply a vintage look with just a few clicks.
What is the best vintage photo app?
Snapseed is great for creating vintage effects – it's available on iOS, Android and web and is completely free. Photoshop Express is also free and offers excellent functionality.
Final Words
That's it – as you can see, there's more to it than a simple photography style. I hope you enjoyed this trip to the past and that you can use these tips to gain more experience.
Let us know your favorite styles and time periods, or share the website of a vintage photographer. Don’t forget to post your own tips or ask any questions in the comments section below.

Check out these 8 essential tools to help you succeed as a professional photographer.
Includes limited-time discounts.

Ana Mireles is a Mexican researcher that specializes in photography and communications for the arts and culture sector.
👋 WELCOME TO SHOTKIT!
🔥 Popular NOW:
