


Lightroom HDR Tutorial
Want to know how to create HDR images in Lightroom? This tutorial is for you! Learn more about high dynamic range photos with this guide.
Lightroom | Software | By Erin Spiller
Shotkit may earn a commission on affiliate links. Learn more.
Using the Adobe Lightroom Photo Merge feature to create HDR photos is a simple and fun way to give your images more punch.
The photography term HDR or ‘High Dynamic Range' photos are used to capture scenes that have a large dynamic range.
Dynamic Range is the measure of the range of light intensities from shadows to highlights, and HDR photography is a popular technique to create vibrant, powerful photos.
To take HDR photos, you need to ‘bracket' your exposures, by taking multiple identical images with the exposure altered by approximately 3 stops.
Popular course reveals the simple tricks to getting incredible results with Lightroom in record time. Give Your Photos The Look They Deserve!
![]()
Most modern digital cameras have an exposure bracketing feature, or you can simply change your shutter speed or ISO to bracket manually.
Once you have your bracketed images, it's time to head into Adobe Lightroom to create your HDR photo merge.
You need a post-June 2018 version of Lightroom Classic 7.4 to access the photo merge feature.
Get the latest version of Lightroom here, or as an alternative, try Aurora HDR which provides even better results.
Lightroom HDR Summary
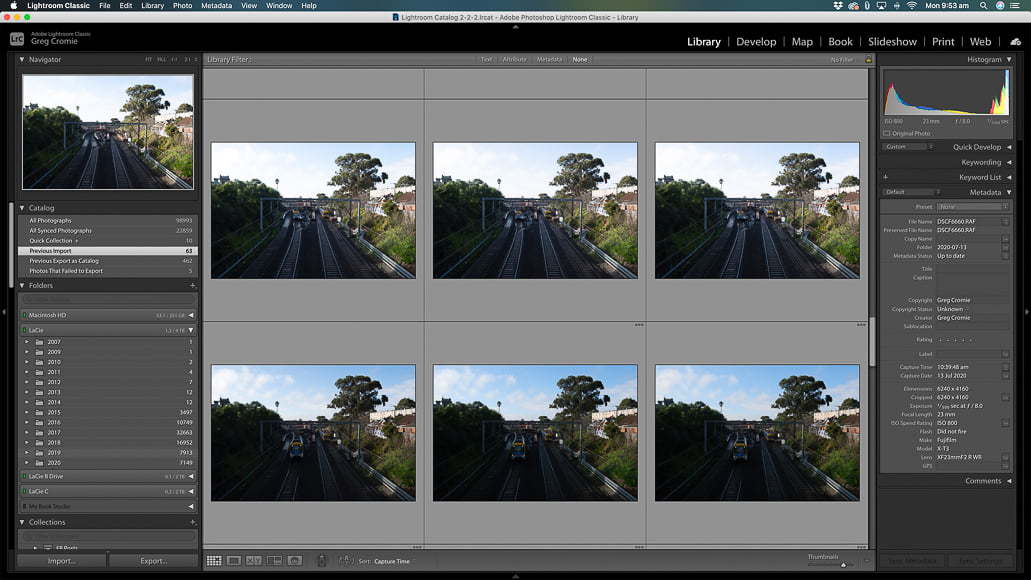
Cmd/Ctrl+click each of the images in the Lightroom Classic Library module to select them. In the menu, select Photo > Photo Merge > HDR or press Ctrl+H. In the HDR Merge Preview dialog, choose the Auto Align option if you didn't use a steady tripod, and Auto Tone to provide an evenly-toned merged image.
How to Create an HDR Image in Lightroom
Lightroom is ideal for all levels of photographers. Whether it's your first time creating an HDR merge or you simply want to take advantage of the speed and accuracy that this software provides, using Lightroom is a fantastic and easy way to create awesome high dynamic range photos.
The purpose of a photo with high dynamic range (HDR) is to create an image with as much detail as possible in the shadows, midtones, and highlights.
It can often be quite difficult to capture photos – especially landscapes – that are exposed for both the shadows and highlights. HDR photography ensures that your shadows aren't blacked out and your highlights aren't blown out either.
So let's take a look at the steps you need to take to arrive at a beautiful HDR image.
1. Gather Your Photos
The first thing you need to do, of course, is head out and photograph your scene. As mentioned above, you need to take multiple frames with varying levels of exposure which you can later merge together.
So how many photos do you need?
The trick to creating detailed, crisp HDR images is to use the smallest number of photos possible so you won't have to worry about photo ghosting later on. Less is more!
That said, sometimes it isn't possible to only use 2-3 images and that's okay. HDR images are usually made up of 3-7 photos, so use your best judgement to determine how many photos you need.
Of course, in some situations, you will have no choice but to take more images to get the optimal dynamic range. It varies in each situation, so you may need to play around with the number of exposures to get it right.
It's better to shoot more so you have more options and get a better quality final HDR image. Once you start getting used to shooting for HDR, you won't necessarily have to shoot as many photos in one session.
It's also very important to use a tripod for HDR photography.
Lightroom essentially layers your images on top of one another and uses the best exposed components of each frame to create a perfectly exposed picture.
If you use a tripod, you will know that your photos are as sharp as they possibly can be.
On top of that, the photos need to be identical. Too much image shake or movement in the frame and you will not get a sharp, clean final HDR image.
Sometimes, there is subtle movement from wind or people walking, but we'll get to that later!
Most digital SLR cameras have a feature to automatically take bracketed exposures. This helps reduce image shake and also saves time.
You can choose how many exposures you want taken. This is a good option if you're worried about capturing identical frames.
You can also bracket your exposures manually by changing ISO or shutter speed. Never change the aperture, however, because it will change which details are sharp and which are blurred and make it very obvious in the final stages that you altered the image.
The goal here is to make it appear as though you took a single image, so keep that in mind.
2. Select Your HDR Options in Lightroom

After you've taken all your shots, import your RAW files into Lightroom Classic. Don't make any edits yet, though.
Cmd/Ctrl+click all the images you want used to create your first HDR photo. (This is the standard way to select multiple images in Lightroom.)
Then, choose Photo > Photo Merge > HDR, or use the shortcut Ctrl+H.
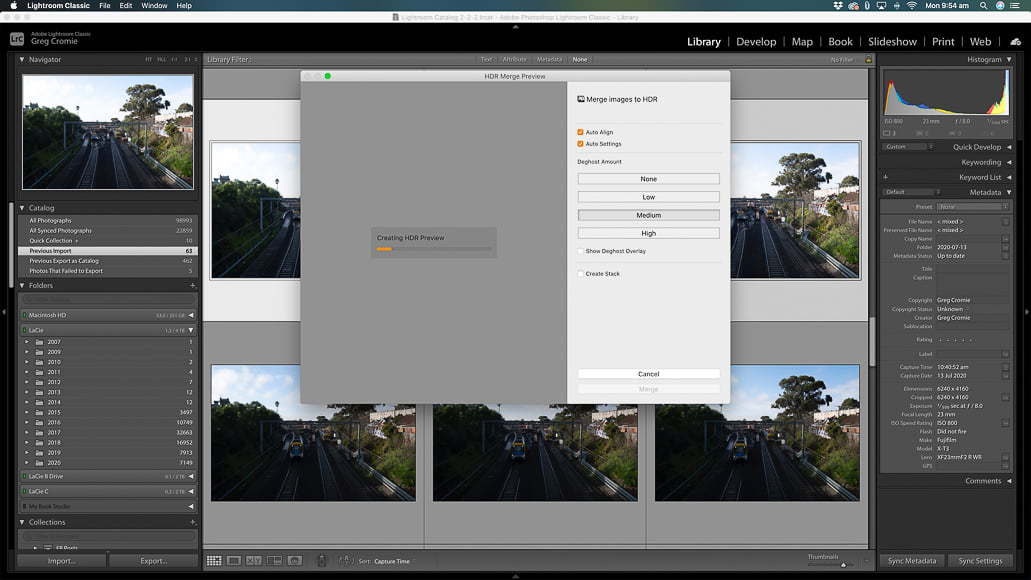
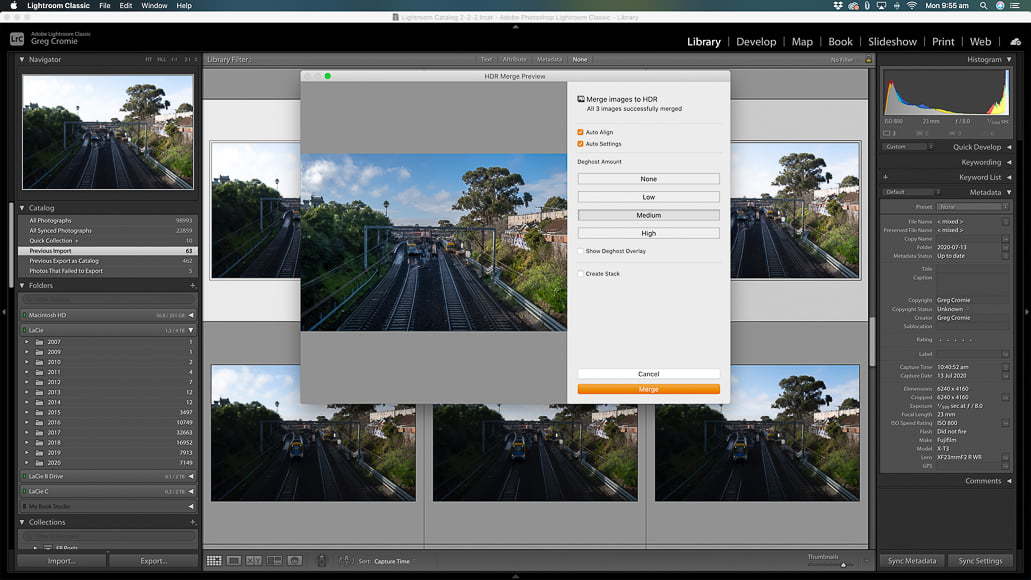
It may take a minute to process, then you will see an HDR Merge Preview. If it doesn't look quite how it's supposed to, you can go back and select more or less images until you achieve your desired results.
From there, you have the option to select or deselect Auto Align and Auto Tone, and to apply deghosting. Let's explore each of these options in turn.
Auto Align
Auto Align is made more for any handheld exposures, but if it was a windy day or you were bracketing manually, you can select this option to make sure all of your images are aligned properly.
If you used a tripod, you most likely will not need to select this option, but it's good to try it out just in case you missed a few details.
Auto Tone
Auto Tone will help with colour correction. If you were shooting a sunrise, for example, there is a good chance the sky may have changed colour (even subtly), so it's important that the images are colour corrected now to avoid weird tones later on.
Deghost Amount
Ghosting occurs when there is movement in between exposures, so your final HDR image may appear to have translucent layers. Auto Align might fix some of the movement, but if it doesn't, Deghosting is a good tool to use.
There is a higher risk of ghosting with situations requiring more images, handheld shooting, or windy conditions. Rather than going into Photoshop and trying to put together bits and pieces, you can save an enormous amount of time, effort, and learning by simply using this feature.
Luckily, you have options to reduce ghosting (deghosting) in Lightroom during the process. In the HDR Merge Preview, you can choose from a range of options to remove ghosting, based on how much there is in your photo.

If you don't have any ghosting, select None and you can move on.
If you see some ghosting and want to get rid of it, you have a few different options. Choose from Low, Medium, or High levels of deghosting. Start with the lowest option and increase it until you no longer see any ghosting.
You can choose to see a preview of what each option will do to your image, which is a fantastic feature. It may take a little longer for HDR photos comprised of more photos, so be patient if it takes a few seconds to load.
This should eliminate all your deghosting. If it doesn't, and you still see a noticeable amount, it most likely means that your photos were too different and the process didn't work.
If that happens – it's okay! Just choose a different group of exposures and try again.
3. Merge Your Photos
Click Merge and that's it – you're done! Lightroom will create your HDR image as a separate file with a .dng extension. At this point, you can now make your final edits.

Organising Your Photos With Photo Stacks
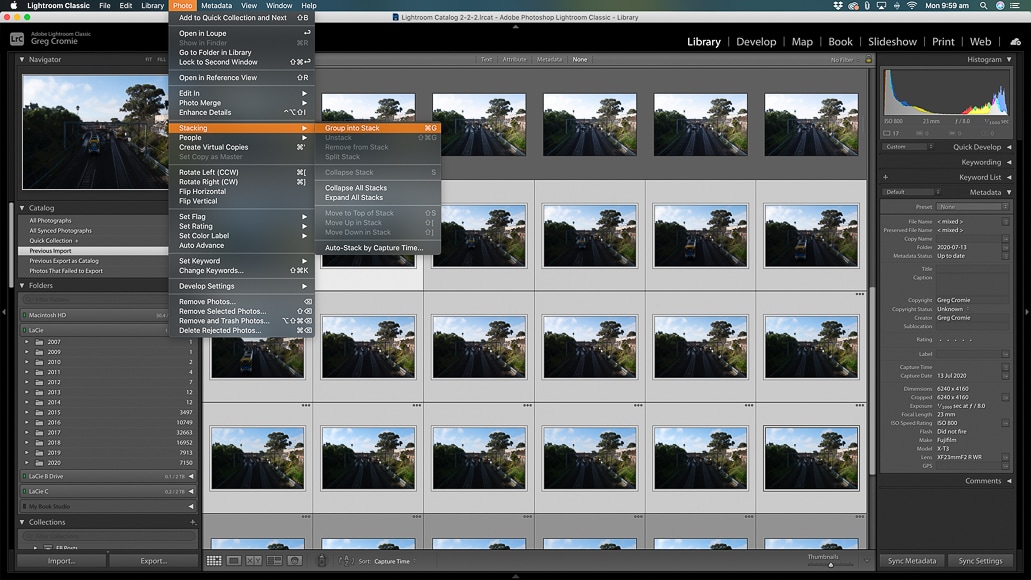
Creating an HDR merge requires you to take multiple photos of the same scene to create one beautiful, final image.
Creating a Stack is the optimal way to keep organized in your Lightroom catalogue. It stacks your images in groups based on capture time.
Normally, you wouldn't be shooting fast enough for your photos to be automatically stacked, which is why you have the option to do so manually.
Making a stack was first made available in Lightroom Classic CC 7.4 and is available in all versions that came after.
This is a great feature for HDR photography because you can easily group and keep track of which photos belong to which image. You will definitely be making multiple attempts to ensure you have a good selection of images to choose from, so organizing all those identical photos can become confusing.
To create a Stack, simply Ctrl+click each image, right-click to display the dropdown menu, and select Create Stack.
Frequently Asked Questions
What is Deghost in Lightroom HDR?
Deghost is a feature in Lightroom to eliminate any translucent layers that may appear in the final image, due to movement between frames in the photography stage of creating an HDR photo.
How do I stack photos in Lightroom for HDR?
To stack photos, simply Ctrl+click the photos you want in the stack, then right-click on any image and select Create Stack. Alternatively, you can use the free Lightroom Enfuse plugin.
How many photos are best for a photo merge using Lightroom?
This varies in every situation, but less is more. If you can make it work with 3, that's awesome, but generally, HDR photos can be created using anywhere from 3-7 exposures. Experimenting with this will help you determine your best option.
Alternative Software to Merge HDR Images
If you're using Lightroom's Photo Merge HDR feature and having subpar results, you should check out a software application called Aurora HDR.
Lightroom is a jack of all trades, but when you need to create the best HDR images, it can fall a little short. Adobe Photoshop does a slightly better job, but it's a lot more complicated to get right.
We find that Aurora HDR does a much more effective job, largely because it was specifically designed to create beautiful and natural-looking HDR images. In other words, it does one thing – but does it really well.
It's also very easy to use.
If you're serious about HDR image creation and want to simplify the process, you can find out more about Aurora HDR here.
Regardless of which software you end up using, we hope you've found this information helpful and that you have fun with the process of creating stunning HDR images!

I am a passionate writer and travel photographer with an affinity for learning new languages; I currently speak English, French, and a little Italian.
👋 WELCOME TO SHOTKIT!
🔥 Popular NOW:
