






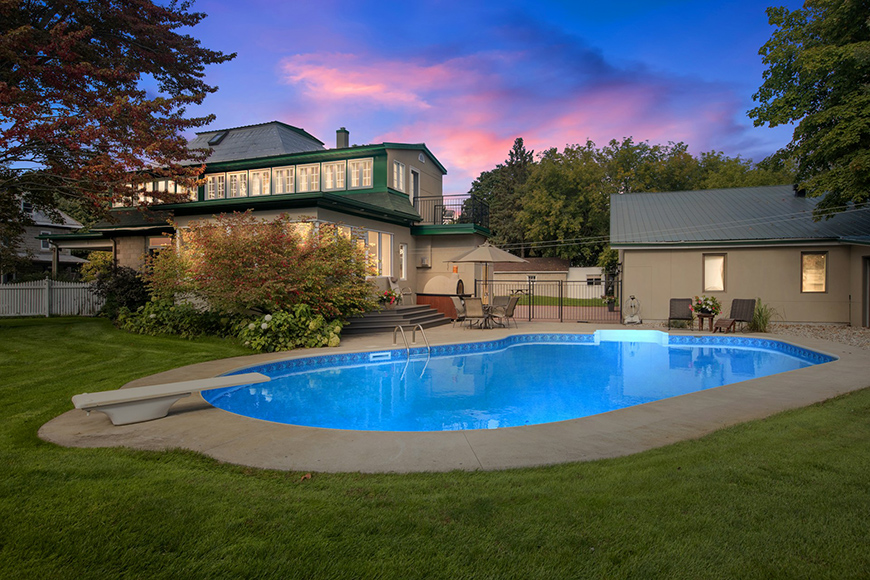
Real Estate Photo Editing with Luminar: Best Tools for Every Scenario
Learn how to edit real estate photos with Luminar, with the best tools and techniques for different shooting scenarios and common photo challenges.
Luminar | Software | Paid Partnership | By Ana Mireles | Last Updated: September 3, 2026
Shotkit may earn a commission on affiliate links. Learn more.
Are you looking for the best way to edit real estate photos?
A great property image can make your listing stand out from hundreds of others and encourage potential buyers to schedule a viewing. But even with careful planning, every shoot presents challenges like bright windows, overcast skies, dark corners, and more.
Whether you’re selling your house or becoming a professional real estate photographer, editing is an essential part of your process.
In this article, I’ll show you how Luminar can help you with this task thanks to a series of tools that target common problems encountered when photographing a property.
Why Use Luminar for Real Estate Photography?
Real estate photography is all about presenting a property in its best possible way while staying true to reality.
Like product and other commercial photographic genres, you have to balance a faithful representation with an inviting aesthetic. This isn’t easy to achieve, especially with the tight schedules and deadlines that you may have.
You can achieve this by highlighting the feature’s properties while minimizing distractions from bad weather, an oversight during the photoshoot, or the camera’s limitations.
Luminar is particularly useful for this type of editing because it combines powerful AI-assisted features with traditional editing tools and offers precise manual controls in both.
Rather than trying to cover every tool in the application, I’ll focus on the features that are most useful for solving common problems faced by real estate photographers.
I’ll also give you a basic real estate photo-editing workflow you can use as a starting point if this is your first time tackling this type of photoshoot.
A Simple Real Estate Photo Editing Workflow in Luminar
There isn’t a single ‘correct’ workflow for editing real estate photos, and many challenges can be solved using different combinations of tools.
As you gain experience, you’ll naturally develop a process that fits your shooting style, turnaround time, and client’s expectations. In the meantime, you can follow this workflow that suits most situations.
- Merge exposures (if you shot bracketed images).
- Correct perspective and lens distortions.
- Balance exposure, contrast, and color.
- Enhance details and overall image quality.
- Remove temporary distractions.
- Replace the sky, if needed and appropriate.
- Export in the format and size required by your client or listing platform.
This workflow is meant to be a useful starting point, but every photoshoot may require a different approach depending on the lighting situation, size and shape of each room, etc.
In the next section, I’ll cover a problem-solution style so you can learn how to use Luminar to edit your real estate photography.
The Best Luminar Features for Real Estate Photography
As I mentioned in the previous section, every photoshoot will face different challenges that require different tools. However, this isn’t the only variable. It’s also important to acknowledge that not everyone editing real estate photos has the same needs.
A homeowner photographing their house for sale only needs one set of photos, and it’s not necessary for them to learn advanced editing techniques.
A real estate agent may regularly shoot properties themselves because there’s no budget for a professional photographer. This also means there isn’t enough budget for them to dedicate hours to photo editing or invest in specialized equipment.
A professional real estate photographer, on the other hand, may need to deliver 25-50 photos per property, or more for larger villas and luxury homes. They usually get paid handsomely and therefore require more advanced editing.
That’s why, in this section, I’ll look at the most useful Luminar tools from a problem-solving perspective. You won’t necessarily need all of them, or you may do a complex workflow that combines them all for a consistent, polished set of images.
The goal is not to learn every tool; it is to introduce you to Luminar and help you easily find the tool you need.
There are also other useful features in Luminar that I won’t cover here. However, we have other guides to help you out, like our guide to SuperSharp AI if you need to recover slight softness, or How to Remove a Color Cast if you need to fix color temperature in mixed-light scenarios.
I encourage you to practice as much as possible and freely explore everything Luminar has to offer. Remember that all edits are non-destructive. So, don’t be afraid to make mistakes – it’s the best way to learn.
Enhance AI
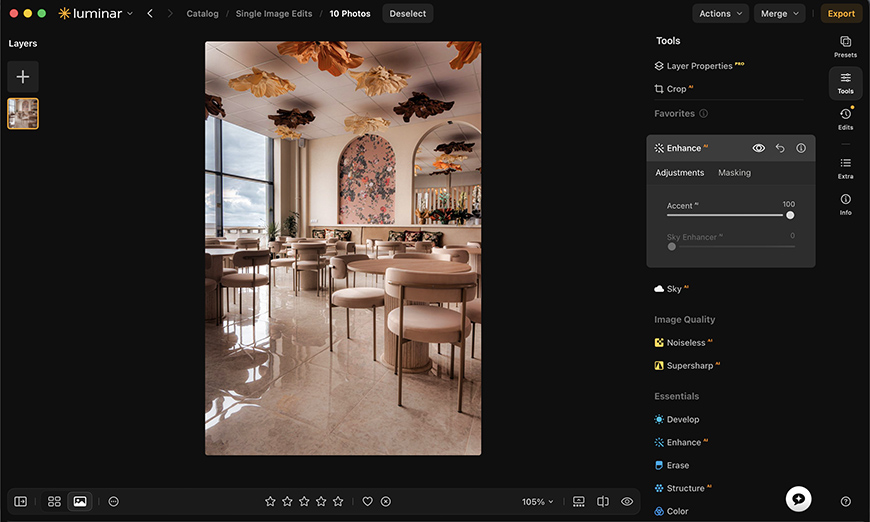
If you’re not looking to spend much time editing and the exposure is already close, Enhance AI may be the tool for you.
Rather than adjusting individual settings, Enhance AI analyzes the photo and intelligently balances exposure, contrast, color, and detail with a single slider called Accent AI.
This tool works both for interior and exterior photos. In fact, for exteriors you’ll also have a second slider called Sky AI.
For photographers, Enhance AI works well as a starting point upon which they can keep fine-tuning. Homeowners and realtors looking to quickly adjust flat-looking photos can use it on its own.
Best for users who want to improve their pictures without learning advanced techniques or wasting time.
HDR Merge
It’s common to find highly contrasted scenes in real estate photography. In the same room, you can have bright windows, deep shadows behind the furniture, well-lit areas close to the window or lamps, and darker ones on the other side.
That’s why exposure bracketing is commonly used. However, not all cameras support internal HDR, and if they do, you might still prefer to do it externally to keep control.
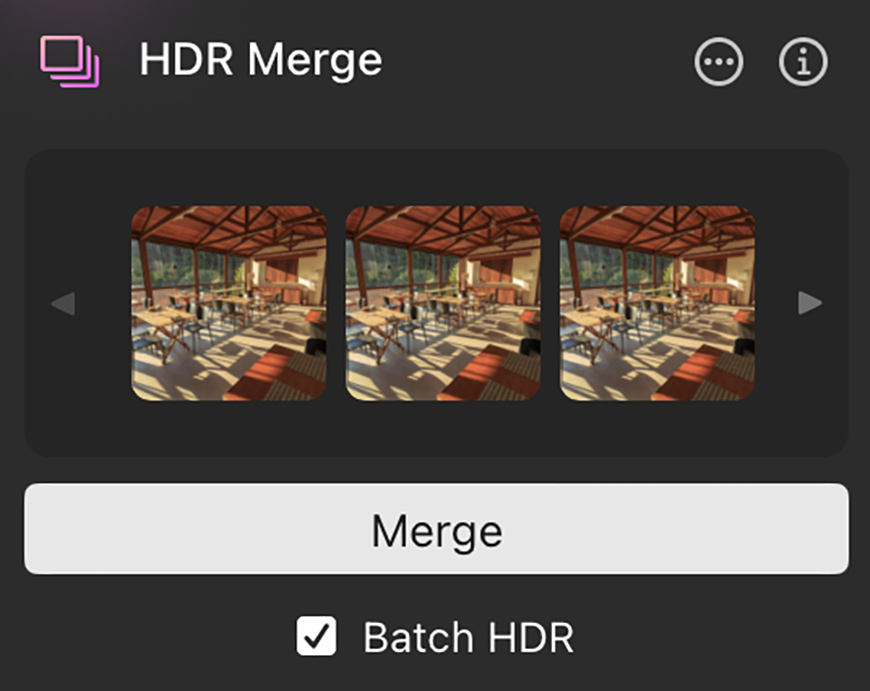
Luminar has HDR Merge, so you can do all your editing with a single program. You’ll find a complete guide in this article, but it’s very straightforward.
Simply import your bracketed images and drag them into HDR Merge. It supports up to 1000, and Luminar will automatically separate them into sets which you can check and adjust before launching the merge.
Then, adjust the settings and upload a reference image if you want. That’s it; Luminar does all the heavy lifting and will produce a high-quality TIFF file per set.
This file will have details in both highlights and shadows, but you can keep editing it if you need to.
For photographers editing dozens of images per listing, Batch HDR Merge can save a considerable amount of time.
Best for high contrast interiors, harsh outdoor conditions, or any bracketed photo set.
Light Depth
Even well-exposed real estate photos can have areas that feel too dark, such as hallways, corners or simply areas that are further away from the window.
To balance the picture, you can try Light Depth, which analyzes the depth of the scene so you can relocate the main light and redistribute the lighting.
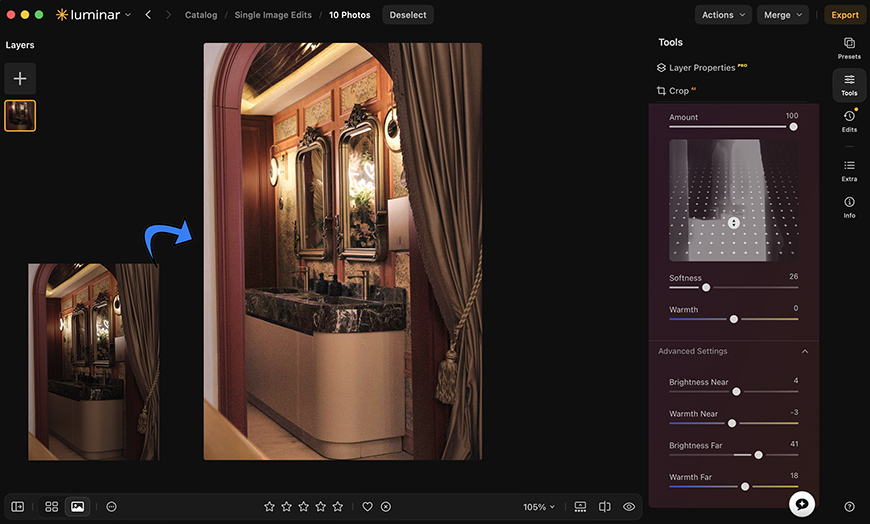
Then, you can adjust how the light falls on the rest of the scene naturally by narrowing or expanding the affected area. Plus, it lets you brighten and change the light temperature of the foreground and background independently.
For real estate photography, this is a real time saver because it means you have to spend less time creating complex masks or making local adjustments.
As with any AI-powered adjustment, subtlety is key. The goal is to reveal details that are already present, not to make the lighting look artificial. If you need a more in-depth guide, check our dedicated Light Depth article.
For more problematic images, you might find our guide to fixing high-contrast photos with Luminar useful.
Best for rooms with uneven light, dark corners, or corridors.
Perspective Correction and Optics
Wide-angle lenses are the go-to choice for real estate photography as they allow you to capture more of a room in a single frame. However, they can also create distortions, especially toward the edges.
Also, tilting the camera upwards or downwards can create perspective distortion, causing parallel vertical lines like doorways or walls to converge.
Correcting these issues is key for architectural accuracy and building buyers’ trust. Luminar has two key features for this: Perspective Correction and Optics.
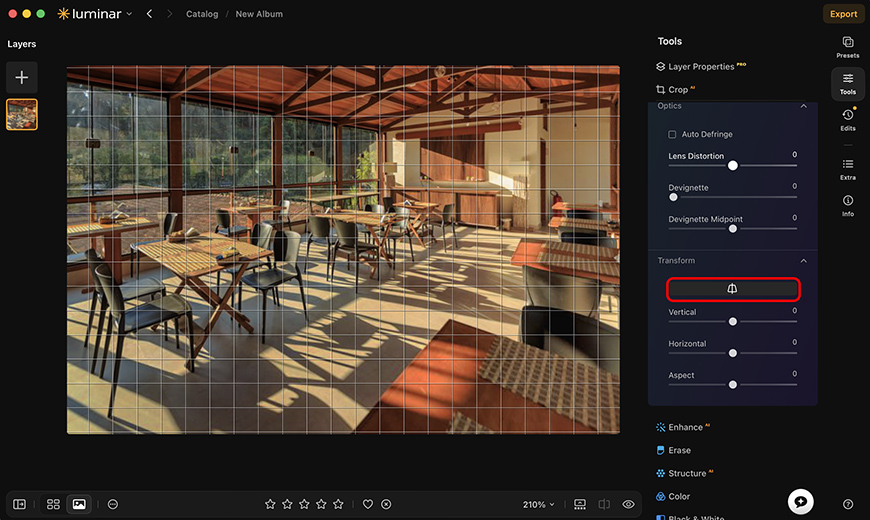
In Luminar’s Perspective Correction, you have a handy Auto tool that you can enable by clicking the first button in the panel. You can further adjust the vertical and horizontal axes manually using sliders.
The Optics tool is designed to correct lens distortion, remove chromatic aberration, and reduce color fringing that can appear around windows or high-contrast edges.
Together, these tools help create clean, natural-looking images that better reflect the property’s true proportions.
Best for wide-angle interior and exterior shots with leaning verticals, lens distortions, or color fringing.
Sky AI
The weather doesn’t always cooperate with the shooting schedule. A cloudy or washed-out sky can take away from an otherwise beautiful property. If rescheduling for better conditions isn’t an option, Luminar’s Sky AI lets you replace the sky with just a few clicks.
This tool may not be suited for everyone. Not all countries or states allow this sort of editing in real estate photography, especially for listings – however, it’s usually allowed for editorial use.
So, it’s best to check the regulations in your area.
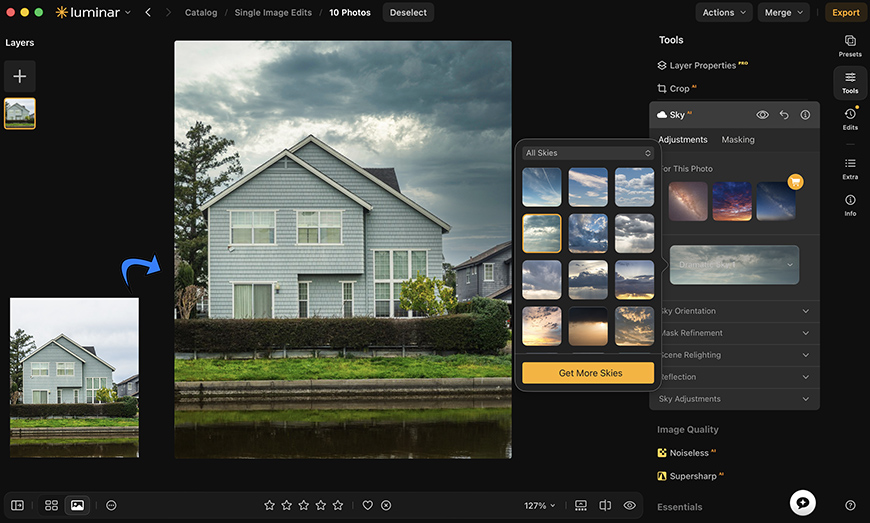
Sky AI analyzes the scene and suggests the best matching skies from the collection, and it creates a mask even with complex details like trees and chimneys.
You can also upload your own sky. This way you can use a sky that matches the lighting and weather conditions of the property’s actual location. You can even use one provided by the property owner, taken on a different day. This will help your images stay as real as possible.
Luminar will automatically adjust the lighting and color of the foreground so it blends seamlessly. The great thing is that you have plenty of easy-to-use controls so you can adjust things and get final say in the outcome. Shotkit has a Sky AI article if you need more guidance.
The great thing about Luminar is that it gives you full control. This way, you can enhance the presentation without misrepresenting the property.
Best for exterior photos taken on overcast days or featureless skies.
Erase
Preparing a property for a photoshoot takes time, but it’s rarely possible to create a spotless scene. Perhaps you miss something that was ‘invisible’ to the eye, but it’s distracting in the shot, or fresh leaves may have fallen onto the pristine backyard by the time you reach that part of the house.
This is where Luminar’s Erase tool can save valuable time. Rather than tidying and cleaning constantly on location, which would make the photoshoot longer, you can quickly remove those distracting elements in seconds using the Erase tool.
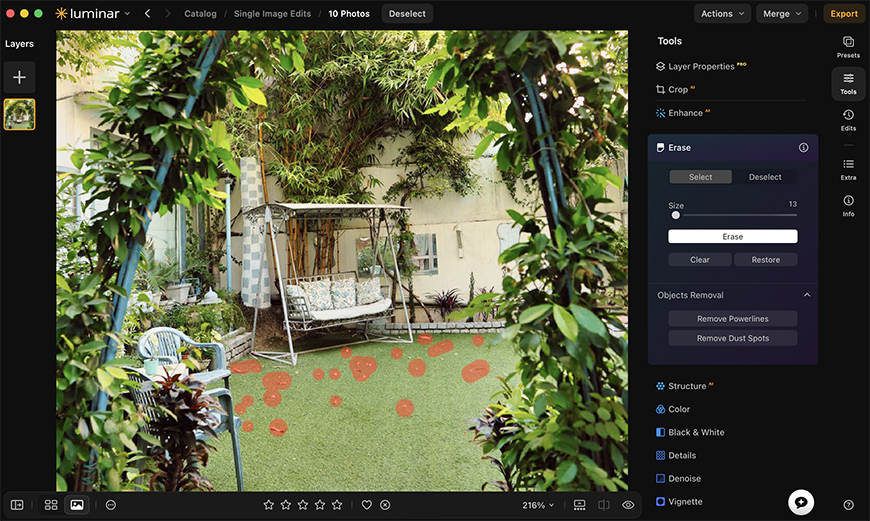
The key here is to use the tool responsibly. The goal isn’t to alter the real conditions of the property – you wouldn’t erase a crack on the wall, for example. Instead, you can use it to remove the temporary distractions that were there when you took the picture.
Best for removing trash cans, fallen leaves, cables, and cleaning up the scene.
Batch editing
Real estate photo shoots can result in anything from 15 images for an average condo to over 40 for larger, luxury states. Editing each one of these images individually not only takes longer, but also makes it harder to maintain a consistent look throughout the gallery.
Luminar’s Batch Processing tools help streamline the workflow by letting you apply the same adjustments, presets and export settings to multiple photos at once.
This is especially useful for images captured under similar lighting conditions, such as a series of interior rooms or exterior shots taken during the same session.
You can even create online galleries with Luminar Spaces for your clients to review and approve without wasting any time.
The result is a fast editing process with a cohesive set of photos for a professional presentation and delivery.
Best for large real estate galleries, multi-room properties, and photographers with multiple photoshoots per week.

Ana Mireles is a Mexican researcher that specializes in photography and communications for the arts and culture sector.
👋 WELCOME TO SHOTKIT!
🔥 Popular NOW: