


13 Sunset Photography Tips for AMAZING results!
From exposure to composition, sunset photography can be trickier than it seems. This guide will help you get the most out of your sunset shots.
Learn | Photography Guides | By Teryani Riggs | Last Updated: January 11, 2025
Shotkit may earn a commission on affiliate links. Learn more.
Sunset photography is a tricky thing to master – this guide will help you get better at it, with 13 tips you can implement today.
Ever take a photo of an amazing sunset and found yourself disappointed? Sunsets are one of the most beautiful features our planet has to offer, yet capturing them well isn't always as easy as it would seem.
Not only are there a few tricks to getting the exposure right, but composition and point of view also play a huge role.
And while amazing sunsets often take us by surprise, proper planning and setup can make a world of difference in the quality of the images you capture.
(You should also check our guide to sunrise vs sunset photography and get some inspiration with our sunset captions.)
Here are 13 sunset photography tips.
13 Sunset Photography Tips | Nailing Exposure
Getting the exposure right with sunsets isn't especially difficult.
The key thing to be aware of is that unless you're shooting in manual or being very careful with your focus point, your camera's sensor is likely exposing for the foreground.
This means that the sky will likely be overexposed, sometimes a lot, sometimes just a little, but either way that will dampen the richness of your sky colors.
Luckily, there are a few things you can do to fix this.
1. Underexpose the image
If you're having problems with the sky being too bright, slightly underexposing your entire photo will make a surprisingly big difference. Just a -3 or -7 can allow the sky to be properly exposed and bring out the vibrancy of the colors. While getting the right exposure is essential, how you compose the scene and some key tips for sunset photography can make a significant difference in the overall quality and impact of your photo.
The flip side of this, though, is that your foreground will be somewhat underexposed. That works fine if your foreground isn't the focus and/or you're going for a sunset silhouette photo. If you're needing more emphasis on your foreground, this quick fix won't work.
The quickest way to underexpose your photo is to shoot in aperture priority mode and use your exposure compensation buttons (+/-).
Alternatively, if you're shooting in manual, simply increase the shutter speed a bit. (The meter in your camera should tell you exactly where you're at, so knowing how to get to that feature is helpful.)
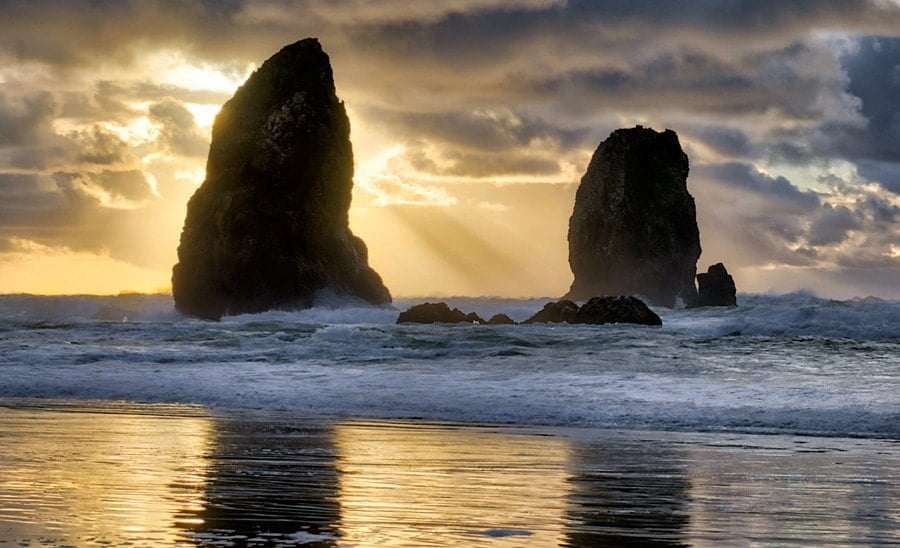
The rocks are mostly in silhouette here | Nikon D7000 + Nikkor 50mm f/1.8 | f/500 ISO 200 HDR
2. Take multiple exposures (HDR)
The reason your camera exposes for either the foreground (making the sky overly bright) or for the sky (making the foreground overly dark) is because the sensor can only see a fraction of what the human eye sees.
A common work around for that is to take multiple shots of the exact same scene and then combine them in into one complete image.
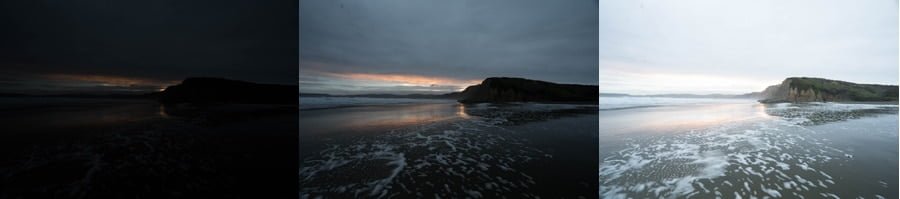
These are the three photos I used to create the image above.
Traditionally this is done with one underexposed, one properly exposed, and one overexposed. For example, in the series above, the first photo is underexposed by -3, the middle one is properly exposed (according to my camera's meter), and the one to the right is +3.
My focal point is on the colors in the sky, which properly exposes the sky but not the foreground. I happen to really like the wave pattern, so I wanted it properly exposed too. That's where combining multiple exposures come in, also known as shooting in high dynamic range (HDR).
Shooting in HDR, when done well, will bring back the information in your highlights and shadows that simply isn't as full-fledged in a single exposure. In other words, the overexposed shot provides additional detail of the darker foreground while the underexposed photo brings out the vibrancy of the rich colors of the sky.
In the example above, I probably should have used the correct exposure and then two graduated exposures up from that, but that would have taken more time to program than I had, so at that point I just had to rely on my post-processing.
Under most circumstances, shooting in HDR takes a bit of extra effort. You'll need a camera capable of it (most modern DSLRs and mirrorless cameras, as well as some phones), a tripod, and editing software that knows how to combine the exposures.
Both Lightroom and Photoshop can handle the work, but their output isn't quite as nice as some other programs out there. My personal favorites are the Nik filter HDR Efex Pro and Aurora HDR (what the shots taken above were edited with).
If you're using your camera phone, be aware that selecting the “HDR” mode won't necessarily mean that it's taking three exposures and then combining them. Some phones do but many don't, so make sure to check.

Nikon D7000 + Nikkor 50mm f/1.8 | f/16 ISO 100 HDR|
3. Use an ND filter
Filters are one of a landscape photographer's best friends, with a graduated neutral density (ND) filter being among the particularly helpful. ND filters sit in front of your lens and, in this case, have a gradient from dark to light built into the glass.
It's really the simplest way to naturally darken the sky while correctly exposing for the foreground all in one shot. There are lots of different ND filters out there, so be sure to choose the right one for sunsets.
In this case, you'll want to select one with a neutral density of .6-to-clear with a two-stop differential.
It's also important to note that using the right graduated ND filter is helpful for sunsets, polarizers and UV filters actually diminish the richness and contrast of the colors.
It's harder to recover information in blown out highlights than in the shadows. | 1/30 f/22 ISO 200 | Nikon D7000 + Sigma 10-20mm f/4-5.6
4. Expose for the highlights
A common work around if you don't want to go through the trouble of shooting in HDR and you don't have an ND filter is to expose for a scene's highlights, especially if you have a camera with a larger sensor (i.e. a full frame).
It's easier to recover the detail in shadows than in blown out highlights, so if you get the highlights right, you can always go back in to Lightroom and recover the detail in the shadows. This works better for higher size/quality sensors, but can be done to some extent on any decent camera.
(Obviously you'll get the best results with a camera with a full-frame sensor, as they capture much more information than crop sensors.)
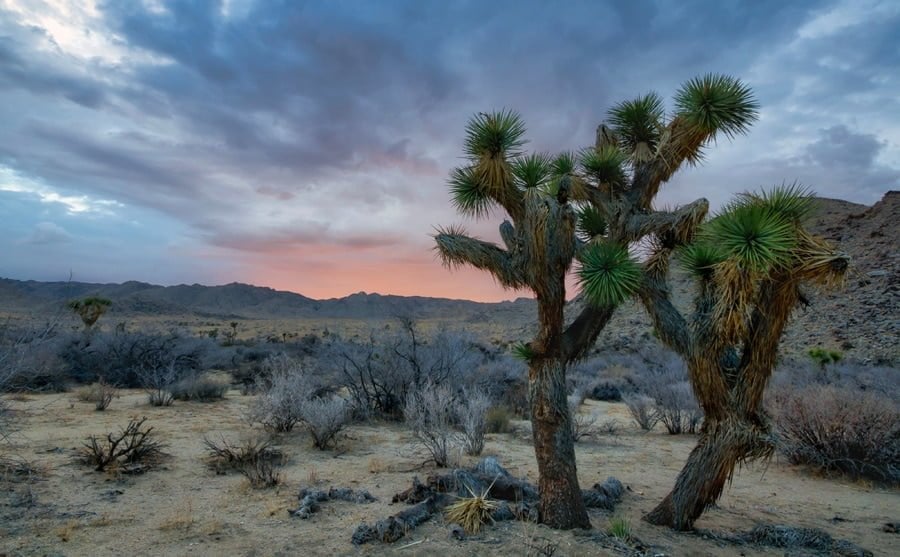
5. Use your camera's built-in guides
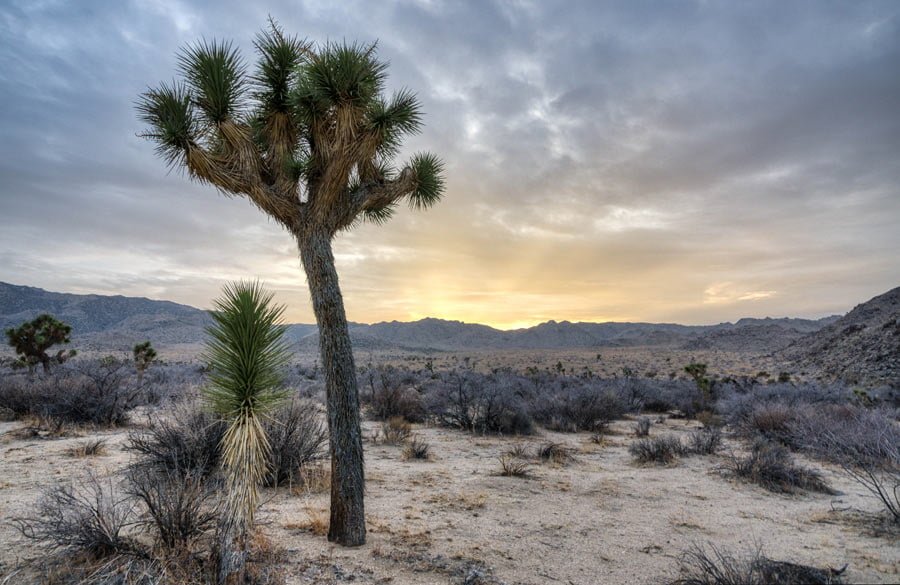
If you're shooting with a modern camera, you should have a number of built-in exposure guides. Use them! From the histogram to the light meter, paying attention to where your exposure is at in-camera will not only save you a lot of time in post-processing, but will also ensure that you catch the shots you want when the light is fading fast. Utilizing your camera's built-in guides and understanding the right sunset photography settings are crucial in capturing those perfect moments where the light is just right.
On most mirrorless cameras and on the live view of most DSLRs, you can set up your display to see the light meter and/or histogram in real time – this is what I did for the photo below in Joshua Tree National Forest – see: forest photography tips.
The ideal combination is to set your camera to its native ISO (usually around 100), set your aperture to where you want it, and then adjust your shutter speed. This requires shooting in manual, but it really is the best way to get the highest quality shots.
Another guide many cameras have is “highlight alert”, which tells you which portions of your image are overexposed in real time. This is especially helpful if you're choosing to expose for the highlights and recover the shadows in post.
(Photzy offers some excellent Snap Cards that inclu-de great tips on Sunset Photography.]
Nikon D7000 + Sigma 10-20mm f/4-5.6 | f/8 ISO 100 HDR
6. Jpeg vs. Raw
If you're someone who like to shoot Jpegs, then getting your exposure right in-camera is particularly important–you won't be able to adjust it so easily in post-processing. Though, you can convert your JPEG into RAW format for post-processing, to get better results.
If you're shooting in Raw, you'll need to do more post-processing but you'll be able to fix just about anything that goes wrong with the exposure.
See more on JPEG vs RAW.
Nailing Composition
While getting the right exposure will help capture the richness of the colors and along with key details in the foreground, how you compose the scene will make a huge difference in the overall quality and impact of your photo.
Find a strong foreground element | Nikon D7000 + Sigma 10-20mm f4-5.6 | 1/4 f/8 ISO 400
7. Find a strong foreground element
Ideally, the sunset itself isn't the only element in the photo. Sure, you may have captured the colors beautifully, but without a foreground element there won't be much lasting impact. Understanding how to photograph sunsets also means knowing how to incorporate foreground elements. This will not only enhance your composition but also elevate the overall look and feel of the image.
A strong foreground element will add interest, depth and context to your image. Almost anything can be used–rocks, people, a pier, a cityscape–just about anything. For example, the image above uses a Joshua tree, while the first image uses both the sea foam and the colors of the reflection.
Both images would be much weaker without these elements–even with the strong colors of the sunset in the first one. A crucial aspect of learning how to take sunset photos involves emphasizing the foreground, which gives context and depth to the vastness of the sunset sky.
8. The rule of thirds works well here
Where you place the line of the horizon in a sunset will highlight the area where you want the viewer to focus. This is one of many instances where the rule of thirds comes in handy.
The rule of thirds essentially divides the image into thirds both horizontally and vertically, placing the interesting elements on the lines or the intersections of the lines.
In the case of sunsets, place the horizon on the bottom third if you want to highlight the sunset and on the top third if your sunset is a bit lack luster and/or you'd like the viewer to focus more on the foreground.

Since the wave is the key point of interest in this image, the horizon line was placed on the upper third to give more visual weight to the wave | Sony a7III + Sony FE 16-35mm f/4 ZA | 1/6 f/8 ISO 100
9. Be creative
Sunsets aren't only for horizon shots. They can be used to enhance just about any image. In fact, if you focus on just standard landscape or cityscape shots, you run the very real risk of having an amazing shot lost amidst all the other sunset shots out there. While standard sunset images are beautiful, trying unconventional compositions or subjects can give you a unique shot that stands out from the rest.
The solution?
Think outside the box.
Find the sunset shot that no one has ever done before.
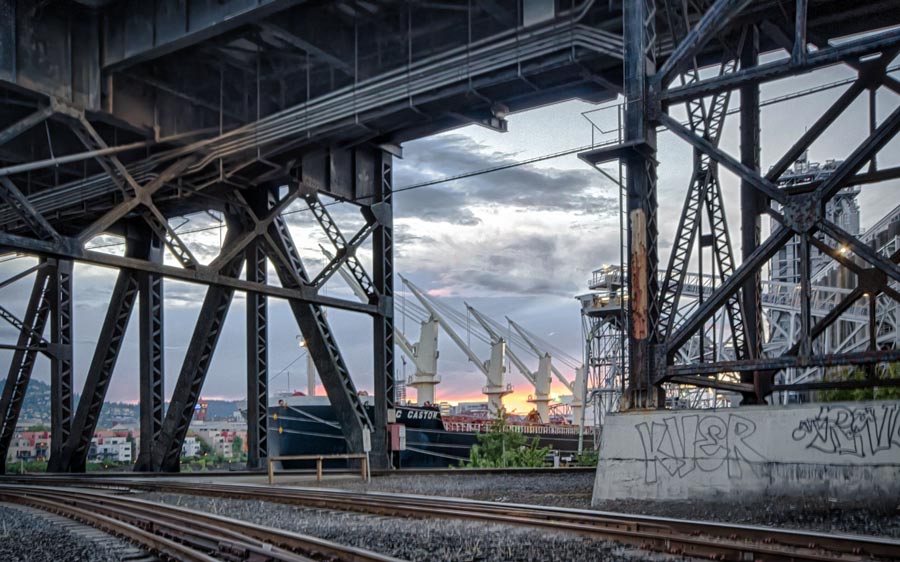
Sunsets can be found in the oddest places | Nikon D7000 + Sigma 10-20mm f/4-5.6 | 1/250 f/8 ISO 800
Light-chasing
While a lot of beautiful sunsets happen by surprise, the best shots usually come when you're ready for it. Knowing how to take sunset pictures also involves being prepared for that perfect moment. Timing, preparedness, and understanding the fleeting nature of golden hour can make or break a shot.
In fact, many landscape photographers won't photograph at any other time than the hours surrounding sunrise and sunset. They spend the hours in between scouting for primo spots, getting their gear ready, and doing other things.
When I caught the photo at the beginning of this post, the light literally lasted a max of five minutes. There was another photographer out there who'd driven all the way out to this beach for sunset photos of the elephant seals and the sunset, but he didn't have his tripod or a rain jacket for his camera.
Suffice it to say, he missed the light.

You had to be ready and literally standing in the water to catch both the light and the seals during this sunset | Sony a7III + Sony FE 16-35mm f/4 ZA | 1/13 f/8 ISO 100
10. What you need to be ready
- Spend some time scouting your location. Know where you want to set up well ahead of time.
- Have all your gear ready, especially your tripod, intended lens(es), and camera rain jacket if the weather's inclement.
- Get there early and set up well before the sun starts setting, especially if you're close to the equator where the sun sinks remarkably quickly.
- If you have one, bring a second camera so you can leave your main camera set up on the tripod in the best spot.
11. Use a tripod!
Many of the best sunset shots require a longer exposure than you can reasonably hold steady, even with image stabilisation in your camera or lens. Utilizing a long exposure sunset technique can enhance the dynamic range of the sky and foreground, resulting in dramatic and breathtaking imagery.
Even the the shorter exposure shots will benefit from using a tripod – the one I currently use is the ZOMEI 799C.
There are also some good tripods for smartphones too – see our guide.
12. The Starburst
If you have a camera that can be stopped down to a small aperture, getting the starburst effect can really add to an image. Simply stop down to f/20 or f/22 as the sun nears the horizon. This will accent the rays of the sun – see image below – and can also introduce light leaks in certain situations.
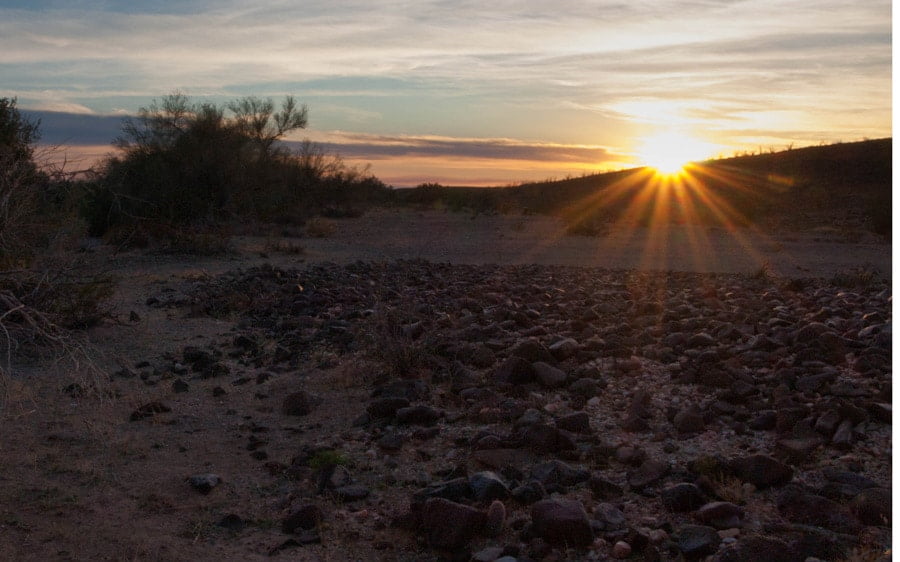
Capturing a starburst as the sun hits the horizon| Olympus E-520 + Olympus 14-42 lens | 1/30 f/22 ISO 200
Sunset Photography Secrets | Final Words
Well, that rounds out our guide to the secrets of sunset photography. With the proper exposure, composition, planning, and prep, you should be able to capture fabulous sunset shots every time.
So get out there and keep those cameras rolling. And don't forget to take your tripod!
Know of any sunset photography secrets I missed? Let us know in the comments below!
Disclaimer: All recommendations are impartial and based on user experience, with no bias to the products or the brand. The products in this post may contain affiliate links.

Check out these 8 essential tools to help you succeed as a professional photographer.
Includes limited-time discounts.
Teryani Riggs (they/them) is an adventure, who loves all things wild and free. Teryani can often be found in the midst of a social/eco-justice campaign, hiking through wild backcountry, or hitchhiking around the world listening to other people’s stories. While their focus has historically centered on landscape, travel, and wilderness photography, they’ve also been hired to shoot genres as varied as historical fiction reenactments in the studio to product and food photography.
2 Comments
Leave a Comment

👋 WELCOME TO SHOTKIT!
🔥 Popular NOW:

Good article.
The only thing I would add is my standard advice: always check behind you to see if there might be another cool shot. Golden hour light might be illuminating a scene that is in the opposite direction from the sunset (or sunrise).
Great tip, Dan! Often overlooked too.