


How to Share a Photo Album on iPhone (Easiest Way)
There are 2 main ways to share albums on your iPhone. Here we detail both the older way (via the Shared Albums) as well as how to do it with iCloud.
iPhone Photography | Learn | By Ashley Darrow
Shotkit may earn a commission on affiliate links. Learn more.
The Photos app is full of useful features for photographers, but knowing how to share an album on iPhone is a key skill that often gets overlooked.
The shared album feature allows you to share your own photos with anyone you add to the album.

Sharing an album is a basic skill - learn many more exciting secrets to totally transform your iPhone photography with this course!
Tap red button to save 80%
I find this feature to be really useful when collaborating with other photographers—especially when we need to share images on the fly.
Whether you want to use shared albums for your family, friends or even clients, this guide will help.
I'm going to walk you through everything you need to know to set up shared albums and iCloud photo sharing.
How to Enable Shared Albums on iPhone
I'm going to start us off with the basics before we get too deep into the details. Making the most of Photos starts with simply enabling shared albums.
Luckily, it's an easy two-step process to share photos on your iPhone.
1. Open Your Settings App
As with most tech issues, it all starts in a settings menu…
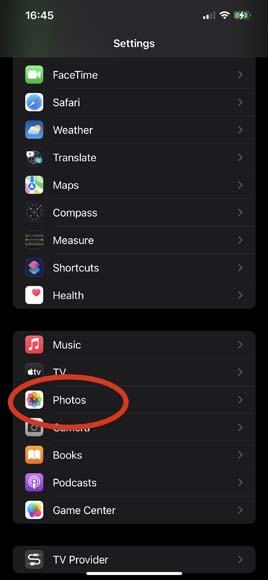
The first thing you need to do is open up your settings application and then find the photos menu.
The location of your Photos app settings is going to change depending on how many apps you have installed and the version of iOS that you're running.
For me, the Photos app was closer to the bottom and I had to scroll down a little bit to find it.
2. Toggle Shared Photos On
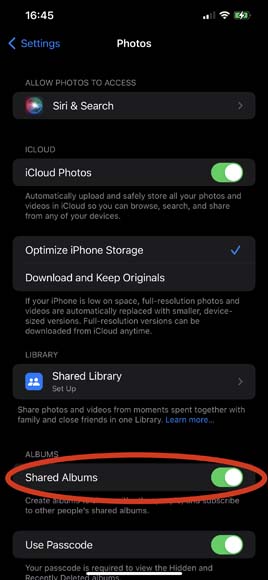
Once you open up the settings for photos, you'll see a menu with a few different options.
The toggle switch for activating shared albums is toward the bottom of this menu.
Make sure that the switch is green and toggled on so that you can start sharing your photo albums.
How to Create a New Shared Album on iPhone
Now that shared albums is activated, you're going to need to make a new photo album to start sharing pictures.
I prefer to set up individual shared albums for each new project. This lets me keep track of each shared album separately.
1. Open Photos
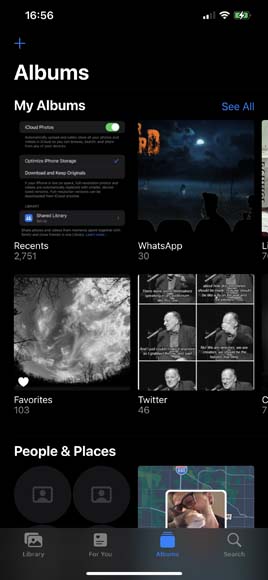
The first step in creating a blank album to share is opening up the Photos app.
2. Select Albums
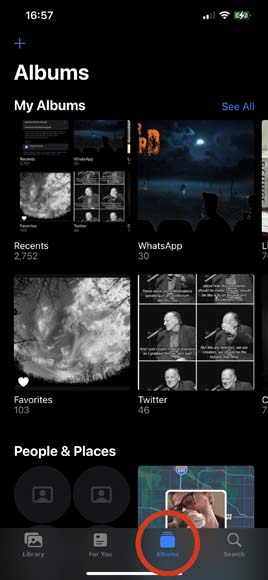
You want to make sure that you've got the albums tab selected. You can find this on the lower right hand corner of the screen.
3. Tap the + Icon and Add a New Album
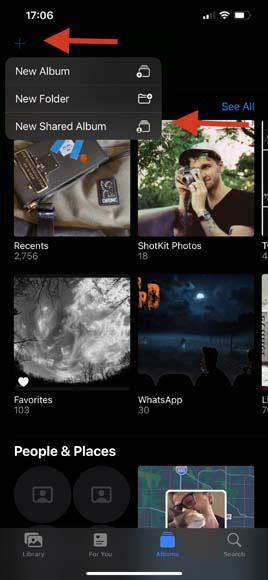
Once you're in the album view, you can create new albums by tapping the plus “+” icon in the upper left hand corner of the app. After that, you can create your first shared album by selecting “New Shared Album.”
4. Name Your Album and Create It
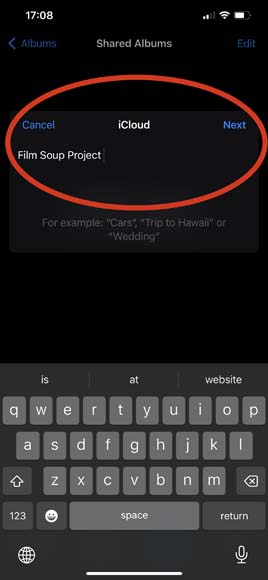
Your next step is to name your album and create it. I like to choose a name that connects the album to the current project that I'm working on.
Other people I know name and date a new shared album.
5. Share Your New Album
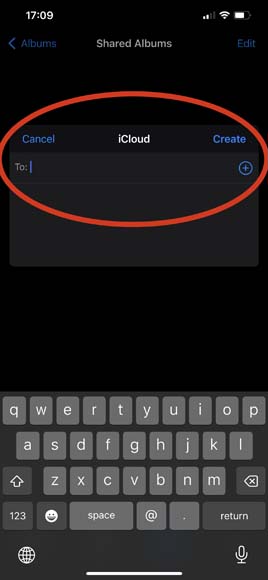
Once your album is named and created, you'll be able to share it.
You'll have to enter contact information for anyone you'd like to share your album with.
6. Change Your Shared Album Settings
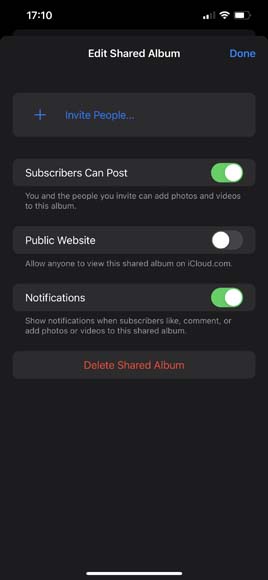
You can adjust a few settings for your shared album.
Of course, you can delete the album and add new participants, but you can also restrict who can post new pics to the album or toggle the public iCloud website for the album on and off.
How Do I Turn an Existing Album into a Shared Album?
Turning an existing photo album into a shared album is one of the easiest things to do on iPhone.
1. Open The Album You Want to Share
The first thing you need to do is open up the album that you want to share.
Keep in mind you can't share every album. The default albums “Recents” and “Favorites” can not be shared, but some application albums, like the one from Lightroom mobile, can be shared.
Any album you create can become a shared album.
2. Open the Menu and Share Your Album
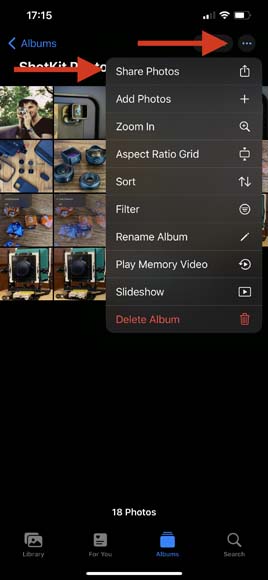
Sharing your album starts with tapping the ellipsis icon in the upper right. This will open that album's settings menu.
You want to tap the “Share Photos” option to get started.
3. Choose How You Want to Share Your Album
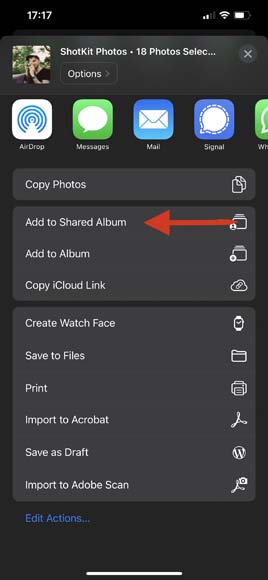
This option works best if you plan on adding pics from a private album into an existing shared album.
4. Create a New Shared Album (If Needed)
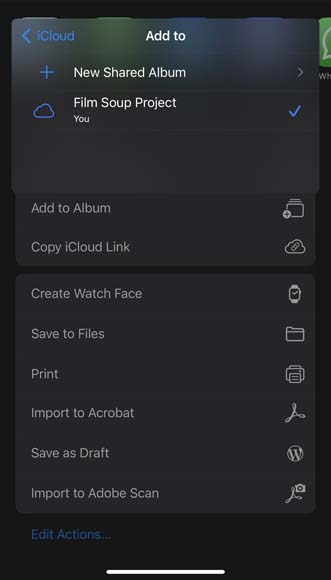
You can also create a new shared album. Even though all shared albums are placed into their own section of the Photos app, I prefer to give albums unique names like “Summer Vacation – Shared” to keep things organized.
If you're creating a new shared album, the rest of the process will be the same as if you had just created the album from scratch.
How to Share Album on iPhone: Some Important Facts
There’s a few important facts you should know about sharing your albums on iPhone. Here are four of the most important.
How Many Photos Can You Put in an Album
While there is no limit to the amount of images and videos that either the Photos app or iCloud can store, there is a limit for shared albums.
A shared album can only hold 5,000 images or videos. Once you hit your 5,000 image limit, you’ll need to either create a new shared album or start deleting unwanted pics and videos.
Albums Don't take Up Space
A new album does not take up any additional space on your Apple device.
Additionally, adding the same image or movie to multiple albums does not take up extra space. The image simply exists in multiple albums at once and is not actually copied.
You Must be Connected to the Internet
Shared albums rely on all participants having a stable internet connection. Without the internet, you might notice some common bugs.
If someone in your shared album has a bad internet or data connection, changes they make to a shared album might take a while to show up.
Always communicate with shared album participants when you’re making changes. This prevents people from making the same change twice or accidentally deleting the wrong images.
How to Revoke Shared Album Access
You might not want to always share your pics with people you have invited to an album. There are a few ways you can revoke access to a shared album.
The easiest is to toggle the “Shared Albums” setting off. This will turn off all shared album features on your device.
You can also delete individual images from a shared album to revoke access to specific pics or videos.
You can also kick participants out of existing albums. All you need to do is click on their contact information in the settings of your shared album. You can change their status or kick them out entirely.
How to Share an Album Using the iCloud Shared Photo Library
You've got more options than just sharing individual photo albums inside of the photos app. You can share entire image libraries using your iCloud account.
Apple's Family Sharing features allow you to share your iCloud photos with up to five people at a time.
(See how to share photos with friends and family.)
Keep in mind that you need to be running the most current iOS update for your device in order to share an iCloud image library.
1. Enable iCloud Photo Sync
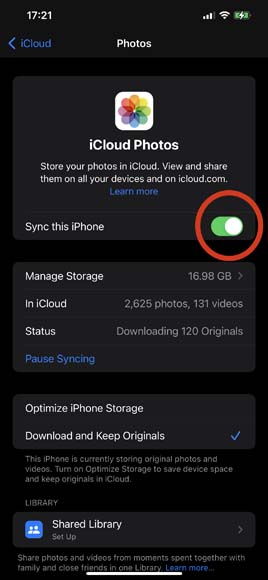
The first thing you need to do is enable photo sync and your iCloud profile.
The first step is to enter your iCloud settings. You can do this by tapping your name on your iPhone, tablet, or through the settings on your Mac.
Once in the iCloud settings, scroll down until you see photos. You'll be able to toggle photo sync on and off.
2. Enter the Shared Library Setup
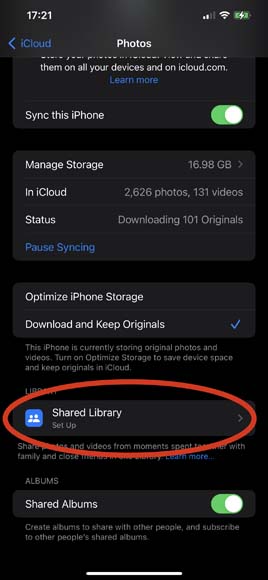
While you're still in the iCloud photo settings, you can scroll down to enter the shared library setup.
3. Get Started
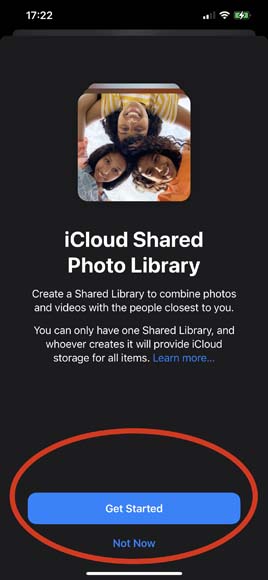
The first thing you're going to see is the get started screen. Just tap the big blue button at the bottom and you'll be ready to put together your first shared iCloud image library.
4. Add Participants
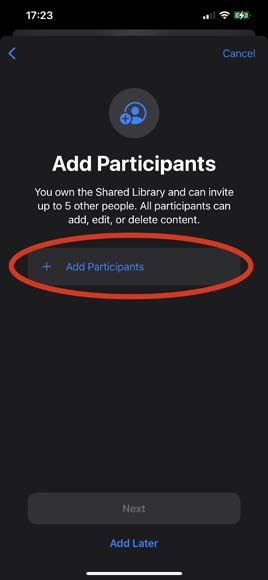
Your first step is to add participants. They won't have access to anything just yet, but you do need to select the people that you want to share your iCloud Library with.
You can always add more people later or kick people out.
If you really want to test things out, you can always add a trusted relative or friend to make sure that you're sharing the right images before you commit to inviting the extended family.
5. Choose Your Photos and Settings
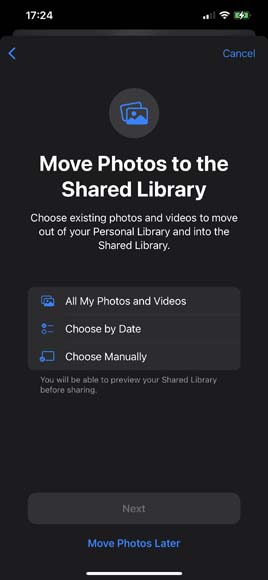
Here's where you can select which iCloud photos you share with the people that you've invited to your iCloud library.
Your options include giving them access to all of the photos and videos in your library, selecting photos by date, or by picking photos and videos manually.
6. Preview Your Shared Library
Now it's time to use the most important feature in the iCloud shared library. The preview lets you see exactly the images and videos you will be sharing before you actually make them public.
I strongly recommend scrolling through these images and making sure that they're the ones you want to share rather than images you'd rather keep private.
7. Invite New Shared Library Participants
You shared your library with people during the first step, but now you need it to actually invite them to be able to share images in this library.
You can either copy a link that you can send however you choose or you can invite them over a text message.
You'll also be able to edit how images upload to your library. You can either set images to upload automatically whenever you take any picture or video or you can add images to this library manually.
8. Managing Your Shared Library
You are the owner of this iCloud shared library which means you have a few options when it comes to managing it over the long term.
The owner of a shared iCloud library can change how images are uploaded to the library, add new participants, or revoke access to the shared library.
You can even stop sharing your library all together if that's what you'd like to do.
Remember, this is your shared iCloud library and you can stay in charge of which images or videos you share with other people.
iCloud Shared Photo Library vs. Shared Albums for Photos and Videos
There are a few differences between shared photo albums and your shared iCloud library.
One of the biggest differences is that your iCloud library can only be shared with up to five participants at a time. On the other hand, you can have up to 100 people sharing your Photos albums.
You're also restricted to just a single shared iCloud library. You can create up to 200 shared photo albums.
Shared photo albums are also designed to be under the control of the person who created the album. Participants in a shared album have less power when it comes to adding images or deleting the album.
Participants in your iCloud shared library have much more power and can add or delete photos.
Also, and this is very important, anyone invited into a shared iCloud library that stays in that library for more than a week gets a full copy of every photo in that library saved to their own iCloud storage.
FAQ
Why can't I share an album on iPhone?
You need to make sure that you have shared albums turned on in the Photos app as well as an iCloud. You should also make sure that you have a good data or internet connection.
Does creating photo albums on iPhone take up more space?
Creating more albums does not take up additional space either on the local storage on your device or in your iCloud account. Copying one image to multiple albums also does not add additional storage.
Where do I find shared album invites?
Your shirt album invites are going to pop up as a notification from the Photos app. You might not be seeing them if you have the notifications turned off for this application.
How do I delete a shared album in iPhone Photos?
You can delete a shared album if you are the owner of that album by clicking the settings and then deleting the album you want to get rid of. If you are not the owner of an album, you can click on the settings for that album and then leave the shared album to have it removed from your devices.
How many photos does an album hold on iPhone?
Each element on iPhone is limited to holding just 5,000 pictures or videos. However, there is no limit to the amount of images or videos you can store on your iCloud account as long as your current subscription meets the storage requirement.
What is the difference between albums and folders in iPhone Photos?
The difference between albums and folders in the Photos app is very straightforward. Albums allow you to add and remove individual images while folders only allow you to add and remove albums and other folders.
Can I delete iPhone photos from my camera roll but keep them in an album?
It is not possible to delete photos from your camera roll but keep them in an individual album. Albums are simply a way of organizing your photos and videos and do not store individual copies of those images.
Final Words About Your Photos App
I hope this guide helped you get started sharing your photo albums on iPhone.
I found this feature to be incredibly useful, especially when I'm working with other photographers.
If you're looking for more guides on how to make the most of your mobile photography on iPhone, check out my other articles on the subject.
Let me know if you have any questions in the comments below.
There's a maze of settings in the iOS menus, and I'm here to help you navigate these options so that you can focus on your photography.
Sharing an album is a basic skill - learn much more exciting secrets to totally transform your iPhone photography with this course!
Tap red button to save 80%

Check out these 8 essential tools to help you succeed as a professional photographer.
Includes limited-time discounts.

Ashley is a photographer, writer, and film critic. When Ashley’s not writing essays on photography, cinema, and theory, he’s out taking pictures with retro film cameras.
👋 WELCOME TO SHOTKIT!
🔥 Popular NOW:
