


How To Transfer Photos From iPhone To Computer (PC or Laptop)
Find out 5 simple ways to transfer your iPhone photos to your Windows or Mac computer, without using iTunes. Free yourself from the Apple ecosystem.
Shotkit may earn a commission on affiliate links. Learn more.
IPhones are famous for their amazing photographic abilities. They're also always with us, even when our dedicated cameras are not. That means our Camera Roll can get filled up pretty fast.
So what to do with your iPhone photos when your storage capacity is full, or you want to edit on a larger screen? Deleting all photos from your iPhone isn't always possible – a better idea is to transfer them to a computer.

Use iMazing to transfer, backup and browse your iPhone live photos and data.
Use the Link save 20%
Transferring to a Mac is pretty straightforward. ITunes and/or iCloud will pretty much take care of everything.
Transferring to a PC, however, especially if you don't want to use iTunes, can be a bit more involved.
Still, there are various ways to do it, no matter which operating system your computer uses, and each has its pros and cons.
Let's take a closer loom at how to transfer photos from your iPhone to your computer.
How to import photos from iPhone to Mac
As one would expect, transferring photos from an iPhone to a Mac is pretty straightforward, even when dealing with Live Photos.
Here are your top options:
Import to Photos via a Lightning Cable
When you connect your iPhone to your Mac, the Photos app automatically launches, asking if you'd like to import photos. You can either follow the prompts or this step-by-step process:
- Connect your iPhone to your Mac via your Apple Lightning-to-USB cable or other iPhone camera accessory that features the same cable.
- If needed, unlock your iPhone and confirm that you trust the device.
- The Photos app should open, showing your iPhone images in the main window. If it doesn't open, open Photos manually from the applications folder or your floating toolbar.
- Conversely, if Photos opens but doesn't show your iPhone photos, go to the left-hand menu and select your iPhone there. That should bring all of your iPhone's images and videos to the main window.
- Once the photos are in the main window, click on the “Import All New Items” button in the top right-hand corner. You can also individually select photos and then click the “Import Selected” option.
Apple says that you need iTunes 12.5.1 or later for this style of import to work. Since even my old 2012 Mac Air is running 12.8, most folks should be running a current enough version.
Transfer photos from your iPhone to your Mac via iCloud Photos
If you have fewer than 5GB of photos and videos in your iPhone's photo library, iCloud is an extremely convenient option for transferring files immediately.
(If you're trying to reduce the amount of photos to under 5GB, you should try and find any photos that may be similar or identical and delete them – see our guide to the best duplicate photo finder for some recommendations.)
Once all your devices are set up, your latest shots are automatically uploaded to iCloud Photos, which in turn synchronizes all of your i-devices, including iPhones, iPads, iPod touch, Macs, and Apple TVs.
First, make sure that iCloud is set-up both on your phone and your Mac. Also, make sure that you're signed in to iCloud with the same Apple ID on both devices.
- Setting up iCloud on Your Phone
- Go to Settings.
- Tap on your name at the top.
- Go to iCloud.
- Underneath the iCloud storage indicator, you’ll see a list of Apps Using iCloud.
- Tap on Photos.
- Switch on iCloud Photo Library (iCloud Photos in iOS 12)
- Setting up iCloud on Your Mac
- Go to System Preferences and select iCloud
- Click the Options button next to Photos
- Select iCloud Photos
Once iCloud is set up on both devices and you're signed in with the same ID, your media should automatically sync between your iPhone and your Mac while iCloud is turned on.
Note, iTunes and iCloud can't sync photos at the same time. If you're already syncing photos to your iPhone via iTunes and you turn on iCloud, you'll see a message that says “Photos and Videos Synced from iTunes will be Removed.”
Don't worry. As long as iCloud is active on your Mac, the photos and videos will sync through iCloud and you'll no longer need iTunes for the syncing. All your iPhone photos will be accessible from the Photos app on your Mac.
Another thing to note is that while you have iCloud Photo Library on, any changes you make to photos on one device will automatically sync to the other. If you want to delete the photos from your iPhone and keep them on your Mac, make sure to switch off sync after you’ve transferred everything.
Once on your Mac, you can move the images to a different file if you like to prevent overloading your free 5GB limit. Or, if you find iCloud incredibly convenient and want to use it for all your photo/video needs, you can always upgrade your iCloud plan to give you more space. (From $0.99/month for 50GB to $9.99/month for 2TB.)
- Read more: How to unlock an iPhone without a passcode
Transfer photos from your iPhone to your Mac via Airdrop
If you have a somewhat current Mac (2012 or newer) and are running OS X Yosemite or later you can use AirDrop to transfer photos from your iPhone to your Mac.
You can even transfer PNGs, which is handy if you've just used an app to remove a background from your photo.
The caveat is that you'll need to have your computer and your phone within Bluetooth and/or wifi range.
Set-up:
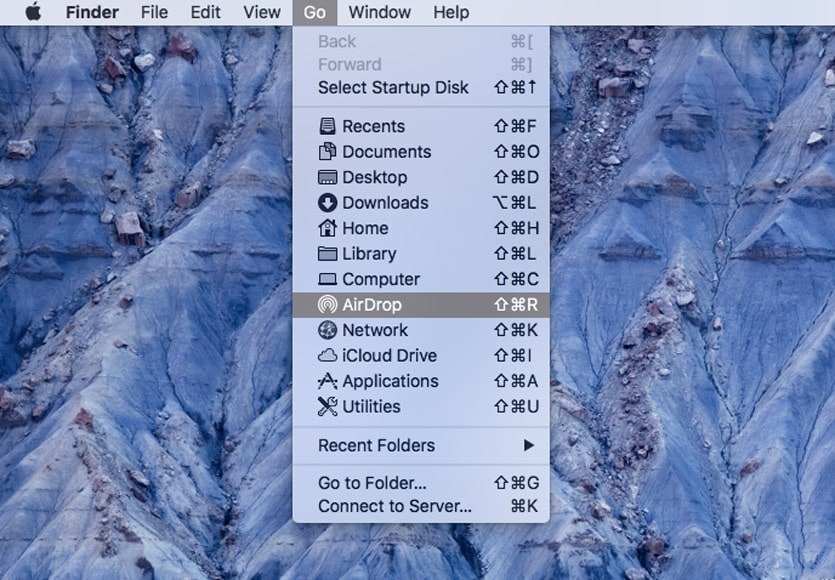
- Make sure that both devices have both wifi and Bluetooth turned on.
- Make sure your personal hotspot is turned off.
- Set AirDrop receiving to Everyone. On your iPhone you can find this in Settings>General>AirDrop. On your computer you can find this in the Finder under the Go drop-down menu. (See image above.)
Give both of your devices a chance to find each other. It may take a moment.
Transferring:
- Open Photos on your iPhone.
- Select the photos you'd like to transfer. You can swipe right or left to select multiple photos or even live photos.
- Tap the sharing button in the bottom left-hand corner.
- Choose your Mac as the recipient.
- On your Mac you'll see a window pop up asking if you want to receive the files. Click accept. The file will end up in the same app you sent it from (i.e. if you sent it from Photos in your phone it will end up in Photos on your computer).
- You can turn Airdrop off (on both devices) once you're finished with the transfer.
Third-Party Programs
If you're frequently transferring files between your iPhone and your computer, it could be worth your while to look into some of the excellent third-party software out there that can really make the transfer process a breeze.
I'll get to some of the most popular of those at the end of the article.
How to transfer photos from iPhone to PC without iTunes
As with Macs, there are multiple ways to transfer photos from your iPhone to a PC running Windows OS.
If you've installed iTunes for Windows, that may be your go-to method.
If you're not into iTunes, check out the alternative methods below.
Transfer photos directly using Windows Explorer
Transferring photos to a PC directly via Windows Explorer is by far the most straightforward way to transfer photos from your iPhone to your computer. There's no third-party software needed; your PC will automatically detect your iPhone as a camera. The only thing you'll need is your lightning cable.
The set-up:
- Connect your iPhone to your PC with a lightning-USB cable.
- If needed, unlock your iPhone using your passcode.
- If you see a prompt on your iPhone asking whether you to “Trust This Computer,” tap Trust or Allow to continue.
From here the instructions are different depending on which version of Windows you're running.
How to Transfer Photos from iPhone to PC (Windows 10)
- On your PC, select the Start button and then select Photos to open the Photos app.
- Click the Import icon located in the upper right-hand corner of the Photos app.
- Select the photos you want to import. When you're done, tap Continue.
- The next pop-up will allow you to choose where to save the photos. There's also an option to delete the imported photos from your iPhone after importing.
- Click Import.
Once your photos have been imported onto your PC, you'll be able to view them in the Collections menu or in a particular album using the Album icon on the left sidebar.
Note: if iCloud is enabled on your iPhone you won't be able to transfer photos this way. You can either install the iCloud desktop app on your PC or turn it off while transferring via Explorer.
How to Transfer Photos from iPhone to PC (Windows 8.1)
- On your PC, select the Start button and then select Photos to open the Photos app.
- With a trackpad, swipe in from the bottom edge to get to the app commands. With a mouse, right-click within Photos.
- Select Import. (You won't be able to see the Import option if you're looking at a single photo in full-screen mode.)
- Select your iPhone.
- Photos will automatically search for and select all the photos that it hasn’t imported before. You can either click on individual photos or choose Select all.
Note: You can find your photos in the Pictures folder. Just look for a subfolder named with the date you took the photos.
How to Transfer Photos from iPhone to PC (Windows 7)
Windows 7 will recognize your iPhone as a portable device. That means that you can treat it like an external hard drive. The caveat is that it only supports moving iPhone Camera Roll photos.
Here's how:
- Connect your iPhone to your PC.
- Choose Trust this Computer on your iPhone when it pops up.
- Under My Computer, look for the portable device that is your iPhone. Once you find it, double click it and look for the Internal Storage icon.
- Double click the Internal Storage icon. You should see the DCIM folder. That’s where your camera roll photos are stored.
- In the DCIM folder, drag-and-drop or copy-and-paste the photos you’d like to transfer.
Transfer photos to your PC using iCloud
If you don't have your Lightning cable handy, you can sync photos from your iPhone to your computer using iCloud. There are two ways to go about it. One requires that you download iCloud for Windows onto your PC. The other allows you to do it through the web.
Before you get started, though, you'll need to activate iCloud on your phone. Go to Settings > [your name] > iCloud > Photos and then turn on iCloud Photo Library.
Note: Make sure you have enough iCloud space to store all the photos/videos on your phone before turning on iCloud Photo Library. If you don't have enough space, you'll need to use another method.
Once you have iCloud Photo Library activated on your iPhone, choose one of the following methods:
i) With iCloud for Windows installed on your PC
- Make sure both your iPhone and your PC are connected to wifi and are running iCloud.
- Next to Photos, click on Options. From there, select iCloud Photo Library.
- Make sure that Download new photos and videos to my PC is selected. If you have another location in mind, tap the “Change” option.
- Once you click Done, your iPhone photos and videos will be copied to your computer.
- See also: How to Download All Photos from iCloud
Note: check Download and Keep Originals if you want to keep the full-size originals on your phone. If you want to save space on your iPhone, click Optimize iPhone Storage. This will keep only thumbnails on your phone, leaving the high-res images on iCloud and/or on your computer.
ii) Using iCloud.com
- From your PC, go to iCloud.com.
- Sign in to iCloud using the same Apple ID as you use on your phone.
- Among the options, choose Photos.
- Select the photos you'd like to transfer from iCloud to your PC, either by individually selecting them or by using the Alt button to select multiple photos.
- From there, click the Download Selected items icon at the top right-hand corner of your screen.
Third Party Options
As mentioned before, there are a number of third-party programs available for photo transfers. Some, like Google Photos and OneDrive offer free storage in the cloud (up to a point).
Others, like Mobimover are made solely with file transfer in mind. All work with both the Mac OS and Windows (7 and above).
Here are three best options:
Google Photos

Google Photos is a photo sharing and storage service that offers a ton of features for free. You can store an unlimited amount of photos (each up to 16 MP) and videos (up to 1080 HD) for free in its cloud service.
Once in the cloud you can access them from any computer or mobile device, regardless of OS – it's a replacement for Google Picasa, which is now discontinued.
You'll need to download the app to your phone and then backup your photos to Google Photos. From there you can access them via the Google Photos website from any other device (including your computer). You also can sync your iPhone photos with your computer via the Desktop Sync tool.
One of Google Photos' coolest features is the ability to search via AI recognition. Once your photos are on its platform, you can search for people (via facial recognition), places (landmarks, geotagging, etc.), or things. It can even track faces as they age.
If you like to share your photos, Google Photos also has a shared albums feature that multiple people can use at once.
All of these features together with the fact that it's free and storage is unlimited make this the iPhone transfer choice of literally millions of users. It's also a fantastic way to organize digital photos across all your devices.
OneDrive

OneDrive by Microsoft works much like Google Photos, but without the AI. Windows 10 users often default to it, as it comes pre-installed. It's also officially part of Microsoft's web version of MS Office. With it you can store photos and sync them across any mobile device, Windows or macOS computer, or even Xbox 360/Xbox One consoles.
As with iCloud, the first 5GB is free. After that you'll have to sign up for one of its subscription plans. Conversely, if you're already a subscriber to Office 365, you already have a full Terabyte of storage at your service.
Another benefit to using OneDrive is how it seamlessly works with the Photos app on Windows 10.
If you're needing a lot of cloud storage and don't have an Office 365 subscription, it'll probably make sense to use Google Photos instead.
Mobimover

Mobimover is my favorite third party app, as does everything you could hope for regarding file transfer yet is completely free.
Unlike Google Photos and OneDrive, Mobimover doesn't provide cloud storage. It's a simple, yet direct file transfer method that allows you to transfer photos off your iPhone to a PC or Mac or even to another iPhone. It also happens to be freeware.
Particularly simple to use, all you have have to do once it's installed is connect your iPhone to your computer, select the files you want to transfer (including music, contacts, books, screenshots, etc.), and hit transfer. Even better, if you ever want to upgrade to a more current iPhone, Mobimover makes it easy to transfer all the contents of your old iPhone to your new one.
Mobimover works on Macs, PCs running Windows 7 and later, and iOS devices with iOS 8 or later. It's truly a great way to transfer files from your iPhone to your computer.
Other Third-Party Apps
Other third-party apps like Dropbox, WinX MediaTrans (Windows only), AnyTrans, and CopyTrans will also work, but the three mentioned above are definitely the most popular.
Of all of these, only Google Photos and Mobimover are completely free. All of the others have either storage limits or ask you to pay for the full version.
If you're going to pay for any of them, AnyTrans is a popular option – it's an all-in-one manager for your iPhone, iPad, iPod, iTunes and iCloud content – it lets you transfer, manage and back up iOS data in a simple and fast way.
How to transfer photos from iPhone to laptop
Transferring photos from an iPhone to a laptop is essentially the same as transferring to a desktop. All of the above methods will work, depending on your OS, of course. Linux users, however, will have to use other methods.
See also: what do most photographers use?
Final Words
Getting your images off your iPhone is useful, whether you're looking to clear out some space in your Camera Roll, sync your photos over all your devices, or simply transfer a few files over to your computer for editing.
Which method you choose will depend upon your computer's OS, how often you need to transfer, which programs you're more familiar with, whether you're wanting cloud storage, or whether you want a simple, direct link between your iPhone and your computer.
For single files on my Mac, I prefer Airdrop. Otherwise, I really like Mobimover. (I don't use the cloud.)
How about you? Which method works best for you and why?
Use iMazing to transfer, backup and browse your iPhone live photos and data.
Use the Link save 20%

Check out these 8 essential tools to help you succeed as a professional photographer.
Includes limited-time discounts.

Usnea Lebendig is an experienced photographer and reviewer who loves to photograph professionally and in moments where the world’s beauty and/or strangeness leaps in front of the lens.
18 Comments
Leave a Comment
👋 WELCOME TO SHOTKIT!
🔥 Popular NOW:

I like the efforts you have put in this, regards for all the great content.
If you put photos in shared album someone told me if I delete picture from my camera roll it won’t delete from my shared album. Is this correct?
When you add photos to a shared album on your iPhone and then delete those photos from your camera roll, they should remain in the shared album. Deleting a photo from the camera roll does not automatically remove it from any shared albums it may be part of.
Confused. If I download all my photos to my Mac when I delete from my phone or iPhone doesn’t it delete from the ones I downloaded? Also won’t it sync my photos back to iCloud?
Donna
If you download your photos from iCloud to your Mac and then delete them from your iPhone, the photos on your Mac won’t be affected. Deleting photos from your iPhone does not automatically delete them from your Mac or any other device that has a local copy.
However, the sync with iCloud depends on the settings you have configured. Here are a few scenarios:
iCloud Photos Enabled:
If you have iCloud Photos enabled on your iPhone, deleting a photo from your iPhone will eventually remove it from iCloud and all devices connected to the same iCloud account. This includes the Mac if it’s also connected to the same iCloud account with iCloud Photos enabled.
iCloud Photos Disabled:
If you have iCloud Photos disabled and manually download photos to your Mac, deleting them from your iPhone won’t affect the copies on your Mac. Your Mac will have its own local copies of the photos.
In general:
To Prevent Syncing with iCloud:
Disable iCloud Photos on your iPhone.
Download the photos to your Mac and manage them locally.
To Use iCloud Photos Sync:
Keep iCloud Photos enabled on your iPhone and Mac.
Any changes you make on one device (deleting or adding photos) will be reflected across all devices connected to the same iCloud account.
Hope that makes it a bit clearer.
Thank you for the article. I used to be able to take a photo with an I phone and once connected to wifi it would automatically download to a file folder onto my computer using Icloud for windows. As a result I could delete the photos on my phone and know they were stored and backed up to my computer. It appears that apple has removed this function. Too bad there is not a way to accomplish this.
Hi Mark,
thank you for your article. I am coming because I am searching for an answer how to solve my these days issue.
Few years already I have been downloading photos from my iPhone to my Mac via airdrop. It use to work perfectly for me. I always moved the photos from the “downloads” file to the file I created and then all the transfer dates changed within few seconds to the original dates (when the photo was taken).
Lately this does not happen anymore and the dates stays as it is – I see all the pictures have the date and time of transfer. I do not think I did any software updates, but could be.
Is there a way to set some settings to keep the original information while airdropping the pictures?
Thank you.
There’s very little control you can have over the way AirDrop transfers files, unfortunately Baara!
Mobimover only downloads fulkl photo gallery, i want to select just a few photos and not wait three hours to download the fulls stock.
When I google for “how to transfer photos iphone to pc individually select” it shows this blog and you failed to deliver the answer
Sorry Luis, I don’t know about ‘Mobimover’.
Mark,
I use Air Drop to transfer photos from my phone to my iMac. After I edit them, either in Photo or Lightroom, I Air Drop them back to my phone if I want to post the edited photos to Instagram. I use the Squareready free app on my phone to adjust the non-square photos to an acceptable IG shape and select the file size I want to post to IG. This has worked well for me.
Ah yes, when Airdrop works, it’s perfect! I feel it’s got much better in recent iOS updates. Thanks for sharing!
Photosync app works wirelessly and efficiently
Thanks for the tip, Frank!
As a long time Mac user and one who doesn’t use iPhoto, I use Image Capture which is a tiny utility supplied with virtually all versions of Mac OS X. Connect whatever iphone you have to either Mac laptop or desktop, launch Image Capture chose a folder to store your images and voila!
That sounds like a nice solution, Michael. Yes, Image Capture is a very underutilized tool, that many Mac users don’t even know exists.
Very helpful article. Another way is if you have a micro usb slot copy to it and then to the laptop or computer.
This is something iPhone users can only dream of!