


How to Colorize Black and White Photos (5 Free Options)
Colorizing your old black and white photos used to be an arduous and expensive process. Now you can do it in a couple of clicks for free. Here's how.
Learn | By Judyth Satyn
Shotkit may earn a commission on affiliate links. Learn more.
This guide on how to colorize black-and-white photos will walk you through the best five free colorization options.
Photographers and artists have been painting black-and-white photos for decades to add vibrance or to focus the viewer's eye on a subject.
Now it is possible to use AI tools to colorize with one click, use the step-by-step guides and learn how to digitally colorize your vintage photos.
5 Options for Colorizing Black and White Photos for Free
1. How to Colorize Black and White Photos in Photoshop
Adobe has a filter that will instantly colorize black and white photos with one click using AI technology.
This technology is incredible for creating accurate colorizations of old classic black-and-white images in seconds.
First introduced as a beta filer in 2021 but has now climbed the prestige ladder to become a permanent Photoshop filter.
The Colorization action is a Neural Filter that uses Adobe Sensei (Photoshop's AI feature) and machine learning to scan, calculate and colorize black and white images.

Follow this step-by-step guide and learn how to colorize using Adobe Photoshop.
Step 1: Download a free trial of Adobe Photoshop
Head to the Adobe website and select an Adobe package that includes Photoshop.
When a payment is requested for the subscription, select the option for a free trial and download Photoshop.
Remember to end the subscription before the trial period ends, or you will be charged.
Step 2: Open the Black and White Image
Open your black-and-white photo in Photoshop.
Ensure the photo is in RGB color mode, navigate to Image > Mode, and select RGB.
If the photo is aged and tinted sepia, desaturate it to facilitate a more accurate colorization by navigating to Image > Adjustment > Desaturate.
And if the photo is faded and lacks contrast, boost the contrast to make it easier for AI to decipher color.
Head to Image > Auto Contrast.
Step 3: Open Neural Filter

Uploading your black and white photo.
Navigate to Filter > Neural Filters
This will open up the new Neural Filters panel.
Step 4: Colorize
In the Neural Filter Panel you will find the Colorize option, click this.
If you have not previously used the Colorize Filter you will need to download it.
Click Download.

The colorized filter takes 326.1MB of disk space to install.
Photoshop AI will instantly colorize your image using its image recognition technology.
Step 5: Adjust Colorization
Make custom adjustments in the Colorize Panel by sliding the saturation and hues bar
Change the colors as you see fit, then click Ok.
Your black-and-white image will now be colorized.

Tips: Neural Filters are not working
You might need to enable Neural Filters in Photoshop, go to Photoshop > Preferences > Plug-Ins.
Check the Enable Neural Filters box and click OK. Restart Photoshop.
If this doesn’t fix the problem, try updating to the latest Photoshop CC version.
To do this, open your Creative Cloud account and click on update beside the Photoshop App.
2. How to Colorize Black and White Photos in Lightroom Classic
Colorizing images using Lightroom Classic is a little more time-consuming than Adobe Photoshop, but still possible if you are a die-hard Lightroom fanatic.
To colorize using Lightroom Classic, use the Lightroom adjustment brush with a colorized swatch applied.
The other is to add new layers and paint on color using a brush and eraser tool.
Follow this step-by-step guide and learn how to colorize using Lightroom Classic.
Step 1: Download a free trial of Adobe Lightroom
Head to the Adobe website and select an Adobe package that includes Lightroom Classic.
Set up an account when a payment is requested, select the free trial option, and download Lightroom Classic.
Remember to end the subscription before the trial period ends, or you will be charged.
Step 2: Open the Black and White Image.
Open up the black and white image to Lightroom Classic.
Right-click on the image and create a virtual copy.
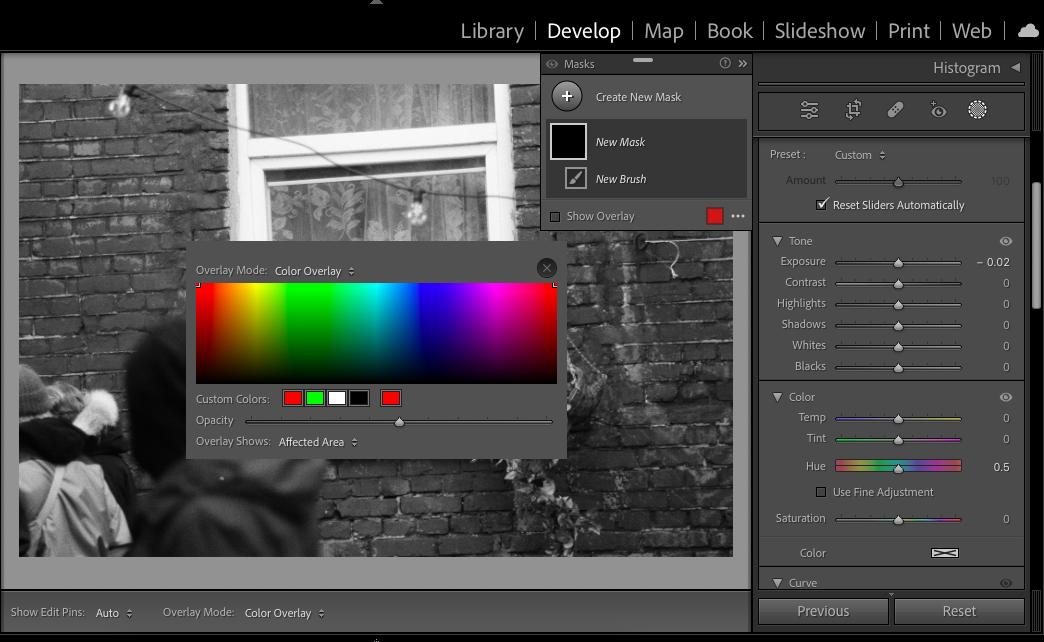
Step 3: Select Adjustment Brush
Select the Adjustment Brush tool and click the Reset button at the bottom right of the tools panel.
Set the Adjustments Brush tools color, size, feather, flow, and density.
The color red has been selected to color the brick wall red.
The Adjustment Brushes density has been decreased to 34% to allow for transparency.
Now paint all the areas of the wall with the Adjustment Brush tool.

Step 4: Set to Erase
To clean up any edges that have accidentally been colored red, for example, the window frame, click Erase in the Adjustment Brush tool panel.
Now use the Eraser brush to erase the color red where it is not needed.

Step 5: Repeat
Follow the steps to color the rest of the photo, select a suitable color for the person or object, paint the subject, and finally erase any mistakes.
You can see it is possible to colorize in Lightroom Classic, but it is a cumbersome and time-consuming process.
Although there is one advantage, you will have complete control over the result.
3. How to Colorize Black and White Photos in Lightroom Mobile
Screenshot or YT Embed
Using Lightroom Mobile you can isolate an object to change its color from green to red or pink to purple with a few clicks.
Colorizing is possible but not as swift, and the colors will be selected by you, not AI.
Follow this step-by-step guide and learn how to colorize using Lightroom Mobile.
Step 1: Download the Lightroom Mobile app
If you have an Android head to Google Play, if you have an iOS head to App Store and download Lightroom Mobile.
Lightroom Mobile is an excellent image editing app and it is free!
Step 2: Open a Black and White Image
Open the app and open the black and white image to colorize.
Step 3: Mask
Click the Masking icon in the bottom left of the screen.

A panel will pop up, click the blue circle with the plus symbol inside, then choose Brush.
A layer mask is created over the black-and-white image, using the brush to draw a section of the image.
Adjust the settings of the brush, and using your finger draw over the image, in this case, we have colored the dress first.
Click the eraser icon to swap over to the eraser if you need to remove areas.
Step 4: Color
In the bottom panel click the Color icon and a Color Panel will appear.
Slide the color sliders, Temp, Tint, Saturation, Hue, and Color, from left to right to adjust the color of the Layer Mask.

Step 5: Repeat
Repeat steps 3 and 4 for each section that needs to be colorized.
When finished, share or save your colorized image to your phone.
Adobe MAX 2024 Update
The Adobe MAX Update 2024 further enhances Lightroom Mobile’s powerful editing and workflow management toolkit.
The 2024 MAX update adds the new Quick Actions feature and significantly improves the Generative Remove function.
Quick Actions automatically creates masks to best suit an image's subject matter. It also suggests ways to optimize your workflow further and reduce time spent editing on the go.
Generative Remove is the second standout feature of Adobe MAX Update 2024 for Lightroom.
It’s simpler than ever to identify an unwanted distraction, circle it, and Generate Remove cleanly remove the item and correctly render the vacant space.
4. How to Colorize Black and White Photos on iPhone
There are many Apps to choose from when you want to colorize vintage black-and-white photos on your phone.
You can use an app such as Apple Photos App, Google Photos, Colorize, Snapseed, or Fotor, to name a few.
Most Android and iPhone photo editing apps use AI to colorize black-and-white photos.
The final result will be instant and impeccably accurate.
Fof this step-by-step guide, we have chosen to use the Fotor App.
The following steps are transferable to most other photo editing apps.
Step 1: Download Fotor
Head to Google Play or App Store and install Fotor on your phone.
Step 2: Open Image
Give Fotor access to your photo library and open your black-and-white photo to edit.

Step 3: Click Colorize
Below the photo, an editing option bar will appear.
Slide until you find the Colorize button, then press it.
Your image will be instantly colorized, save your image.
5. How to Colorize Black and White Photos in GIMP
Even though GIMP is known as the poor man's Photoshop it still has an abundance of powerful tools and features.
You will not find an automatic AI-powered miraculous one-click colorization option in GIMP.
But like Lightroom Classic, there are alternative ways to colorize a black-and-white photo using GIMP.
You will be pleasantly surprised at GIMP's capabilities, follow these simple steps, and we will show you how.
Step 1: Download GIMP
Head to the GIMP website and select Download from the top menu bar.
When the downloads page opens, click the orange Download button.
GIMP will now download onto your device.
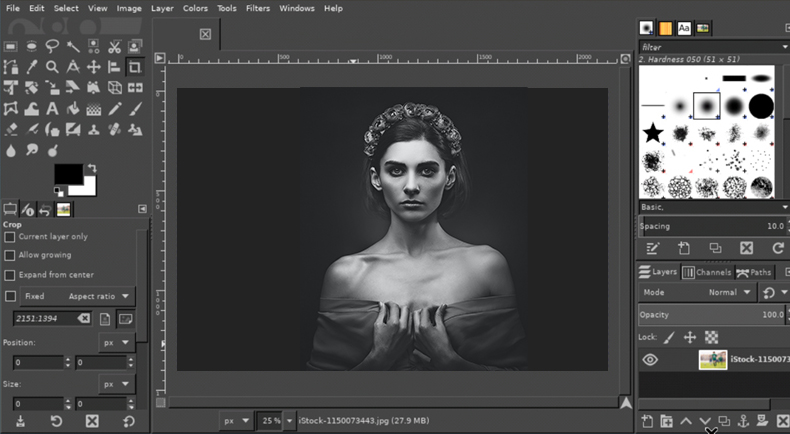
Step 2: Upload a Black & White Image
Open the black and white image you wish to colorize in GIMP and convert it to GIMP SRGB color mode.
Make sure the image mode is not greyscale.
If the image mode is greyscale, change it to RGB to access GIMP colors when editing.
Duplicate the image layer.
Step 3: Open a Color Reference Image
Open a reference image.
A reference image contains the source colors you wish to transfer onto the black-and-white image.
Step 4: Select Colors
Select the eyedropper tool from the toolbar, ensuring the sample average is checked.
Use the reference image and select the colors you wish to add to your black-and-white image.
Such as skin tones, dress tones, lips, and hair.
Step 5: Create Color Palettes
Create Color Palettes and add the color swatches from the reference image.
To do this, navigate to the top menu bar and select Windows.
From the drop-down menu, select Dockable Dialogs > Palettes.
This will open the Palette Panel to the right of the canvas workspace.
Click the custom Palette icon to create new palettes.
Add the colors, and name the palettes accordingly, for example, skin tones, lip tones, or dress tones.
When you have created the necessary color palettes you are ready to colorize.
Step 6: Colorize
Skip back to the black-and-white photo.
Decide which area you wish to paint and activate the corresponding Color Palette by clicking on it in the Palette Panel.
Ensure the palette colors are arranged from darkest to lightest.
Navigate to the top menu bar and select Colors > Map Palette > Map.
This action will instantly transform the image, painting it with the colors from the currently activated color palette.
Step 7: Layer Mode
The applied colors will be clunky and undefined.
To fix this, you can change the Mode of the colorized layer by clicking the Mode box in the Layers Panel.
From the drop-down Mode menu select LCH Color.
Now the palette colors will blend with the image, showing shadows and features.

Step 8: Remove Extra Color
The entire layer will now be covered in the palette tones of the chosen color palette, including hair, eyes, and lips.
Create a layer mask to hide the palette tones from areas it is not needed.
Right-click the layer and add a Layer Mask, making the Layer Mask black transparency.
Select the brush tool, and with the layer mask active, use the white brush to remove color from the image where it is not needed.
Step 9: Repeat
Now repeat these steps for each color palette.
Create a new image copy in the layers panel, apply a color palette to this layer, change the layer mode, and add a layer mask.
This is the way you will be able to colorize the entire image.
This may seem like a long process, but it becomes quicker when the color palettes are added and ready for future use in GIMP.
Although the GIMP colorization method is more time-consuming than Photoshop, it is quicker and more effective than Lightroom Classic.
6. Use a Website to Turn Black and White Photos into Color

If you want to colorize only one or two images use a website so you don't have to download an application.
You won't have to invest time waiting for the application to download, and you won't waste valuable computer storage space.
Many excellent websites will colorize your old black-and-white images for free we have chosen IMG2GO.
Follow this step-by-step guide and learn how to colorize using IMG2GO.
Step 1: Upload Image
Head to IMG2GO webiste.
Upload your image to the website by dragging and dropping it onto the “Drop Files Here” box or by clicking the “Choose File” and locating your file.
Step 2: Start
When your image is uploaded, click the green Start button at the bottom left of the screen.
The website will now begin to process your image using AI for colorization.

Step 3: Download
When the file has been converted, you can upload the image to the cloud or download it to your device.
Download your colorized image and open it to view the results.
Step 3: Feedback
You can rate the final result. In this case, I am more than happy with the result, so I have given IMG2GO the highest possible rating.
What is the Best App for Colorizing Old Photos?

Using an app to colorize your old black-and-white photos is the easiest way to achieve instant, accurate color.
Here are some recommended apps:
- Adobe Photoshop – Multipurpose image manipulation software, including AI instant colorization.
- SnapSeed – Free photo editing app for Andriod and iOs and will colorize a photo in a few clicks.
- Fotor – Free multi-platform image editing software, including colorization.
- Afterlight – A phone photo coloring app, including fast and free colorization.
- GIMP – Free and open-source image editing software, colorization is not instantly achieved.
Now you know how to colorize black and white photographs, get ready to have fun colorizing old family photos, and finally discover what color bikini great Aunt Betty and her friends were wearing.

Check out these 8 essential tools to help you succeed as a professional photographer.
Includes limited-time discounts.

Judyth is an experienced studio photographer and glass artist. When she isn’t Photoshopping comedians into the bellies of sharks, you can find her cooking delicious treats for her guests.
1 Comment
Leave a Comment
👋 WELCOME TO SHOTKIT!
🔥 Popular NOW:

Great list, thanks! I’d also add Photoglory to it, it’s a photo restoration software which is good for both repairing and colorizing photos in a pretty realistic way. Really liked this one.