


Shotkit may earn a commission on affiliate links. Learn more.
Editing portraits in Lightroom is an art. It is, however, very rewarding and enjoyable, allowing you to take a photo and create an image that really grabs the viewer’s attention.
As with many genres of photography, every portrait photograph is different, with lots of variation depending on everything from the lighting and background through to the tonality of your subject’s skin.
If you want to learn how to edit portraits in Lightroom, you should first understand that it’s not just about knowing how to make specific changes; it’s about figuring out what needs to be edited.
Simply knowing how to use certain tools isn’t going to give good results until you also train your eye to see which parts of an image require some tweaking.
Knowing how to work systematically will help you to achieve consistent results.
Like everything, this is just a matter of practice, and this guide will give you some great tips to get you started along your path to becoming a master at portrait editing using Adobe Lightroom.
Popular course reveals the simple tricks to getting incredible results with Lightroom in record time. Give Your Photos The Look They Deserve!
![]()
Guide to Editing Portraits in Lightroom
There’s no “one-size-fits-all” method for how to edit portraits in Lightroom, but there are a number of tools to understand, processes to learn, and tricks to implement that should give you a solid foundation upon which to build.
There’s not a definitive series of steps to follow when editing your portrait as different images often require a different way of going about things, and making changes to one area might mean that you need to go back and tweak something else.
Experience is key, but this list is a good place to get started — just don’t assume that every step always has to happen in the same order.
(Don’t already own Lightroom? Here’s how to get it.)
Get it right in camera
A well-composed, well-lit portrait shot on a high-quality camera will not only require less editing, but it will also be much easier to edit.
Soft, even lighting will avoid you needing to get rid of dark shadows, and a good lens coupled with knowledge of how to focus will ensure that you get eyes that are sharp.
These two things will make your Lightroom editing process much easier and learning how to shoot portraits will give you an advantage when it comes to editing them.
See also: 7 Popular Lightroom Editing Styles to Try Today
Don’t go too heavy with your edit
While landscapes and street photography can sometimes lend themselves well to a heavy edit, it’s best to start off by aiming to keep your portraits looking realistic. If the first thing a person sees when looking at your photo is the editing, you’ve gone too far.
My rule for learning is to ask a non-photographer friend if they can tell that you’ve edited a photograph. If the answer is yes, it’s time to wind it back.
Heavy editing has its place for when you want to push your creativity, but it’s best to learn the rules before you decide to break them. This is especially important when it comes to working with portraits.
Not many brides will want a brutal orange and teal split toned edit for their wedding day, for example.
In addition, heavy portrait editing can hide aspects of the photo that might otherwise have required some work. While this can be useful at times, you might be missing out on some skills that will come in useful later on in your photographic journey.
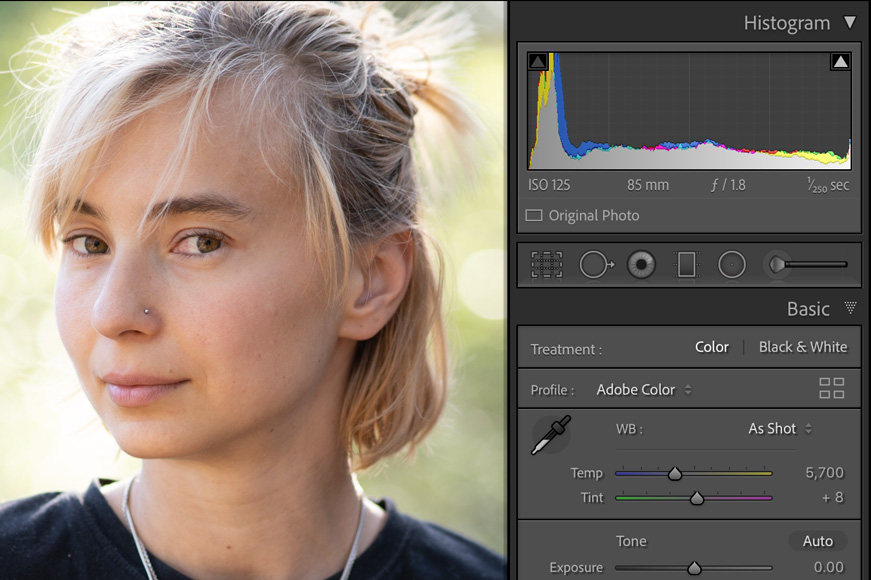
Set the white balance
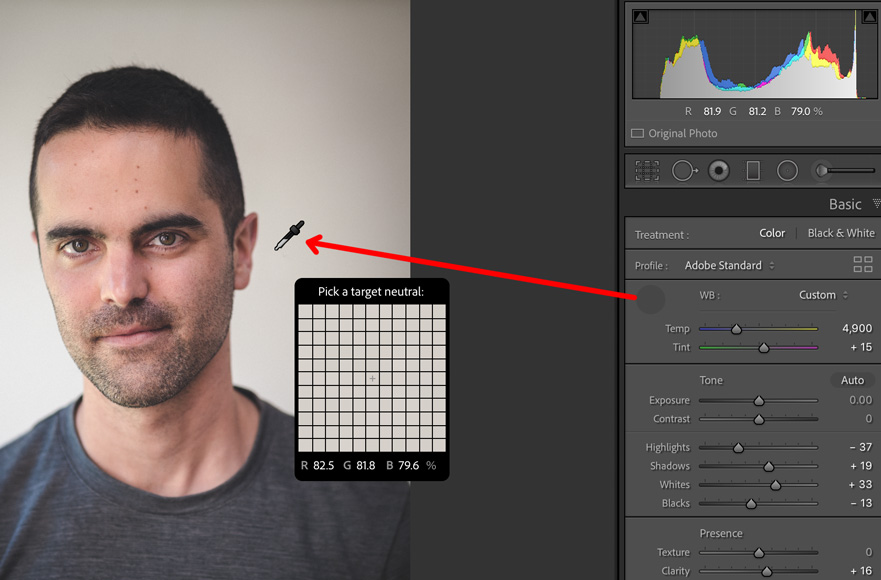
The first step to achieving realistic skin tones in your Lightroom portrait editing is to find the right white balance. There are a couple of different ways to achieve this.
If there’s something that’s a neutral grey or white in your photograph, you can tell Lightroom to use this as a point of reference for the entire image.
In the Basic panel, you’ll see an eyedropper that can be grabbed by clicking it or by pressing W. You can then click on your grey or white area and the white balance will change automatically.
Keep in mind that shades of grey can have more colour in them than you realise and using a grey that’s not neutral as your reference point can cause your photos to have a colour cast.
To be as accurate as possible with your portraits, you can always shoot with something like an X-Rite Color Checker or, failing that, just a sheet of white paper.
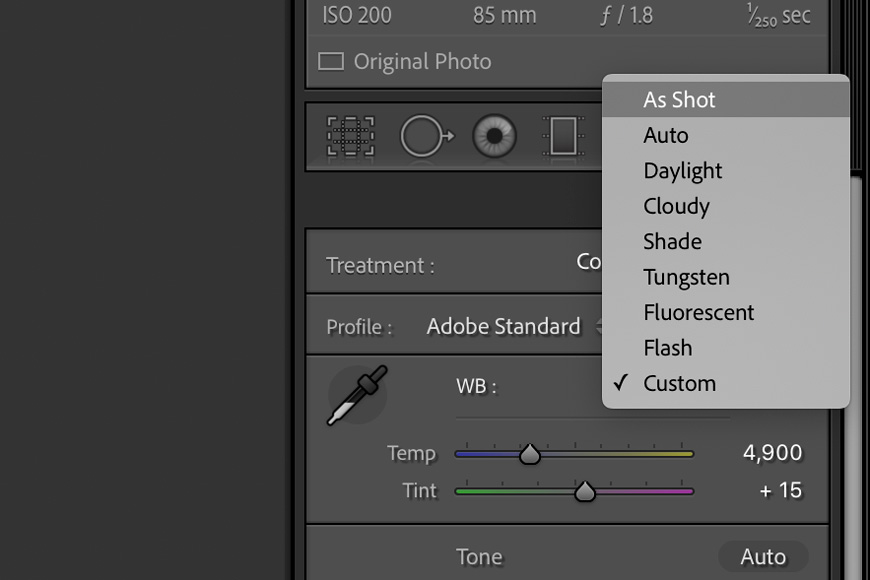
The second method is to choose one of the options from the drop-down menu. From here you’ll find As Shot, Auto, Daylight, Cloudy, etc. You can choose the one that best matches your shooting conditions, or see how it looks with Auto.
Alternatively, you can tweak the White Balance manually using the two sliders: start off by dragging the Temp slider — left will make it colder (i.e., bluer), while right will make it warmer (yellower).
You can then tweak the Tint slider to balance out the green (left) and magenta (right) in your portraits.
Whatever you decide, you might want to periodically reset your eyes by looking away from the computer monitor — ideally by staring out of the window or stepping outside.
At various stages of a Lightroom portrait edit, it’s important to take some time away from the computer as refreshing your vision can allow to you realise when things aren’t quite right.
One last thing to keep in mind: changing the exposure significantly can shift the colours in an image and you might need to revisit the white balance as a result.
Get the colors right
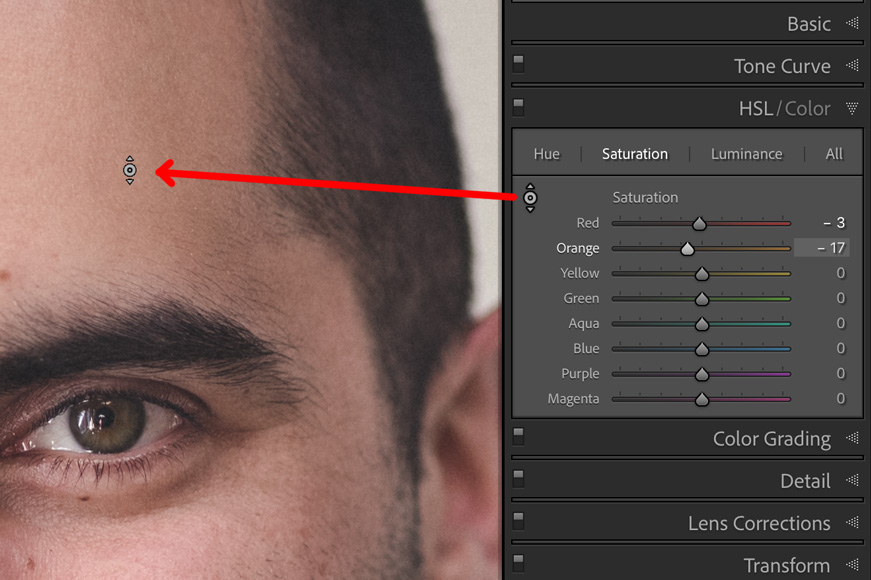
Digital cameras can struggle with skin tones and different screens can also make them look odd.
One trick is to desaturate the skin slightly by reducing the Saturation for the entire image, and this can work particularly well on male subjects.
If you don’t want to change the entire image, go to the Lightroom HSL panel, choose Saturation, and use the color picker (the small circle in the top left of the panel) to then click on an area of skin and drag downwards. You will see that the Red and Orange sliders will shift to the left.
Alternatively, you can apply this as a local adjustment to your portraits — see below.
Exposure
The histogram in the top right-hand corner of Lightroom’s Develop module is key to understanding your exposure, but don’t assume that the Exposure slider itself is the obvious place to start — this will make a global adjustment that can often wait until later when editing your portrait.
Lightroom’s Histogram gives you a good indication of how your portrait photo is exposed according to its tonal range.
There are occasions where we might want a dark and moody edit where information is lost in the shadows (i.e., peaks disappearing out to the left of the histogram), or we might prefer a light and airy edit where we’re blowing information in the highlights (i.e., peaks on the histogram are disappearing out to the right).
For now, try and achieve a good spread in your photo editing with some absolute blacks and whites, and a wide variation in between.
We can have Lightroom assist us by pressing J (the keyboard shortcut for showing clipping in the highlights and shadows – see more Lightroom keyboard shortcuts here.).
You might immediately notice some changes: any regions where the image is too dark to contain any information are being highlighted in blue, and any regions where it’s too bright to contain information are highlighted in red.
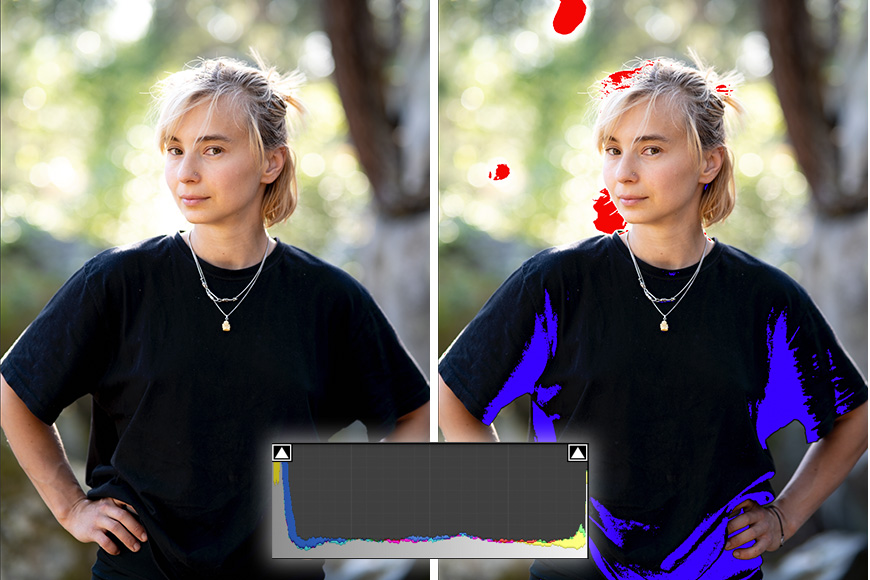
This is a useful visual cue to show us where information is being lost in your portraits, and you’ll notice that the histogram will also reflect this with the peaks being stacked left (too dark) or right (too bright).
A well-lit image might contain some lost shadows or highlights, but not both. However, photos captured in bright, high-contrast conditions might have both red and blue regions showing up.
As mentioned, dragging the Exposure slider will affect the entire image which might not be necessary if the subject’s skin already looks good. Instead, we can use the Black and White sliders.
Holding the Alt (Windows) or Option (MacOS) key and dragging the Black or White slider will give you a visual indication of when information is being lost. Your image will turn white as you drag the Black slider with blue areas appearing where information is being lost, and the image will turn black as you drag the White slider with red areas appearing.
You’re aiming to get each slider just on the edge of where these red or blue areas start to appear. You might be happy to lose information in the blacks to add a little drama to your image, particularly if it has a dark background.
Lift shadows, reduce highlights
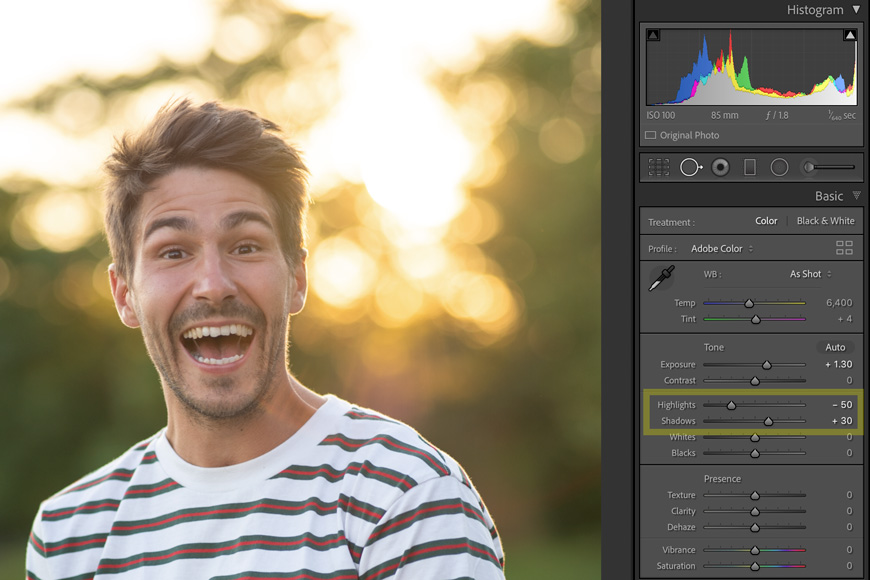
With your black and white boundaries established, you can now take information that’s disappearing in the shadows and spread it towards the midtones, making it more visible. This is done by sliding the Shadows slider to the right, and again you can hold Alt/Option to see where information is being lost.
If you watch your histogram, you’ll notice that the peaks shift to the right as you drag the Shadows slider to the right while editing your portrait.
Similarly, you can bring down highlights, this time moving bright areas more towards the midtones, and reducing the overall contrast of the image. You’ll see that the histogram shifts to the left.
This method of lifting areas of shadow and reducing highlights is used frequently by portrait photographers to even out the tonal range of an image and create a more subtle result — something that is quite flattering for skin tones.
Improving skin: remove blemishes
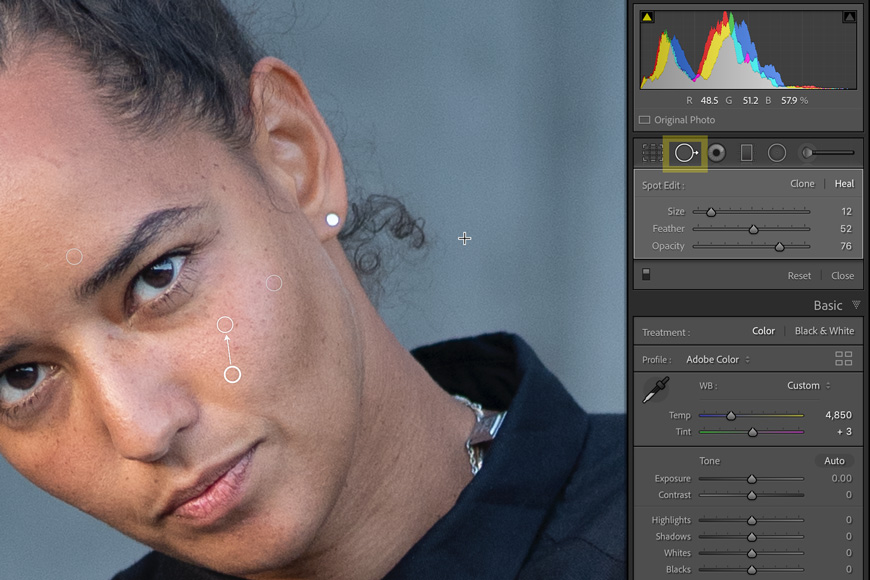
A common question around how to edit portraits in Lightroom is whether it can be used for skin retouching. The answer is yes – you can even avoid using other photo editing software (such as Photoshop) altogether if you wish.
Lightroom’s Spot Removal tool is powerful, offering non-destructive changes and allowing you to use existing parts of the image to remove imperfections in your portraits.
The extent to which you edit your subject’s appearance is often debated. Some photographers will argue that anything that wouldn’t be on the skin in a month’s time — pimples on the face, for example — can be removed. Others will go further, removing moles and scars, and eliminating wrinkles and areas of heavy shadow such as the bags under the eyes.
Where you draw the line with your portraits is up to you, but it’s best to discuss it with your model so that you both have the same expectations.
The one-month rule is a good guide when editing portraits, but it’s worth considering that the static nature of a photo can make imperfections more apparent than they are in real life. There are ways to reduce the presence of a shadow, scar or wrinkle without removing it completely, and this can be a good compromise.
It’s best to work at 100% zoom but it’s important to zoom out regularly as it’s easy to get lost in your edits and push skin retouching too far.
To remove an imperfection, select the Spot Removal tool (press Q while in the Develop Module) and then click or click and drag over an area. Lightroom will try to intelligently cover the imperfection with information from elsewhere in the image.
The tool is circular and you’ll notice that you can change the brush size (with the slider or your mouse wheel), and the feather which will soften the edges of the brush and make blending easier.
For simple blemishes, keep the Opacity quite high — between 80 and 100. The higher the number, the more it will cover up the blemish. (Here’s how to remove blemishes in Photoshop.)
If you click and drag a shape, keep these shapes relatively small as Lightroom will then do a better job of judging where to take a sample from and also give you more flexibility.
If you don’t like where Lightroom is sampling from, you can drag the source selection elsewhere. Alternatively, press the backslash key to make Lightroom automatically choose a different source area.
You can also resize it, though I often prefer to start over if my selection isn’t quite right. To remove a Spot Removal, simply hit Delete.
If your image is filling up with spot removals and the overlays are getting in the way, press H to toggle their visibility on and off. This will also allow you to brush over existing spot removals.
Pro tip: The tool has two modes: Clone and Heal. Clone will take a direct copy from an area whereas Heal will try to blend the content intelligently based on the colors and texture of the surrounding area. Heal often works better on skin as it tends to give a more subtle transition, making it ideal for portrait photo retouching.
Perfecting skin: reducing portrait imperfections

Keep in mind that no-one has perfect skin. When it comes to portrait editing, “perfect skin” does not mean that your model should look like they’re made out of smooth plastic.
To make more subtle changes to skin imperfections — perhaps to scars, bags under eyes, or wrinkles — reduce the Opacity to around 50%.
This way the presence of a feature can be reduced rather than being hidden completely, and it also makes for a more subtle transition when you’re trying to reduce the appearance of something larger.
This can be a time-consuming part of the portrait editing process but you should soon learn how to set your opacity and choose the right source areas in order to create pleasing results.
Perfecting skin: making it smoother
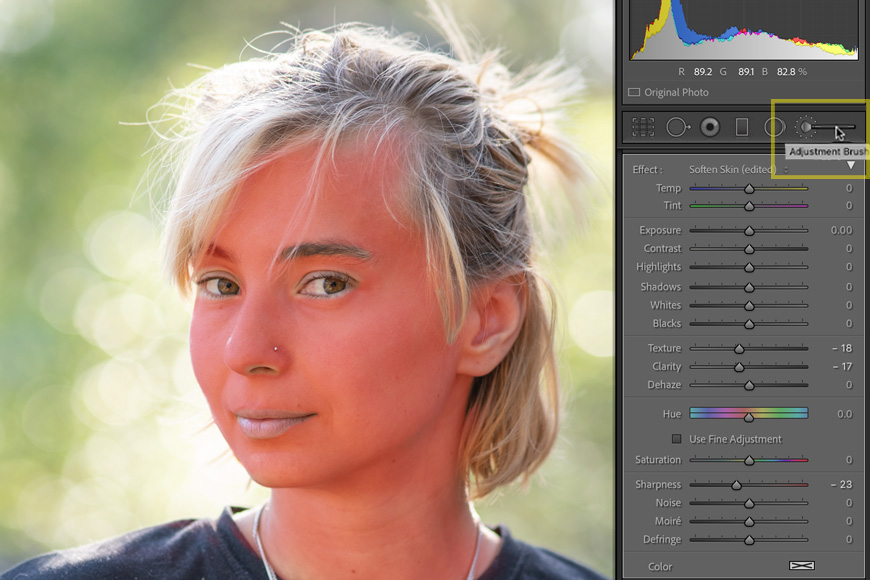
Another thing we can do when portrait editing in Lightroom is to make skin look smoother by lowering sliders such as Clarity, Contrast, and Texture. However, we don’t want to make those changes to the entire image.
Instead, we want to use Lightroom’s Local Adjustment Brush to paint these changes onto specifics parts of the face. You can select the tool by clicking on it or pressing K while in the Develop Module.
From here, you have a choice: you can paint in the area of your portrait that you want to affect, then adjust the sliders to make the changes. Alternatively, you can set the changes that you want to make and paint them in as you go.
Use the first method to make a more general adjustment: double click the word “Effect” in the brush panel to reset all of your sliders. Press T to show the toolbar and click the box next to “Show Selected Mask Overlay” (or just press O).
You can change the size of the brush tool by dragging the slider, pressing the square brackets, or by scrolling your mouse wheel. You can change the feather by doing the same while holding shift.
For now, set both the Flow and Density to 100%.
Flow changes how much comes through in a single stroke of the brush, while Density changes the maximum that can be achieved regardless of how much you’re brushing in the same place. When you’re starting out, leave the Density at 100 and forget about it, adding subtlety to your brushing by reducing the Flow.
You can now paint all of the areas of skin that you want to make smoother, avoiding the eyes, nose, lips, and hair. The mask overlay will make it look red, but this is just a guide to show where you’re painting.
Zoom in to 100% to ensure accuracy.
You can switch to the Erase brush if you make a mistake, or simply hold Alt (Windows) or Option (MacOS) to switch temporarily.
To help you from overlapping past the edge of the face, you can select Auto Mask. Lightroom will guess the boundaries of what you are trying to paint and prevent the brush from going beyond.
Once complete, you can switch off the overlay (press O again) and use the sliders on the right to make a general adjustment for the skin. Make sure that you’re zoomed in to 100% and see what happens when you lower Texture, Clarity, Sharpness, and Dehaze.
(For reference, here’s how to smoothen skin in Photoshop.)
You might also want to brighten the skin very slightly by increasing Exposure and/or Shadows. Again, be very delicate.
Be sure to make this a very subtle change and, as with all things in Lightroom portrait editing, err on the side of caution. Zoom in and out while assessing its impact, and keep in mind that too much smoothing will make your subject look fake.
As we said above, one of the hardest parts about learning how to edit portraits in Lightroom is developing your sense of judgement.
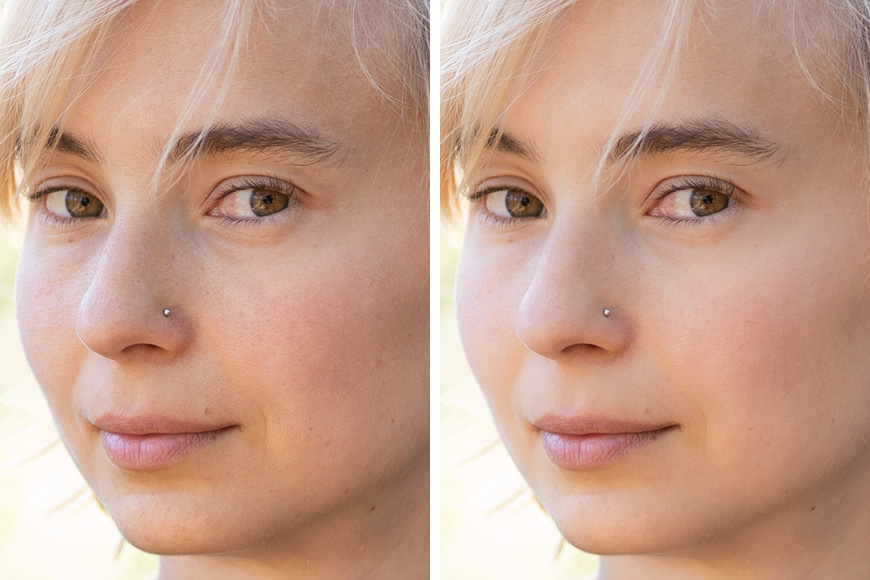
Eyes part one: brightening the sockets
As every portrait photographer will tell you, the eyes are the most important part of the photograph. To increase their impact, there are a few changes that you can make.
Firstly, this can be very subtle but the eyes as a whole can benefit from being very slightly brighter. Use the Local Adjustment Brush tool with a large feather, flow of around 80, and density set to 100.
I find that I get better results by being gentle with the Exposure — say, +10 instead of +20 — but complementing it with a slight increase in Shadows.
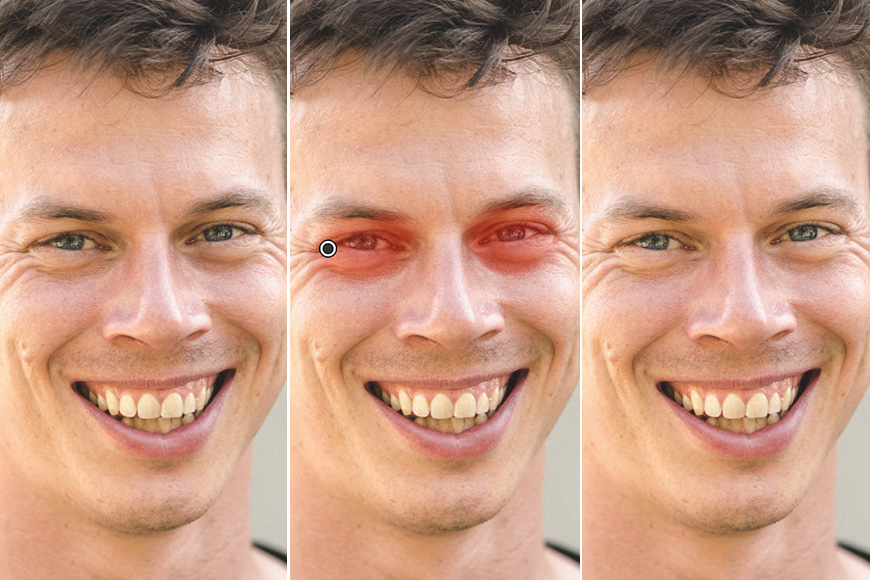
Eyes part two: the whites
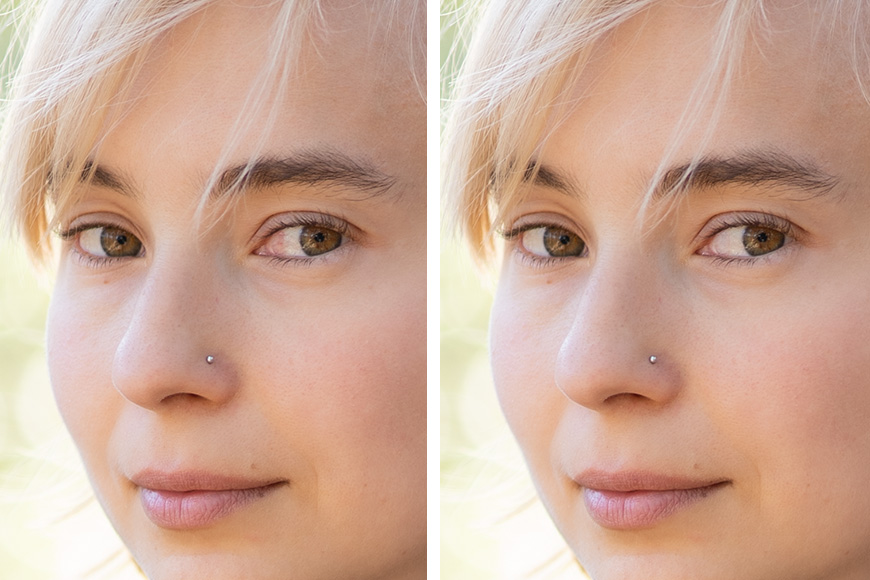
Because the eyes are so important, less experienced photographers find it easy to go a little bit crazy when it comes to editing the eyes. Be gentle.
The whites of the eyes — the sclera — sometimes need a little tidying.
Use a very small Spot Replacement tool in Lightroom to remove unwanted capillaries. You need to be very precise so zoom in to 300% if required and don’t be afraid to use the white of the other eye as a source. Heal definitely works better than Clone.
The corner of the sclera can be pink so use a Local Adjustment Brush to make tiny changes. Start off by turning the Flow to 60, Exposure to 0.10, and Saturation to -20.
Remember to zoom back out to assess your changes. Once you’ve finished painting, you can tweak your sliders to get the best results.
The sclera, in general, can be made brighter and whiter (try Exposure 0.15, Saturation -10) but again, don’t push this too far. Keep zooming out to assess your changes.
Eyes part three: the iris
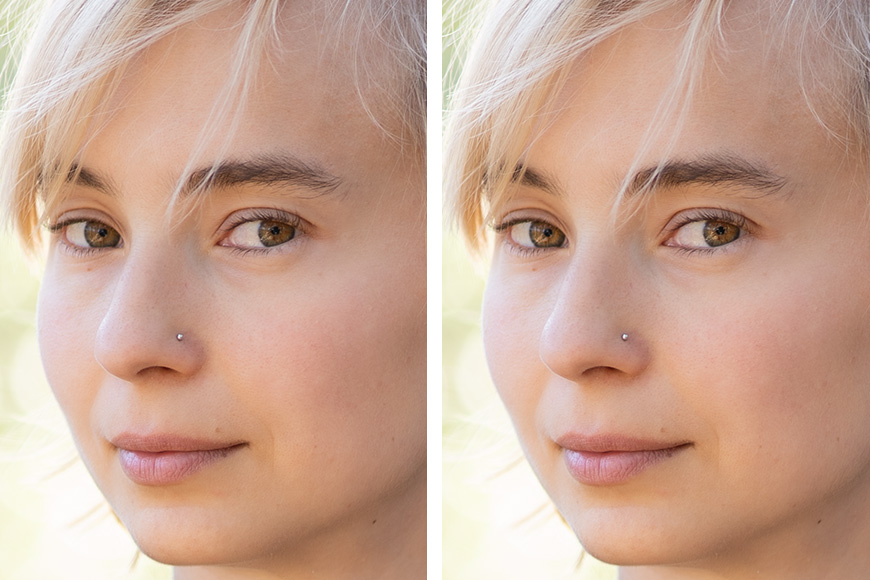
Making the irises brighter and sharper can make someone’s gaze more intense.
Choose the Adjustment Brush and from the dropdown list of Effects, choose Iris Enhance. You will see that it increases Exposure, Clarity, and Saturation.
Alternatively, you can dial in your own settings, perhaps adding Sharpness, or tweaking the color. You can do this by shifting the Temp, using the Hue slider, or painting in a new color entirely by clicking on the white square (next to the word Color) and making a selection.
The Mouth
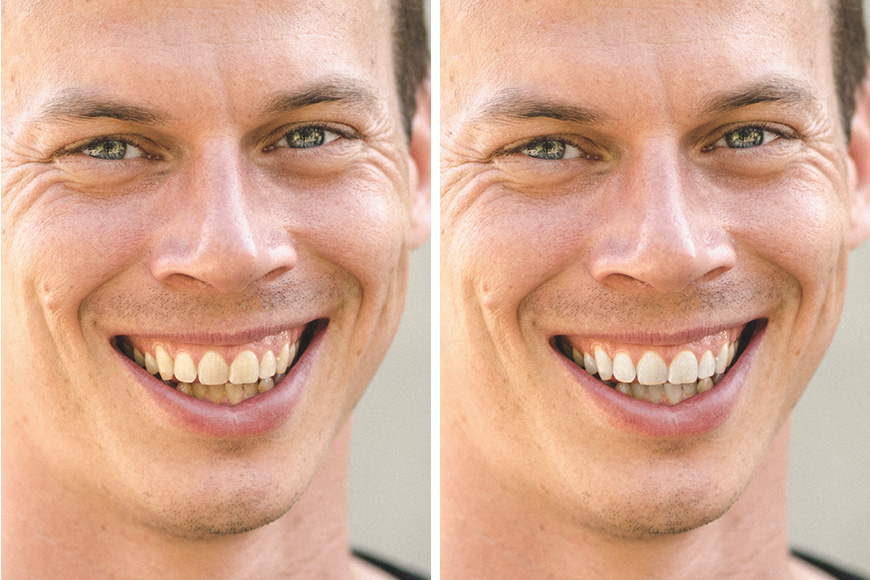
Teeth are another important part of photo editing in portrait photography.
No-one’s teeth are perfectly white and nor should they be, but yellow teeth can be undesirable and photos can make them seem worse.
Using a Local Adjustment Brush, select Teeth Whitening, and note that it lifts Exposure and reduces Saturation. This might be too extreme so be prepared to dial back those settings somewhat.
Lips can benefit from a boost to the Saturation and a slight drop in Exposure. Again, you can dial in your own color if your model was wearing lipstick but it wasn’t quite to your taste.
You can also tidy up any deep furrows in the lips using the Lightroom Spot Removal tool. Keep the opacity relatively low to maintain some of the detail and avoid making it unnatural.
(For reference, here’s how to whiten teeth in Photoshop.)
Lifting heavy shadows
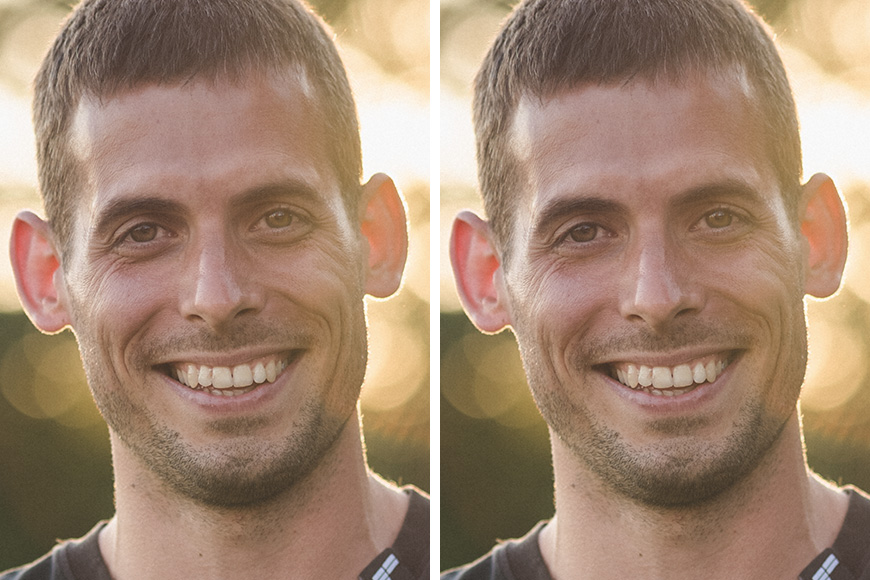
Even with the changes done to the Shadows slider described towards the start of this guide, there might yet be some parts of the face — particularly under the eyes or at the corners of the mouth — that would benefit from a local adjustment.
Choose a brush with a flow of around 50-60 and a generous feather as you’ll want to be quite subtle.
You can pick Dodge (Lighten) from the list of brush effects but I prefer to lift both Exposure and Shadows together as I find it gives a more even result.
Lightroom Portrait Editing FAQs
How do you edit a portrait in Lightroom Mobile?
Lightroom Mobile offers many of the same basic tools as the full version. First, you can adjust exposure and contrast, lift shadows, and fix your white balance. You can then use the Healing tool to remove blemishes and the Clarity tool to smooth and soften the skin.
How do I make portraits pop in Lightroom?
For ‘pop’, try adjusting the sliders for contrast, vibrance, shadows and highlights, and your black and white points. Just be careful not to overdo it or your portrait will start to look unnatural.
Can you edit faces in Lightroom?
Yes. Lightroom can be used for retouching as well as editing. As instructed above, you can remove blemishes, reduce imperfections, make skin smoother, brighten eyes, whiten teeth, and more.
Adobe MAX 2024 Update
The Adobe MAX Update 2024 further enhances Lightroom Mobile’s powerful editing and workflow management toolkit.
The 2024 MAX update adds the new Quick Actions feature and significantly improves the Generative Remove function.
Quick Actions automatically creates masks to best suit an image’s subject matter. It also suggests ways to optimize your workflow further and reduce time spent editing on the go.
Generative Remove is the second standout feature of Adobe MAX Update 2024 for Lightroom.
It’s simpler than ever to identify an unwanted distraction, circle it, and Generate Remove cleanly remove the item and correctly render the vacant space.
How to Edit Portraits in Lightroom | Final Words
You might find yourself spending more time editing portraits than other types of photos, and this is normal given the number of small details that need adjusting.
Because Lightroom’s workflow is non-destructive, you can keep refining your portrait photo until it feels right, or even create Virtual Copies to experiment with different versions.
Now you know some tips and tricks for how to edit portraits in Lightroom, all that’s left to do is go out and give it a try.
This list should give you a good foundation – and do feel free to report back with your progress or ask any questions if you get stuck. Good luck!
Andy Day is a British photographer and writing, living and working in France, specialising in adventure, travel, architectural and landscape photography.
1 Comment
Leave a Comment

👋 WELCOME TO SHOTKIT!
🔥 Popular NOW:

Thanks for the tips