


High Key vs Low Key Lighting (Differences for Photographers)
Want to learn about high key vs low key lighting? This guide explains these lighting styles plus tips for creating them in a studio or outdoors.
Shotkit may earn a commission on affiliate links. Learn more.
Being a photographer means that you use light to build your creative vision. When you choose the lighting of your subject or your scene, you're deciding an entire mood.
This mood determines what the viewer will feel and think when looking at your photograph. High key and low key lighting are two effective lighting styles that can help you with this.
In this article, you can learn what high key and low key lighting styles are. You'll also find some tips on how to achieve these setups in the studio or control the light outdoors.
And finally, we'll go through which situations are better to use one or the other. So keep on reading.
What is High Key Lighting?

High Key is commonly mistaken for a photograph where everything is white. Yes, that would be an example of high key, but it’s not the only one.
A high key image is bright, with a perfectly lit subject and background, and has a dominance of light tones. Overall it has very little contrast.
As you see, it doesn’t mean there won’t be any dark areas, only that they’re kept to a minimum. And you’re also not constrained to use only white backgrounds, you can go with cream colors or pastel tones.
(See also: common photography terms).
When to Use High Key Lighting
You can use High Key Lighting with any kind of photography. It can suit fashion, portraits, still-life, commercial, or any other genre.
It does, however, communicate a very specific message of peace, purity, and joy. That’s why it’s better for certain subjects.
For example, in portrait photography, high key lighting is best for children, newborns, and brides. In still-life, it can be used for spring-related scenes. In commercial photography, it's often used by brands that are associated with sophistication.
So, you want to use high key lighting when your photographs are youthful and joyful, pure and clean, or minimalist and elegant.
What is Low Key Lighting?
Chiaroscuro lighting example
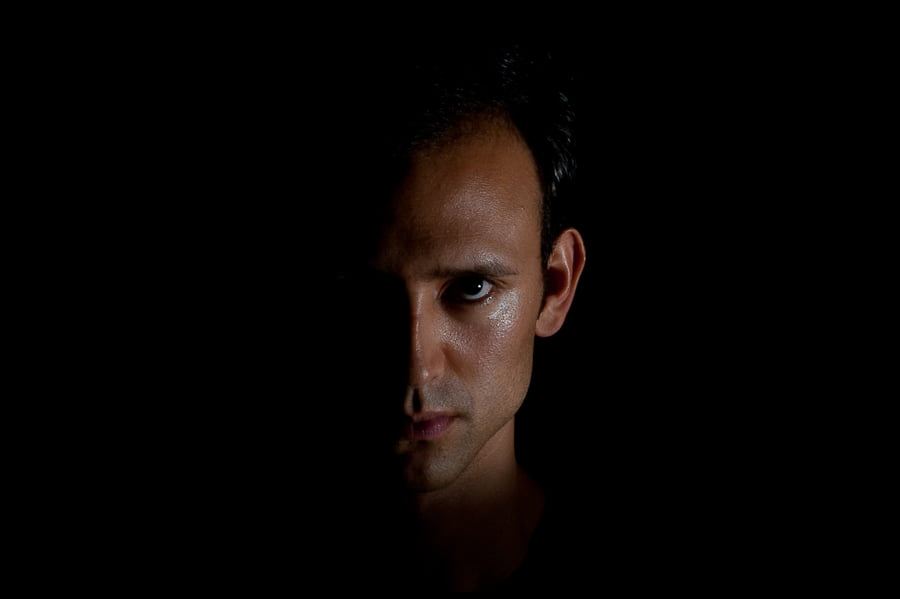
This is the opposite of the high key. Low key lighting creates very dark images with high contrast. They're designed specifically to create a dramatic and intense atmosphere.
Again, it's not about having everything black and no lights. Though generally, there’s only one source of light to highlight a part of the subject and the rest is kept in the shadows.
This way most of the values remain in the dark side of the spectrum. There should be very few whites, but they will be very intense to create the highlights. The mid-tones are usually kept to a minimum.
Low key images are used by photographers to create a very specific mood, but it's also about going with the trend. In the last years, it's been very popular for urban photography, food photography and commercial photography specialized in electronics.
When to Use Low Key Lighting
Just like with high key lighting, it can be used for any photography genre. It just has to fit the specific ambience that you want to set.
The result of low key lighting is a very dramatic image, with tension and mystery. That’s why certain subjects work better than others.
It’s also very popular for ‘moody’ images. If you go to Instagram and search for moody or any related hashtag like #moodyfood or #moodygrams, you’ll notice that many of them are low key.
High Key Lighting Photography Tips
Credit: William F. Santos
The idea of high key originated in lighting schemes for films. It used three lights: the main one that illuminated the subject was the high key. The other two would be a backlight and a fill light.
This doesn’t mean that you absolutely have to make your high key photographs in a studio with three lights. You can also do them with natural lighting.
The important thing is that everything in the frame is well lit, creating very soft shadows. You should get the exposure even throughout the scene so that you don’t have any contrasting parts.
In the Studio
Make sure you light the background evenly. If it’s a big area, you may require two lights, one on each side.
Then place a light on your subject and a fill light that can be one step darker (not more because you don’t want any strong shadows).
Also, keep your background and props in a range of whites or pastels because you want to keep the dark values to a minimum.
You may even want to consider a three point lighting set up if you have enough equipment.
Outdoors
If instead you’re going to shoot outside and use natural light, try to do it on a cloudy day. This will work as a natural softbox.
If this isn’t possible, place your subject in a shadowy area and use diffusers and reflectors to control the light and keep the low contrast.
If you feel it fits the scene, you might want to overexpose half a step or so – just a little in order to keep everything bright.
Low Key Lighting Photography Tips
Credit: NeONBRAND
The main idea is that the majority of the scene is kept dark, and there's only a highlight on the subject.
Whether you’re using studio lights or shooting outdoors, you should expose to the highlights so that everything else stays in the shadows.
Use a black matt backdrop or some other dark color. Keep the clothes of your subject or any props used also in deep colors or shades.
In the Studio
If you want to shoot low key images in the studio, you only need to use one light source. If it's a hard light that’s even better.
You can use light modifiers like snoots to direct the light onto your subject and prevent it from spilling into the background.
Outdoors
If you don’t want to photograph in the studio, then your best bet is to work at night. Find light sources that can light your subject, like street lamps.
You can also do low key with natural daylight, but it’s more difficult and limiting. You would have to find a way to block most of the light, so make sure you plan your location and prepare your gear and props.
One way to ‘kill' the ambient light is to use a fast shutter speed combined with high-speed-sync. Try and shoot several of the same scene in order to minimise your chances of color banding, which can occur when shooting at high speeds indoors.
See our guide to ambient lighting techniques.
High Key vs Low Key Lighting FAQs
- Why would you use high key lighting?
High key lighting is used to create brightly lit scenes and subjects where there is more light and less shadow. Additional lights are used to increase the amount of light on the scene and to reduce the amount of contrast. High key lighting is used for photographing products, food, and makeup.
- What does low key lighting indicate?
Low key lighting is a lighting technique often used to create a more dramatic scene where the contrast and shadows are significantly increased. The contrast is further enhanced through the use of harder lighting to have areas well lit versus those in shadow.
- How is high key lighting done?
High key lighting requires enough ambient light to effectively brighten all areas of the scene. The ambient light includes natural light, speedlights, LEDs, and strobes. The trick to correct high key lighting is to achieve an even amount of light across the whole scene to reduce shadows and contrast.
- What feature on your camera allows you to compensate or override high or low key lighting scenarios?
To compensate or override high or low key lighting scenarios, use the manual aperture control, or Aperture Priority settings on your camera/lens. In high key lighting situations, you can reduce the amount of light by selecting a narrow aperture. In low key lighting scenarios, use a wide aperture to allow as much light as possible to enter the lens.
- What's the difference between high key and low key lighting?
The difference between high key and low key lighting comes down to the amount of light. High key lighting requires additional light to push back shadows and create less contrast. Low key lighting requires less lighting to create stronger shadows and higher levels of contrast.
- How do you capture drama with low key lighting?
To capture drama with low key lighting, make the most of deep shadows and strong contrast. Contrast is an important tool in defining texture, depth and enhancing the appearance of subjects. Shadows greatly aid in adding drama and intrigue to an image as our minds consider what's hidden in the shadows versus what we can see.
Lighting Styles | Final Words
As you can see, the same subject can be photographed with high key lighting or low key lighting. The choice depends on your personal style and the message you want to send.
For example, a model can be photographed in a high key and low key lighting setup to tell two different stories.
Use high key for a corporate portrait that inspires trust in the clients and motivates the staff. Or use a low key style that highlights his or her eyes for a dramatic and moody portrait that emphasizes their visionary character.
Hopefully, this article helped you understand both lighting styles so you can choose which one works better for you the next time you do a photoshoot.

Check out these 8 essential tools to help you succeed as a professional photographer.
Includes limited-time discounts.

Ana Mireles is a Mexican researcher that specializes in photography and communications for the arts and culture sector.
3 Comments
Leave a Comment
👋 WELCOME TO SHOTKIT!
🔥 Popular NOW:

I have GoPro hero13 camera and I want to setup lighting for indoor and outdoor model photography and beauty/makeup.I’m a beginner can you recommend me with budget products for lighting setup
Setting up a budget-friendly lighting kit for indoor and outdoor model and beauty/makeup photography with your GoPro Hero13 is a great way to enhance your images. The Hero13’s wide-angle lens and high-resolution capabilities can produce professional-looking results when paired with the right lighting.
Abeststudio Softbox Lighting Kit: An affordable option for beginners, this kit includes softboxes that diffuse light evenly, reducing harsh shadows—ideal for portrait and beauty photography.
smartinfovision.com
2pack Softbox Continuous Lighting Kit for Camera Photo Video: This beginner-friendly kit offers two octagon softboxes with dimmable lights, providing soft and even illumination suitable for various photography settings.
Neewer 18″ Ring Light Kit: Perfect for beauty and makeup photography, this ring light provides uniform lighting that minimizes shadows, highlighting facial features effectively.
Byrdie
+1
smartinfovision.com
+1
NEEWER Dimmable 5600K USB LED Video Light 2-Pack: A portable and budget-friendly option, these USB-powered LED lights are great for on-the-go shoots and small studio setups.
Godox SL-60W Dimmable Continuous Output Lighting: Known for its high color rendering index (CRI), this light ensures accurate color reproduction, essential for beauty and makeup photography.
NEEWER 2 Pack Bi-Color 660 LED Video Light and Stand Kit: Offering adjustable color temperatures, this versatile kit allows you to match various lighting conditions, making it suitable for both indoor and outdoor shoots.
Investing in the right lighting equipment can significantly enhance the quality of your photography. Start with the basics, and as you gain experience, consider expanding your kit to suit more advanced needs.
Thanks for reading my article – let me know if you have any questions.