


Sky Photography Tips: How to Photograph Beautiful Skies
Everything you need to know about taking the most amazing sky photos, both in the daytime and at night, including the settings to use to maximise impact.
Learn | By Ana Mireles
Shotkit may earn a commission on affiliate links. Learn more.
Would you like to capture beautiful sky photography? Then, you’re in the right place.
In this article, I’ll tell you all you need to know to start shooting sky pictures today.
You won’t need any expensive equipment – except for a few cases. Using your regular camera and lens (or a smartphone), you can create stunning images.
I’ll go through all the recommended equipment, as well as the best camera settings for sky photography.
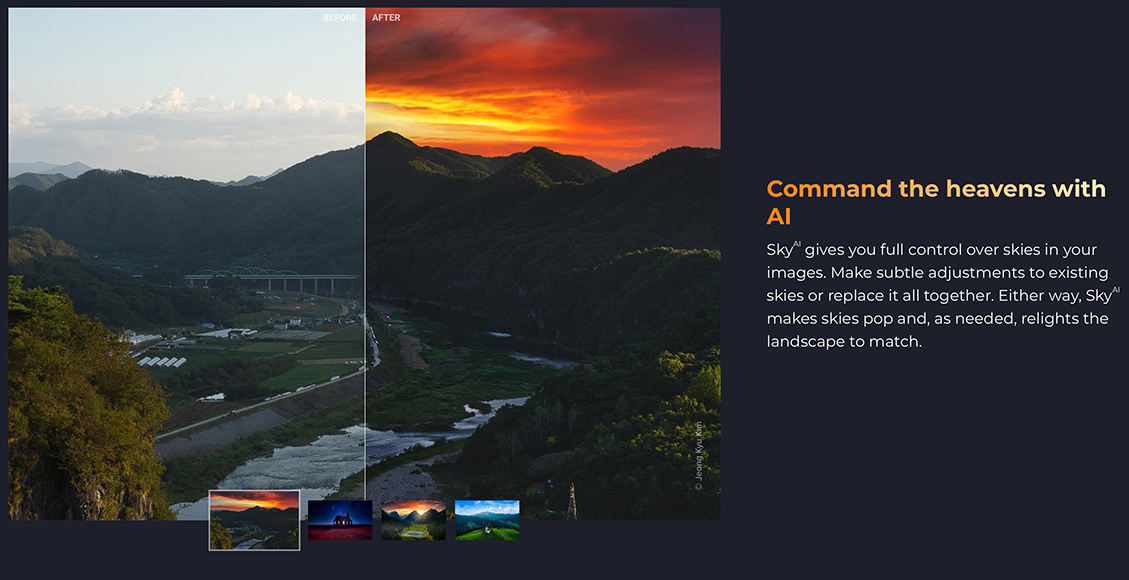
Get full control of skies in your images - make subtle adjustments or replace the sky altogether with just one click.
Use promo code: shotkit10neo
I’ll also give you some pointers to find the perfect time and location for your photoshoot.
You’ll also pickup some great ideas for some scroll-stopping night sky (including deep sky photography) and daytime sky photography.
Are you as pumped as I am about sky photography? Then, let’s get started!
Why Do People Take Pictures of the Sky?

Credit: Hyukman Kwon
Human beings have been fascinated by the sky for thousands of years, whether it was to find a mythical sense of life or a scientific one.
We’ve also associated many cultural meanings with the sky. For most of us, watching the sunset with our partner is very romantic.
Last but not least, the celestial bodies, sky colours, cloud formations, star clusters, etc., have an undeniable visual appeal.
Where to Find a Dramatic Sky
Credit: Sadiqur Rahman
Dramatic skies happen everywhere. It may be in a big city or the countryside, you can see it from high up in the mountains, or down by the sea.
If you’re looking for a specific phenomenon, you might be linked to a precise location. Otherwise, you can photograph dramatic skies wherever you are.
The time of day, the season, and the weather conditions are more important than the location. Of course, you can track all these factors to find out when there will be a dramatic sky wherever you are.
When Is the Best Time of Day for Dramatic Sky Photos?
Doing sky photography during sunrise and sunset usually means having dramatic skies. This is also te best time of day to take outdoor pictures in general.
Of course, it depends on the weather conditions. However, these periods offer a wide range of colors that result in excellent sky photography.
Whenever a storm comes, it’s also a good time to take breathtaking photos. The mood will be different than photographing a sunset. It depends on what you’re looking to create.
For night sky photos, it depends on the subject. If you want to do star shots, try doing it a few days before or after a new moon.
Instead, if you want to capture the moon, you need to wait for the right time in its cicle and the right time of day. For example, it’s best to shoot at dusk to capture the full moon.
To determine the best time for night sky photography, you need to consider the different twilights. Civil twilight is when you can only see a bright star or two. In general, there’s still enough light to move around, and you can capture a good amount of detail.
Then, there’s nautical twilight. This is when you can still see the horizon, but the sky is dark enough for you to see the stars.
Finally, there’s astronomical twilight. Here you can see most of the celestial objects, but some faint ones still won’t show.
Only after these three phases happen you’ll have a night sky.
These are just a few general tips. However, dedicated apps are the best way to determine when and where you’ll find the best conditions for your sky photography. Here are some of the most popular.
5 Apps for Planning Great Sky Photography
TPE. The Photographer Ephemeris: Using this app, you can determine where the sun, moon and milky way will be at a given position. You can also use augmented reality to see how it will look, including an overlay of light pollution. TPE can interact with the weather forecast app Skyfire.
Sun Surveyor: This app is easy to use and customize. It has multiple tools to help you plan your sky photography session. It has Live Camera View, an Interactive Map with Street View, a 3D compass, and other handy features. It’s only available for iPhones and iPad, though.
Photo Pills: The best thing about this app is that it helps you with the technicalities of sky photography. For example, it lets you determine the camera settings, time-lapse shots, and intervals. Of course, it also offers augmented reality and tracking of the Sun, Moon, and the Milky Way.
Stellarium PLUS – Star Map: If you want to get a deeper understanding of what you’re seeing and capturing, this is the app for you. Just point your phone to the sky, and the app will tag everything in sight. You’ll know what planets, constellations, and other deep-sky objects are there. It also offers a simulation of the night sky at any point and place in history.
Astrospheric: This is a weather app designed for photographers. You’ll get information about cloud coverage, air turbulence, air pressure, and other things that could affect your final image. It also helps you to find places with low light pollution.
What Equipment Do I Need for Sky Photography?

Credit: Kamil
You may have heard that you need expensive equipment to do sky photography. In some cases, this is true. However, there are tons of photo opportunities that you can do with regular photography equipment. Let’s break things down.
General gear
Camera – Any mirrorless or DSLR camera will work. Although, a full-frame camera sensor is better than a crop sensor camera.
This is especially true for night sky and deep sky photography. That’s because full-frame cameras have a wider dynamic range – so they have a better low-light performance.
Lens – The focal length depends on the subject and composition. In most situations, you’ll need a wide-angle lens to cover a more extensive sky area.
You can even include an element in the landscape as an anchor point. Instead, to photograph the moon, you’ll want a longer focal length.
Tripod – Any sturdy or heavy-duty tripod works for sky photography. However, there are a few features that come in handy. Consider the lowest height of the tripod. This way, you can point it up to the sky and maybe include a foreground element for composition.
A reversible column might work too. Another thing to consider is the tripod head. When doing star shots, a ball head mount makes it easier to adjust the frame.
Is Special Gear Needed for Daytime Sky Photography?
CPL – A circular polarising filter makes the color in your images look more saturated. This is great for sunrise and sunset. It also enhances the blue in the sky and makes the clouds pop.
Another situation where the CPL comes in handy is when you include bodies of water. This way, you can avoid glare in your image.
ND filter – A neutral density filter is useful when you want to extend the exposure time, and the ambient light is too intense. This way, you can capture long-exposure images of the clouds during the daytime.
Also, a gradual neutral density filter is helpful when the sky is too bright, and the landscape is darker. This way, you can balance the exposure time between both parts of the frame.
What About the Gear Needed for Night Sky Photography?
Fast camera lens – Many people wonder which lens is best for night sky photography. In short, it depends on the subject. More specifically, it depends on the exposure times your subject needs.
For example, the moon is very bright. So you don’t have to worry about the lens’s maximum aperture. However, for star shots, you need very fast lenses. That’s because stars are much dimmer.
That’s because you need a faster shutter speed to avoid the motion blur created by the earth’s rotation. Of course, you can forget about this if you’re making star trails.
Remote shutter release – When photographing the night sky, you need a slower shutter speed. This means that you might create camera shake when you press the shutter. A remote shutter release prevents this from happening.
Lens hood – You probably don’t think about a lens hood while photographing at night. However, it can prevent glare from unwanted light sources – for example, car headlights. Remember that the lens hood won’t prevent light pollution in your photos.
What Gear is Needed for Deep Sky Photography?
The subjects of deep sky astrophotography are beyond our Solar System. Some of these can be captured with a regular camera lens.
Since they are very faint and barely visible to the naked eye. Because of this, you’ll need to use long exposure times. This means that you don’t need a particularly fast lens.
Support system – You’ll need a sturdy tripod. Depending on your desired result, you’ll probably need an equatorial mount. This instrument compensates for the earth’s rotation while you’re exposing your image. However, if you want to capture star trails, you won’t need it.
Telescope – Another optional gear is a telescope. If you choose to use one, you’ll also need an adapter to mount to connect your camera. Here’s a guide to a range of telescopes that will help you capture deep-sky objects.
Remote shutter release – In deep sky photography, you may need long exposures that exceed the maximum exposure time. So, you’ll need to use your camera in Bulb mode. This is much easier to control with a shutter release cable or a wireless remote shutter.
Camera Settings

Credit: Karol D
As you’ve seen, you don’t need special equipment to photograph the sky in most cases.
What is important, though, is the camera setup. That’s why it must have a manual mode functionality.
Daytime Sky Photography Settings
- Exposure mode – The manual mode is almost always necessary to expose your photos properly. This is especially so if there’s an element in the foreground.
- Shutter Speed – If you want to photograph moving clouds, you need longer exposure times. Try starting with 10 seconds, depending on how fast they move. Otherwise, use a faster shutter speed according to the light available.
- Aperture – Use a small aperture to maximise the depth of field. Something like f/8 or f/11 should do. You might need to close it even more if you’re using a slow shutter speed.
- ISO – Keep your ISO to 100 whenever possible to avoid noise in your picture.
Night Sky Photography Settings
- Exposure mode – All your camera will see in the night sky is a very dark frame. So, it won’t be able to get good exposure using the auto mode. That’s why you need to use it in manual mode.
- Focus – It’s unlikely that the autofocus would be able to work in the night sky. So, it’s better to set it to manual mode. Then, use Live View to zoom in on the brightest star and make it as sharp as possible.
- Shutter Speed – There’s a rule in deep sky photography to calculate the slowest shutter speed before you start capturing blur or trails. It’s called the 500 rule because you need to divide 500 by the focal length. For example, if you use a 50mm lens, you shouldn’t exceed a 10-second exposure time.
- Aperture – A wide aperture is undoubtedly the best option. The lens’s widest aperture will help you use a faster shutter speed or a lower ISO. However, if you can afford to do it, step down a few f/stops. An f/5.6 could be a good compromise to widen the depth of field.
- ISO – You might be wondering what ISO I should use for night sky photography. That’s an excellent question without a straightforward answer. A high ISO will fill the image with noise, while a low ISO would require a wider aperture or a slower shutter speed which you might not be able to do. So, a good compromise is to shoot at 400 or so and stack your images in post-production. Otherwise, use a higher ISO and improve your image as much as possible using noise reduction.
6 Tips for Amazing Sky Photos (Daytime)
Tip 1: Look for unusual phenomena

Credit: александр максин
Nature is full of wonders that exceed our wildest expectations as photographers. Tons of awe-inspiring phenomena can happen in the sky.
From fire rainbows to lenticular clouds, from polar lights to a mock sun.
They don’t happen often – otherwise, they wouldn’t be as extraordinary as they are. However, if you do some research, you might be able to catch some of them.
You’ll surely be able to do beautiful sky photography if you manage to be in the right place at the right time.
Tip 2: Do silhouette photography
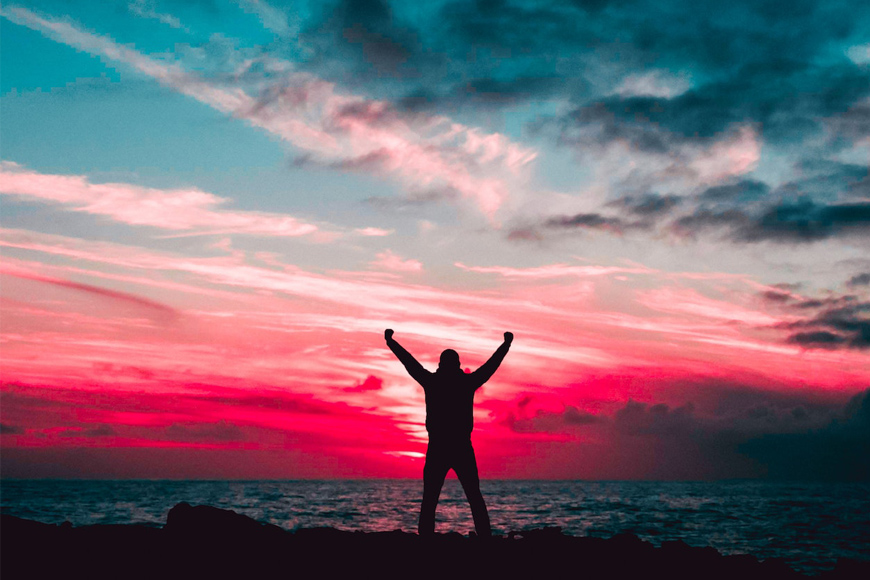
Credit: Rakicevic Nenad
You can create silhouettes in photography by placing any light source behind your subject.
However, a dramatic sky makes for a more amazing backdrop than a simple flash head.
Sunrise and sunset are the best times to shoot silhouette photography. The sun is close enough to the horizon to make it easier to hide behind your subject. Also, it makes for a very colorful image.
Tip 3: Photograph stormy weather
Credit: Douglas Navas
Stormy weather equals dramatic skies. If you want to make this type of photograph, make sure you protect your gear.
Also, use a sturdy tripod and secure it to avoid any accidents caused by strong winds. If possible, shoot from afar using a longer focal length.
This way, you can protect yourself and your camera.
Don’t forget to include some thunders for extra drama.
You’ll need longer exposure times for this. Experimenting with different times from 5 to 20 seconds should get you to a good point.
Adjust the other settings accordingly to get the correct exposure.
Tip 4: Include water reflections

Credit: Juckelene Toledo
Including a water reflection of the beautiful sky is a great way to compose your image. You might need to move around quite a bit to find the right angle.
Make sure you don’t have any intense glare that creates clippings. Try using a polarising filter if you can’t fix this by changing your vantage point.
Tip 5: Consider adding an anchor point

Credit: Benjamin Suter
Sometimes the beautiful sky isn’t enough to capture the viewer’s attention. Including a clear subject can help with that. This is called an anchor point.
You can use an element in the foreground, like a stone on the ground or a bird flying by. There are many ways to use an anchor point to improve your composition.
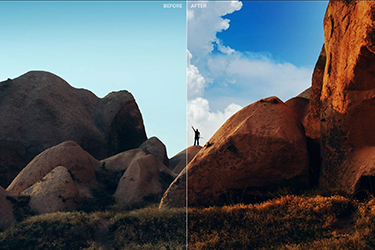
Tip 6: Fake it until you make it with editing software
Adding skies to photos is as easy as a couple of mouse-clicks. Credit: Skylum
We all try our best to capture the most vivid, impactful and vibrant photos of the sky, but luck and mother nature isn’t always on our side.
Imagine being on holiday at a well-known tourist attraction, waiting until sunset to take your photo.
Come sunset, and it’s cloudy and boring – not a colour in the sky. What do you do?
Well, thanks to clever AI-powered software like Luminar Neo, ON1 Photo RAW and Photoshop, you can replace entire skies in just a couple of clicks.
Luminar was the first software to showcase this God-like ability, and it’s really easy to use – you can use coupon code shotkit10neo for a small discount by tapping here.
3 Tips for Amazing Night Sky Photos
Tip 1: How to include people in night sky photography

Credit: Rachel Claire
Nightscape photography is beautiful. However, adding a human element can take it to a different level.
Including a person serves to give scale and depth to your photograph. It’s also helpful to tell a story. As interesting as it is, it might not be so easy. Here are a few tips for you to try.
First, place your subject far from your camera. This is because you’ll probably have the camera focus at infinity and a wide aperture.
So, they won’t be very sharp when the person is close to the camera. You’ll also need to ask them to be as still as possible to avoid blur.
Then, there’s the lighting problem. You can photograph them as silhouettes. In this case, there’s no problem. Simply set the exposure to the night sky, and they will be underexposed.
Instead, if you want to show some details of the person, you need to add an external light. For example, a bonfire or using an off-camera flash.
Otherwise, you might want to take your photograph at dusk before it’s too dark. However, you won’t capture as many stars at this time. So, you’ll need to focus on the moon or the clouds to have an interesting sky.
Tip 2: How to photograph the milky way
Credit: Philippe Donn
The Milky Way is one of the most popular subjects in deep-sky photography. Technically speaking, anything you see when looking up at the sky is part of the Milky Way. This is because it’s our galaxy.
So, what people refer to when they talk about photographing the Milky Way, is its core. The Milky Way core is a band of stars and brighter objects only visible a few times a year.
So, you’ll need to be in the right time and place. Fortunately, it’s such a popular subject in deep sky astrophotography that most apps will help you determine when and where you’ll see it.
Here’s our guide on how to photograph the Mily Way. In a nutshell, you’ll need dark skies. So, avoid photographing close to or during the full moon. Also, find a place without light pollution.
Tip 3: How to capture star trails
Credit: DailyPixel
You can create star trails by doing long exposures. This is because by using slower shutter speeds, you capture motion. In this case, the apparent motion of the stars is actually created because the earth rotates, and the camera moves with it.
There are two types of star trails. One creates straight lines, while the other creates arches or circles. The latter is the most popular but also the trickiest one.
If you’re in the Northern Hemisphere, you need to use the North Star as a reference. If you’re in the Southern Hemisphere, you’ll need to locate the Sigma Octantis (AKA Polaris Australis).
There are some apps you can download to help you with this task. Also, you can find more tips in our guide to star trail photography.
Next, find the time in the moon phase when you can find dark skies. Also, check the weather to make sure there are clear skies. Finally, find a spot where there’s low light pollution.
Now, you’ll need multiple exposures that you can stack in post-processing. Otherwise, it would be best to use a very long exposure time. If you choose the latter, keep in mind that the battery runs out quickly, and the camera might overheat.
FAQ
What is photography of the sky called?
When referring to the night sky, it’s called astrophotography or nightscape photography. During the daytime, it has many names. Sky photography, landscape photography, and cloudscape photography, amongst others.
How do you expose for sky photography?
The first rule is always to shoot raw. During the daytime, the tricky part when exposing for sky photography is high contrast.
Try using a graduated density filter. Otherwise, shoot multiple photos doing exposure bracketing. Then, compose a final image later in post-processing.
For the night sky, start by setting the shutter speed using the 500 rule. Then, make a test shot and adjust the other settings accordingly.
Which camera is best for night sky photography?
All mirrorless and DSLRs are good cameras for night sky photography. However, a full-frame sensor will result in better images. An excellent choice is the Canon EOS Ra.
Which lens is best for night sky photography?
Use a 400mm or 800mm to get a closer shot at the moon. Otherwise, stay with wide-angle lenses to do a nice landscape. For night photography, you need a fast lens. Instead, for deep sky photography, this isn’t as important.
Do I need clouds to make a dramatic sky photo?
During the day, clouds are essential elements for a dramatic sky photo. While photographing the night sky, you can focus on the milky way or another astronomical phenomenon.

Check out these 8 essential tools to help you succeed as a professional photographer.
Includes limited-time discounts.

Ana Mireles is a Mexican researcher that specializes in photography and communications for the arts and culture sector.

👋 WELCOME TO SHOTKIT!
🔥 Popular NOW:
