


How to Use iPhone Live Photos Properly (Expert Guide)
Everything you ned to know about iPhone Live Photos: How to take them, view them, edit them, share them, and even add special effects.
iPhone Photography | Learn | By Ashley Darrow
Shotkit may earn a commission on affiliate links. Learn more.
Live Photos is one of the more interesting features of the iPhone camera app.
However, there are still plenty of mobile photographers who don't know how to make the most of this feature.
Live pics capture visual information for about a second before and after the image is taken.

Want to learn how to take AMAZING photos with your iPhone? Discover hundreds of exciting secrets to totally transform your iPhone photography with this course!
Tap red button to save 80%
I like using Live Pics to create short videos, looping GIFs and long exposures.
Learning how to use iPhone Live Photos has been one of the more fun steps in my own journey of becoming a better mobile photographer.
Here's everything you need to know about the ins and outs of shooting Live.
What Are Live Photos?
Live Photos might seem like magic, but it's actually an interesting extension of how the iPhone camera app works behind the scenes.
When you open the camera on your iPhone, it automatically begins taking pictures even if you don't hit the shutter button.
This allows your iPhone or iPad to capture images much more quickly when you tap the shutter button.
Typically, all of that extra photographic information is deleted behind the scenes without it ever hitting your photos app.
However, Live Photos preserves 1.5 seconds of video information before you tap the shutter button as well as 1.5 seconds after the shutter button is tapped.
This creates a three-second short video that you can either use for a gif or a long exposure.
Live Photos isn't technically a “video” file format. It saves each frame as its own photograph meaning that you have much more visual information to work with than if you just tried pulling stills from a video.
Just in case you're wondering, the constant recording on the Apple camera app isn't saved on your device and the information is not sent off of your device according to Apple.
Which iPhones Can Take Live Photos?
Image Credit: Tomasz Kulesa
Nearly every modern iPad and iPhone can take Live Photos. This feature was introduced with the iPhone 6s and has been a staple of the camera app ever since.
Here's the definitive list for every device that can use Live Photos.
- iPhone 6s and later
- iPad 5th generation and later
- iPad Air 3rd generation and later
- iPad Mini 5th generation
- iPad Pro models from 2016 and later
How to Take a Live Photo on an iPhone
Taking a Live photo is extremely easy. In fact, this is the default way that the iPhone takes pictures.
However, It's possible to turn off the Live Photos feature. Here's a step-by-step guide for taking Live pics for the first time.
Enable Live Photos
Always double check your settings before shooting
The Live Photos icon is in the upper right hand corner of the screen in every iPhone camera app.
If this icon has a slash through it, this means that Live is currently disabled. All you need to do is tap the icon to enable Live Photos.
Live Photos is now on and you're ready to shoot!
You'll see a yellow text box with the word Live pop up for a few seconds after Live Photos is enabled. the icon will also cease to have a slash through it when this feature is active.
Compose Your Shot
Now you're ready to compose your shot.
Keep in mind that Live Photos is essentially going to record a short, 3 second video.
You want to look for fluid movement that can translate into a looping gif-style image.
If you’re going for a long exposure, remember to adjust your exposure by dragging the exposure icon down. Long exposures work great when either your subject or background elements are static during the exposure.
Snap, Edit, Share
Now all you have to do is take your pick, edit, and share.
You can share Live Photos with anyone who also has an iPhone or ipad.
Certain social media sites, like Instagram, can support sharing Live images and stories. However, other social media sites might have trouble with this particular photo format.
You can always convert your Live photo into a short video file. I'll cover this later in the article when I talk about how to share a Live photo.
How to Find Live Photos in the Photos App
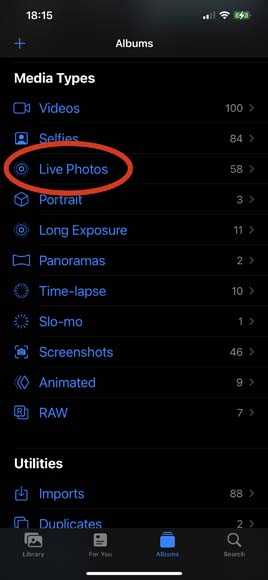
Live Photos get their own media type album
I've got thousands of pictures in my camera roll even after recently clearing out the past few years of images. Scrolling through all of those pics to find my Live Photos sounds like a Sisyphean punishment.
Thankfully, there's a utility built into the photos app that automatically sorts your Live pictures into a single album.
All you need to do to find your Live images is to open your photos app, switch to the album view, and scroll down until you find the media types section.
There is a pre-sorted album labeled “Live Photos” that contains every one of your Live images.
How to Edit Live Photos
You have a few more options for editing Live Photos than you do your average mobile photograph.
Here's a quick guide to the basics of editing a Live photo.
Open the Photos App & Find Your Live Photo
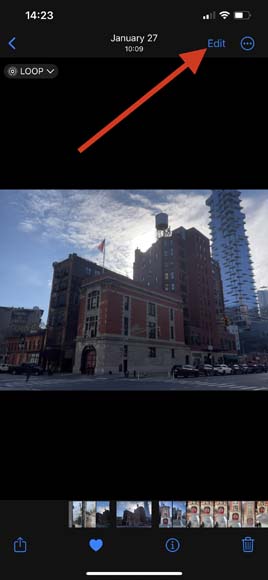
Tap Edit
Who you gonna call? Yourself, now that you know how to edit Live Photos!
Editing a Live photo starts off the same way you'd want to edit any photo inside of the Photos application.
All you need to do is tap the edit button and the editing menu will open up.
Tap the Live Icon
![]()
You should see a new menu icon next to your other editing options. This is the Live menu icon which opens up a new editing menu.
The editing options you have will change based on the Live photo setting you selected for your image.
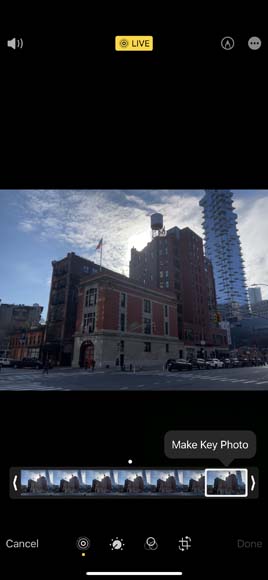
If you have the default Live photo selected, you'll be able to select the “Make Key Photo” option to pick any frame in the 3 seconds of video as the default frame for the image.
You can also make any of the other edits you can usually do in the Photos app. At the very least, I like to adjust my exposure settings and do some light color correction.
How to Add Effects to Live Photos
You can use a few special effects options on each Live photo.
I get the most mileage out of the long exposure option, but that doesn't mean you shouldn't try out loop, bounce, and Live.
Open Your Live Photo
Just like instructions from science class, we're leaving no stone unturned here. Your first step to using some of the Live Photos effects is to open up the Live photo you want to play around with.
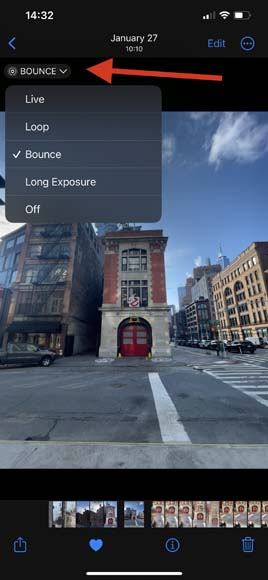
Expand the Live Menu & Select Your Effects
Don't be afraid to explore these special effects options!
In the top left of every Live photo is the Live effects menu.
You can pick your Live special effects from this menu. Here's a quick rundown of what each of the four effects does.
- Live—Allows you to select an individual frame from the Live photo to act as a key frame and the default for the image
- Loop—Turns the Live photo into a continuous looping video with some overlap at the ends
- Bounce—Sets the Live video to “bounce” back and forth by reversing play at the end of the clip
- Long Exposure—Converts the 3 second video into a long exposure photograph—great for removing pedestrians and cars from your pictures
How to Share Live Photos
Taking Live pics is fun, but half the fun is sharing them.
Here’s how you can share a Live photo with other iPhone owners as well as people on different platforms.
Open Your Live Photo
I'm starting to sense a pattern here. In order to share your photo, the first thing you need to do is open up the Live photo in the photos app.
Tap the Share Button

Tap the share button in the bottom of the screen in order to open up the options you have for sharing your Live photo.
Share with Other Apple Users
You can share your Live photo with other Apple users by sending it through a text message, giving them access to your iCloud Library or a Photos app album, or by airdropping it.
If you want to send a Live photo that's been converted into a long exposure or one with a key frame selected as a still image, you can send that over any texting, email, or social media platform that can support images.
This will cause it to lose any Live photo features, but if your goal was to create a still image then this isn't too bad of a trade-off.
How to Export Live Photos to Video

Saving as a .MOV is the only way to share Live Photos with non-Apple users
You can also export your Live images to video.
This is ideal for posting Live pics on social media platforms that do not support Apple's Live photo format. Converting a loop or bounce Live photo into a video is the best way to share that particular special effect with anyone on Android or other mobile operating systems.
In order to save a Live photo as a video, you need to select the “save to files” option. This will allow you to save your photo to your iCloud account.
A Live photo set to either bounce or loop will automatically save as a short .MOV file that retains its animation. You can then share this file anywhere you can send a .MOV or convert that into a MP4 to share it on other platforms.
How to Turn Off Live Photos
You've got two options for how you can turn off Live Photos. You can either turn off Live Photos within the camera app or you can turn off this feature in the system settings.
Turn off Live Photos in the Camera App
In the upper right-hand corner of the camera app you'll see the circular Live Photo icon.
You can turn off Live Photos within the camera app by tapping this icon so that a gray slash cuts through the icon.
Keep in mind that this is an inconsistent solution. This will keep Live Photos off before this camera app session, but Live Photos turns back on by default every now and then.
There is a more permanent solution for toggling Live Photos on and off.
Turn off Live Photos in System Settings
If you want Live Photos to stay off until you manually turn it on in the camera app, you need to enter your system settings.
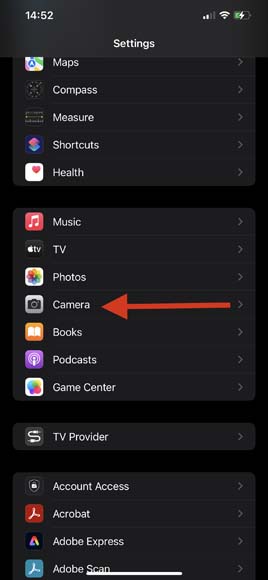
Open your settings app and scroll down until you see the options for your camera app.
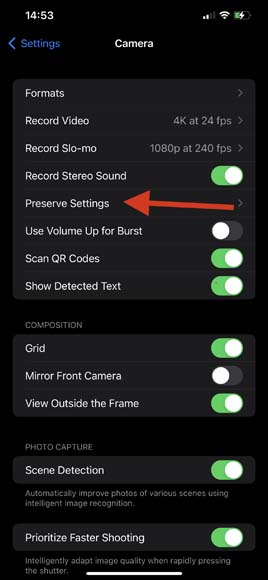
Once you're inside the camera app menu, look around to find the preserve submenu. This one might be buried in the wall of options you have in the camera app settings, but it's in there.

The options in the preserve menu allow you to select new default options for what your camera does when you open the app.
Looking at my options, I'm fine with most of the iPhone camera app's default settings, but I did set it to automatically shoot RAW photos and have the Live option off until I want to turn it back on.
If you want to toggle your Live Photos to be off by default, simply toggle the selection so that it's green.
Other Cool Things You Can Do With Live Photos
There are some cool things you can do with Live Photos that you might not have expected.
Make Moving Objects Disappear! (Sort of)
You don't have to be a magician to make people and cars disappear!
The long exposure feature in iPhone Live Photos can make moving objects vanish from your shots.
If you've ever been frustrated by people or cars moving in front of a landscape or architectural shot, just use Live Photos to create a long exposure.
This will capture an excellent image of a stationary subject, but let all of those moving objects dissolve away into the background.
This is also a great way to lower some of the visual noise caused by vehicle and foot traffic when you're taking portraits in a busy area.
Create GIFs
You can turn any of your Live Photos into a GIF.
All you need to do is save your Live photo as a video file. This video file on its own can act like a GIF, but you can also upload it to any application that is capable of converting short video files into GIF format.
Take Better Action Shots with the Make Key Photo Option
Taking action shots on an iPhone can be tricky. Your images might be plagued with blurry shots, awkward posing from athletes and even models, or just a composition that got messed up by trying to track the action.
Shooting Live Photos retains more of the information from the scene. This can let you select any one of the frames as your image which gives you some protection when doing action photography.
Solve the Problem of Blinking Portrait Shots
Group portraits are a challenge because you really can't coordinate when everyone is blinking. You can give yourself some protection by shooting your group portraits as a Live photo.
FAQ
Do Live Photos take up more space?
Live Photos are akin to short video clips which means that they take up more storage. You can expect your average Live photo to take up about twice the storage of a still photograph.
How do you post Live Photos on Instagram?
You can post Live Photos to your Instagram story. add your Live photo to a new story, tap the boomerang icon which looks like the infinity symbol, and select either bounce or loop.
See also: How to Post Multiple Photos on Instagram (In One Post)
Can you use Live Photos as wallpaper on iPhone?
You can use any Live photo as wallpaper on your iPhone. All you need to do is set your Live photo as your lock or home screen wallpaper then tap and hold the wallpaper to watch it play. Note that iPhone SE does not support Live wallpaper.
Can I change Live Photos to normal?
You can turn a Live photo back to a normal photo by tapping the expanding menu at the top left of any Live photograph. You have a few options to choose from, but the bottom option lets you turn the Live features off for that photo.
Wrapping Up Live Photos
I hope this guide has helped you make more use of the Live Photos feature.
Live Photos is definitely more than a gimmick that comes with the iPhone camera app. This is a great tool that can help you improve your photography and take some more interesting shots.
Let me know in the comments if you have any questions about Live Photos or what iPhone photography guides you'd like to see in the future.
Want to learn how to take AMAZING photos with your iPhone? Discover hundreds of exciting secrets to totally transform your iPhone photography with this course!
Tap red button to save 80%

Check out these 8 essential tools to help you succeed as a professional photographer.
Includes limited-time discounts.

Ashley is a photographer, writer, and film critic. When Ashley’s not writing essays on photography, cinema, and theory, he’s out taking pictures with retro film cameras.
👋 WELCOME TO SHOTKIT!
🔥 Popular NOW:
