


How to Stitch Images Together in Photoshop (Two Methods)
Find out how to stitch images together in Photoshop to create a fun collage or to seamlessly merge several photos into one.
Photoshop | Software | By Judyth Satyn
Shotkit may earn a commission on affiliate links. Learn more.
This guide will give you the easiest ways to stitch images together using Photoshop.
I’ve been using Adobe Photoshop for many years and have often stitched images together for creative projects.
Stitching images together seamlessly using Photoshop is surprisingly quick and simple.
Let’s dive into the tutorial.

Download a free copy of Adobe Photoshop to follow along with this simple tutorial.
How to Stitch Images Together in Photoshop in 5 Simple Steps
What does it mean to stitch images together? Nope, it doesn’t involve thread.
Typically, it means to merge two or more images together so they appear as one.
Maybe you have a sequence of photos that you wish to seamlessly stitch together as a panorama.
Or perhaps you have an art project which involves stitching images together in a creative manner.
Another reason one might wish to stitch images together is to make a collage for a birthday card or poster for the wall.
Let’s look at how we can stitch images together using Photoshop.
Option 1 – Quick Fix Simple Stitch
If you simply want to place images side by side to create a collage effect, this is the method for you.
Step 1 – Open Images as Layers in Photoshop
First, open Photoshop by clicking on the app icon on your desktop.
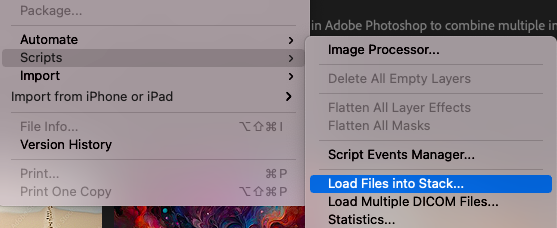
Head to the main menu bar and select File > Script.
From the drop-down menu, select Load Files into Stack.
Once selected, a new dialogue window called Load Layers will open.
In the drop-down menu beside Use, select Files, and then hit Browse.
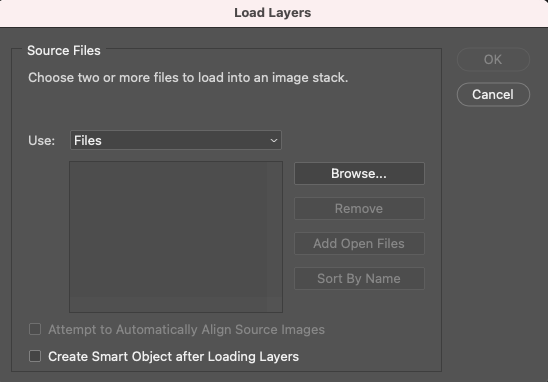
A new window will open from here, and you will be able to locate and select the images you wish to stitch together.
To select more than one image, hold down the Shift key while you click on the images you wish to open.
If you select the wrong image, simply click on it again to de-select it.
When you have selected all the photos, click Open.
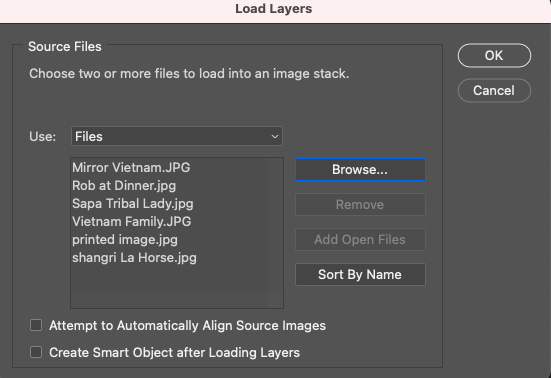
The Load Layers dialogue window will open again.
You will be able to see the names of the files you have selected. The image at the top of the list will be placed as the top layer in the Photoshop document.
You can rearrange the images by clicking and dragging them up or down the list.
Tick the box beside Attempt to Automatically Align Source Images, then hit Browse.
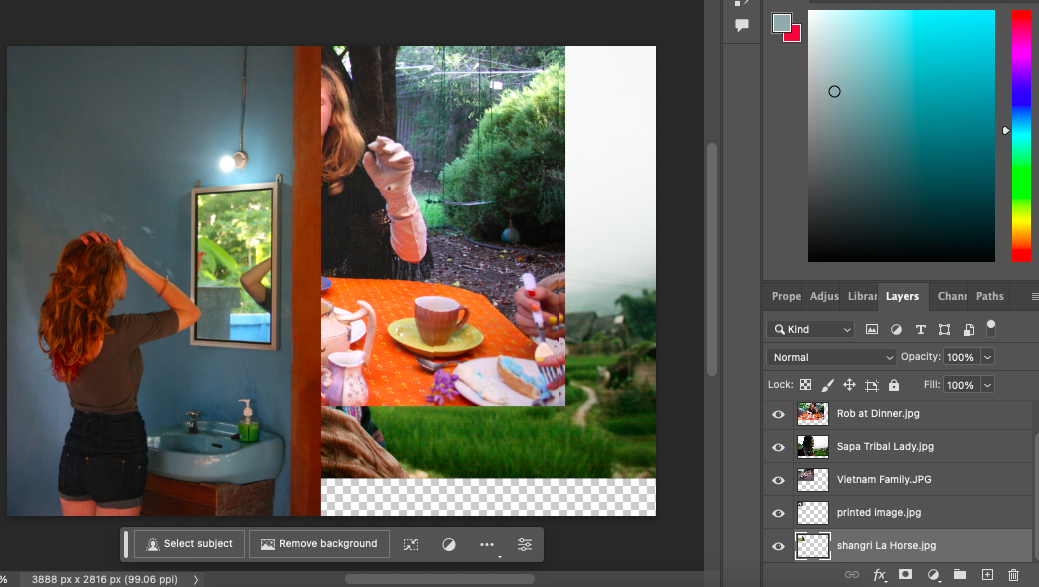
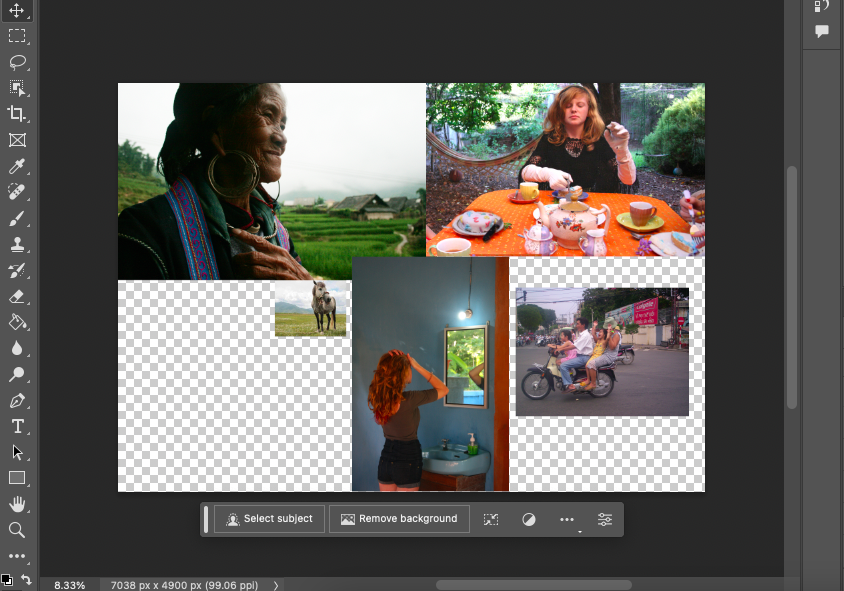
Photoshop will open the files in one document as a single layer.
As you can see in the image below, the files will be opened in their original file size.
Step 2 – Increase Canvas Size
To stitch the images together to be able to view them all, we will need first to increase the canvas size.
Increasing the canvas size allows us to place the images beside each other.
There are two ways to increase a canvas’s size: by using the Canvas Size dialogue window or the Crop tool.
To use the Canvas Size window, head to Image > Canvas Size.
When the Canvas Size window opens, enter the new measurements in the value boxes for Width and Height under New Size.

Then click OK.
To use the Crop tool, select the Crop tool from the tool bar to the left of your canvas workspace. Or hit C for the keyboard shortcut.
When the tool is active, handlebars will appear on each edge of your image.
Click on the Crop Tool’s hand and drag the image into its new position.
A box containing the new canvas dimensions will appear as you drag the frame.
The Crop tool will also generate a preview of the new canvas space. This is useful if you prefer to work by eye.

Release the cursor when you have reached the desired canvas size.
Your image files are now ready to be placed where they will be stitched together.
Step 3 – Reposition Images
Now that you’ve created a large canvas space, you can reposition the images into the right positions so you can stitch them together.
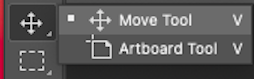
From the toolbar to the left of your canvas workspace, select the Move tool or hit V for the keyboard shortcut.
Click on each image and then drag it across the workspace into position.
Release the cursor when the image is in the correct place.
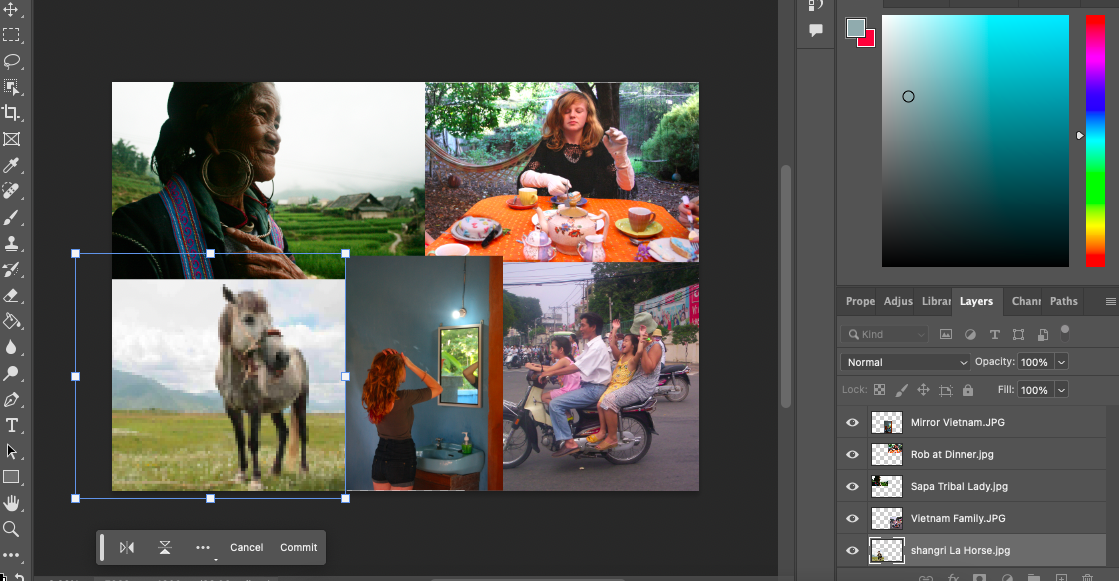
As you can see below, more often than not, the images will not be the correct size.
But that’s not a problem. We can adjust the size of each photo using the Transform Scale tool.
When using the Transform tool in Scale mode, the dimensions of the image will be locked.
This prevents image distortion when altering the size.
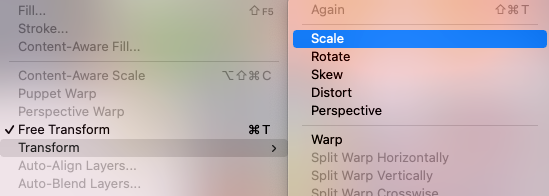
Head to the top menu bar and select File > Transform. From the drop-down menu, select Scale.
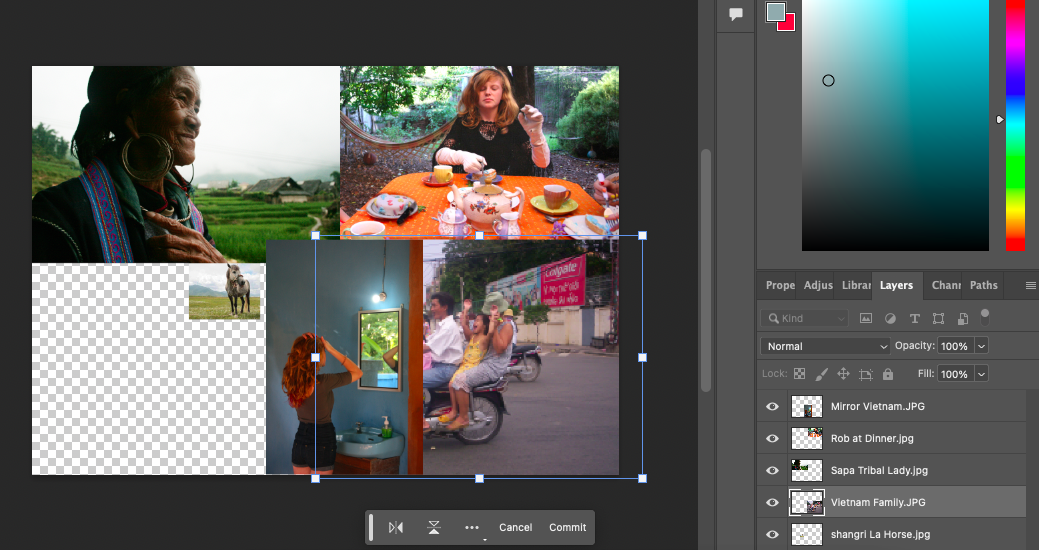
When the Transform tool is active, the edges of the selected layer will be bordered by a blue frame.
Hover your cursor over the blue frame. When an arrow pointer appears, you will be able to stretch or shrink the canvas.
Click on the canvas and drag to transform the image’s size. Release the cursor when you have achieved the correct size.
As you can see in the image below, the image size has been increased, but some of the image is obscured from view.
The Transform tool not only transforms images but also allows you to move images.
Simply hover your cursor anywhere over the active image until the pointer changes to an arrow.
Now click on the image and drag it into position. Release the cursor when the image is in position.
When all the images of your holiday or art collage are in the correct position, you can make the final step and stitch them together.
Step 4 – Stitch Images Together
Using this method, the stitching process is quite quick and simple.
Currently, all your images will still be separate files. You will be able to see each as an individual layer in the Layer panel.
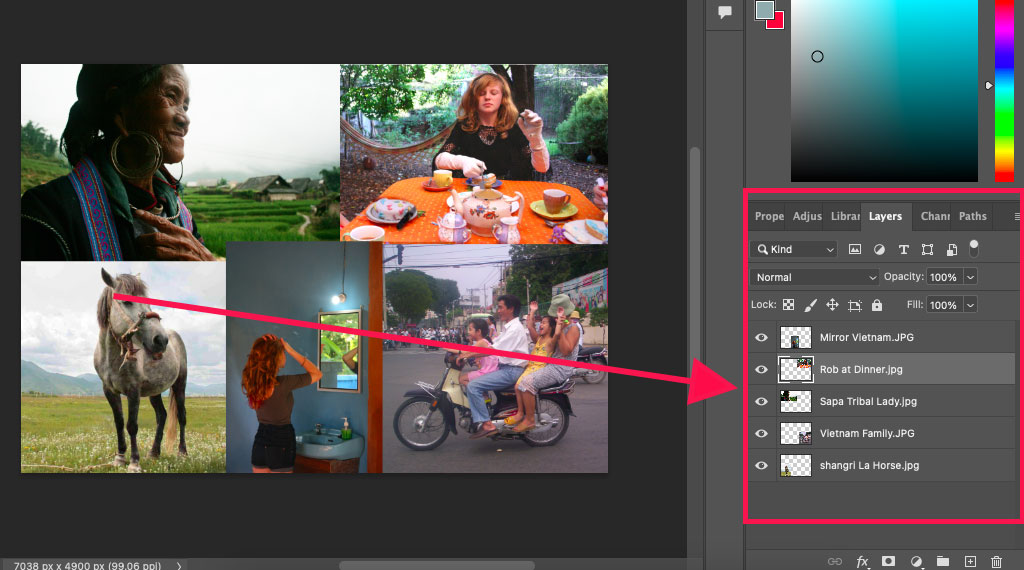
Head to the main menu and select Layer, scroll to the end of the drop-down menu, and click Flatten Image.

When Flatten Image is selected, Photoshop stitches together all the images in the PSD file.
As you can see in the image below, there is only one layer, the background layer.
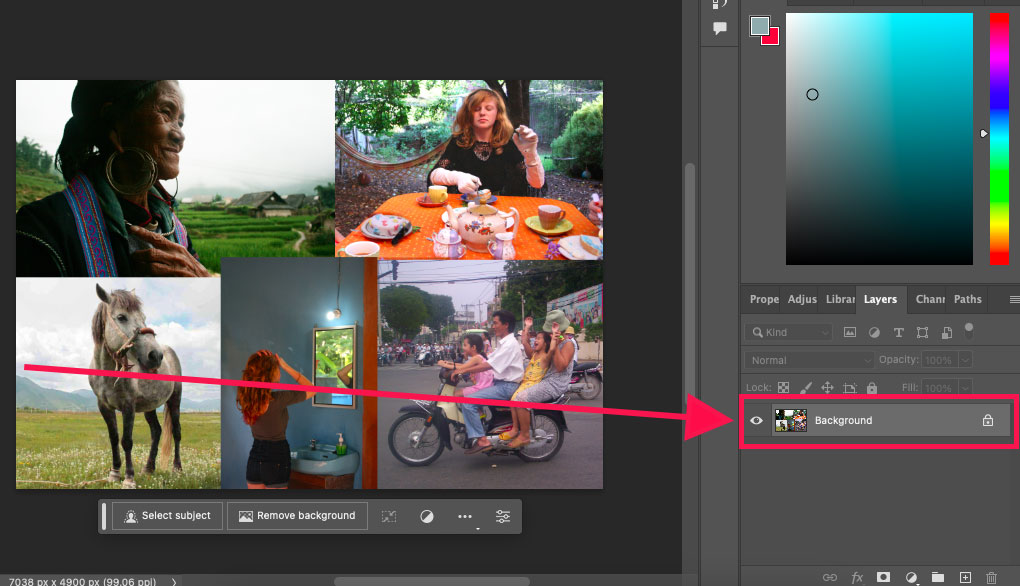 The photos are now one file; any edit you make will be applied to all the images.
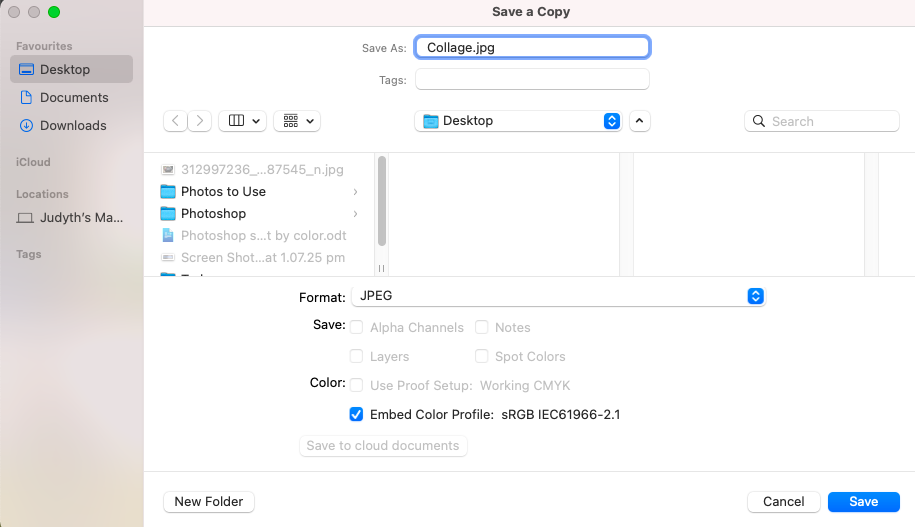
Step 5 – Save the Image
The last step is to save your collage as a JPG file so it will be ready to print or share with the world through social media.
From the top menu bar, select File > Save a Copy.
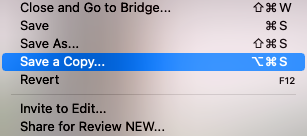
The Save a Copy dialogue window will open.
Enter a name for your stitched image and select the location you wish to save it to.
From the drop-down box beside Format, select JPEG and click Save.
Your stitched image is now complete.
Option 2 – Stitch Images Together Using Photoshop Photomerge
The first image stitch option can be used to stitch random photos together as a fun collage.
Using this technique, it’s obvious that the images are not the same photo.
The next option is to stitch images together so they will appear as if they were never separate images.
Step 1 – Select Photos and Adjust Levels
This method works best using images that were taken at a similar time. If not taken within seconds of each other, at least minutes.
Any longer than this, and the sun will have changed position. Shadows will have moved, and the photo’s tonality could be completely different.
If the images you want to use were taken at different times and thus have different tones, you remedy the differences by adjusting their levels.
Open the images in Photoshop and head to Image > Adjustment > Levels.

The Levels dialogue window will pop open.
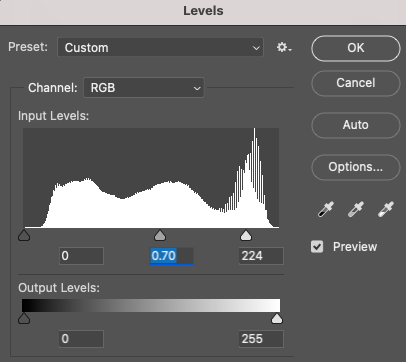
Adjust the photo’s levels by sliding the sliders underneath the Input Levels graph until their tonality appears the same.
Save your images to your device.
Step 2 – Open Photomerge and Select Preferences
Now that the image’s tonality is the same, we can open them via Photomerge.
From the top menu bar, select File > Automate > Photomerge.
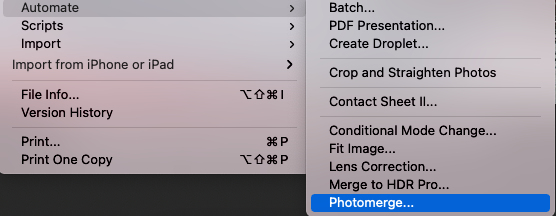
Once clicked, the Photomerge dialogue window will open.
On the left side of the window, you will find the Photomerge layout options.
Photomerge Layout Options
You can pick from Auto, Perspective, Cylindrical, Spherical, Collage, and Reposition.
The icons beside the layout names depict how the photos will be positioned.
Choose Perspective if you want a centrally positioned image around which the other images will be transformed to match.
Cylindrical will create a Photomerge that appears cylindrical in shape.
Spherical will simulate a 360-degree panorama.
Select Collage, and Photoshop will scale and realign images to merge them.
Choose Reposition if you do not want Photoshop to transform or distort the photos when merging them.
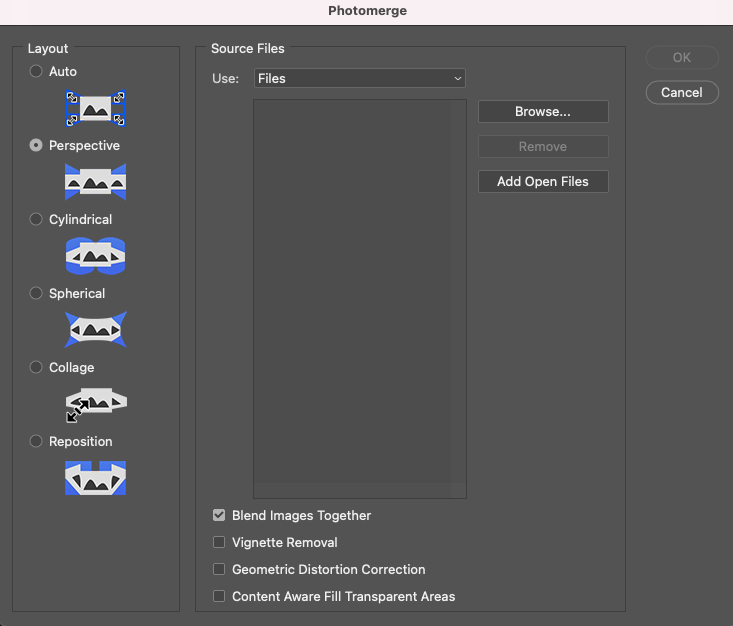
If you have a preferred layout, select it by ticking the box beside it.
Alternatively, tick Auto, and Photoshop will analyze the image to decide which layout best suits your collection of images.
Photomerge Blending Options
You will find merging options at the bottom of the Photomerge dialogue window.
Let’s run through them to decide which options work best for the stitched images.
Tick the box beside Blend Images Together. When this option is selected, Photoshop will use AI to merge the images.
Don’t tick this box if you want more editing control.
The two images below demonstrate the difference between selecting the Blend Images Together option versus when it is not selected.
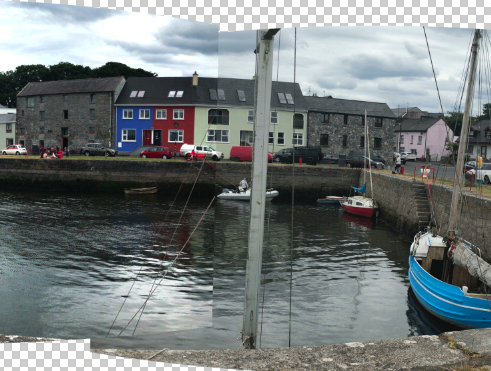
The first image shows how photos are stitched together without ticking Blend Images Together.
As you can see, the two stitched photos have obvious tonal differences. If having contrasting photos is not the aesthetic you are hoping for, you’ll have to edit the image by hand.
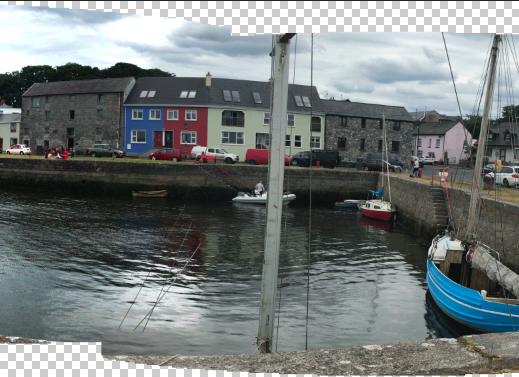
The image below shows how the photos are merged when Blend Images Together is selected.
As you can see, Photoshops AI has worked its editing magic, and there are no obvious tonal disparities between the two photos.
This is amazingly fast, seamless, and easy but gives you less editing control.
If your image has any obvious vignette effect, you can tick the box beside Vignette Removal.
This lets Photoshop know that there is an unwanted vignette effect in the image. Photoshop will then search for and either remove it or compensate for the error by adjusting the edges exposure.
Tick Geometrical Distortion Correction when you want to avoid evident distortion, such as fish eye bulging.
Tick the box beside Content-Aware Fill Transparent Areas if you wish for Photoshop’s AI to fill in empty canvas areas.
As you can see in the image below, Photoshop’s AI has generated additional background around the image.
A new layer for the extra content will appear in the Layers panel.
AI-generated background is a great solution when you don’t want to crop away areas of your image.
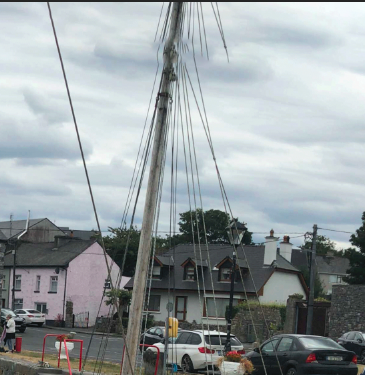
However, Photoshop doesn’t always get it completely spot on. As you can see below, the ropes of the new AI-generated sail don’t match up with the original sail.
If you’re unhappy with the generative fill, you can delete the layer and crop your image instead.
Alternatively, you can edit the new content.
For this tutorial, I’ve only ticked the first option, Blend Images Together. I want Photoshop to transform the photos and automatically adjust their tones.
The images have no vignetting, so I have not selected Vignette Removal, and I don’t mind if there’s evident distortion.
I don’t want Photoshop to add new content to the background. I intend to create a black frame for the final piece.
Step 3 – Upload Image Files
Upload the images by clicking Browse in the top right of the dialogue window.
This will open a search window where you can locate your files.
To select more than one file, hold down the Shift key as you select each file.
Now, click Open.
The images will open in the Photomerge dialogue window in the box under Files.
Click OK in the top right hand corner to automatically stitch the photos together.

Photoshop will take a few moments to calculate the adjustments and stitch the images together.
When it has completed the task the stitched image will open in your canvas.
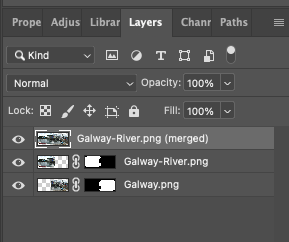
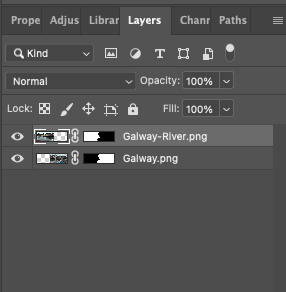
Each photo will appear as a layer in the Layers panel.
You can deactivate one of the layers to see where the stitch line between ths two photos is.
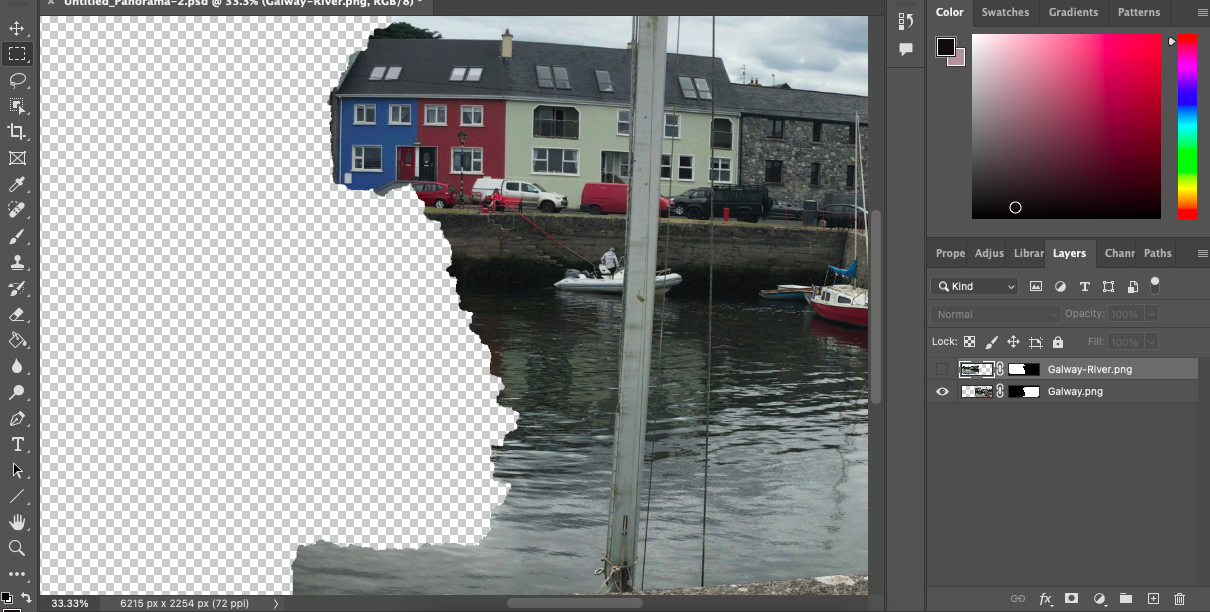
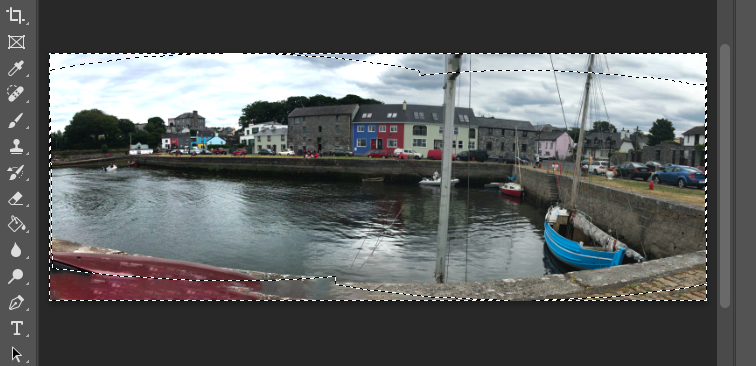
As you can see, Photoshop has done an incredible job of stitching the two images together.
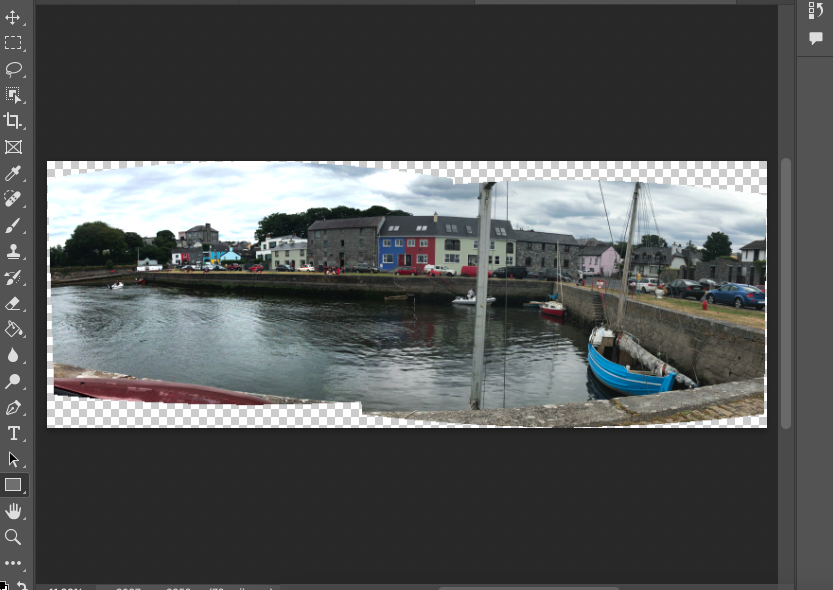
If you look at the image below, this is how the photos looked when they were placed side by side.
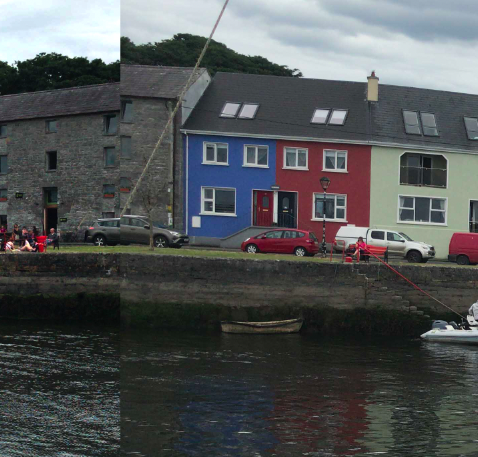
The roof of the grey stone building is angled higher in the second photo. Photoshop has realigned and scaled the photos in exactly the right spots so they appear as if originally it was one photo.

Step 4 – Final Touches
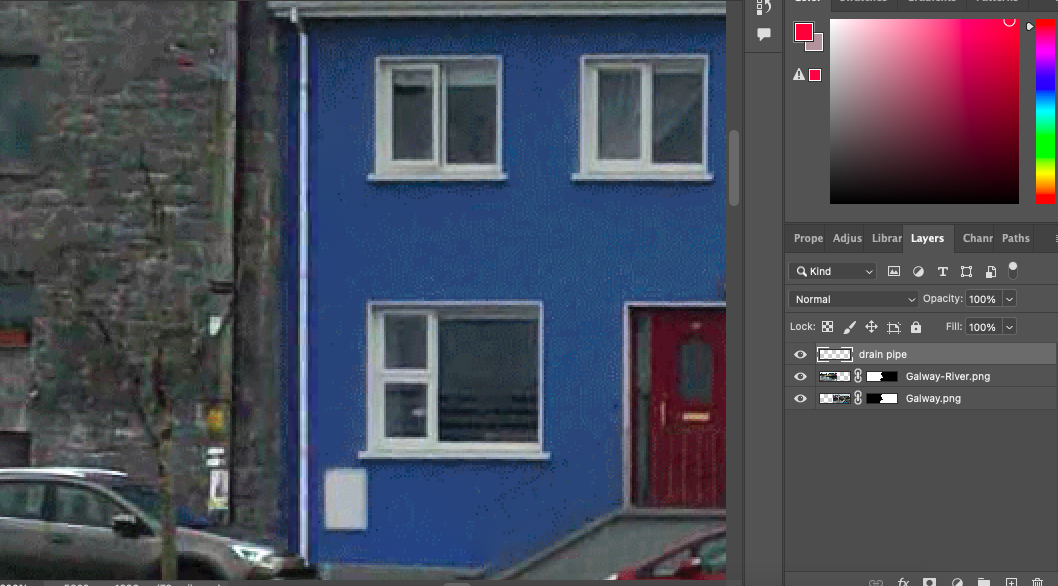
Once the action is complete, it’s worth examining the final image before saving it.
When the final image was examined, there was one blending error found.
As you can see, the drain pipe is jagged, making it obvious that the images were stitched.
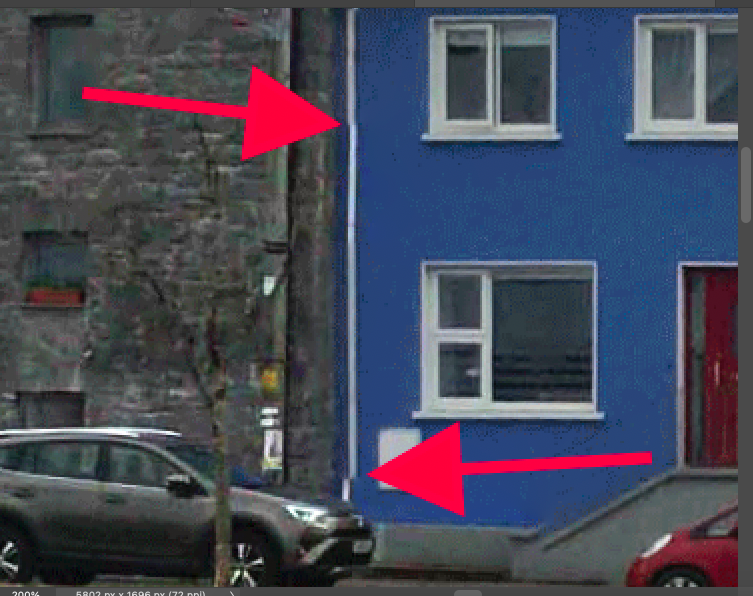
However, this is a simple error to fix. First, open the original photo in Photoshop.
When the image is open, select the Selection tool from the toolbar and create a selection around the intact drainpipe running down the blue building.
Head to Edit > Copy. Now head back to the merged images PSD file and select Edit > Paste.
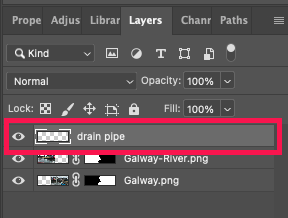
A copy of the drainpipe will now appear in the workspace. Select Edit > Free Transform.
A blue bounding frame will appear around the edges of the pipe.
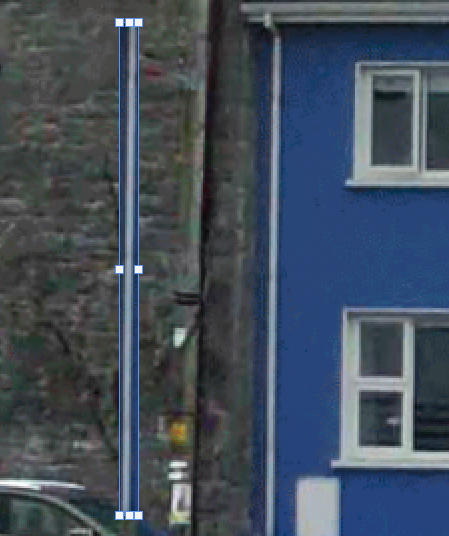
Drag the bounding frame of the drainpipe and position it to replace the jagged drainpipe.
If you haven’t used the auto-fill option, you will need to crop the image to cut away rough edges.
Head to the toolbar to the left of your canvas workspace, select the Crop tool or hit C for the keyboard shortcut.
Once selected, the edges of the canvas will be surrounded by the Crop tool’s bounding frame.
Click on the frame and drag the edges into the new position, removing unwanted edges.
As you drag, a preview will be displayed of the new canvas size. A black box will appear at the edge of the frame, indicating the canvas’s new dimensions.
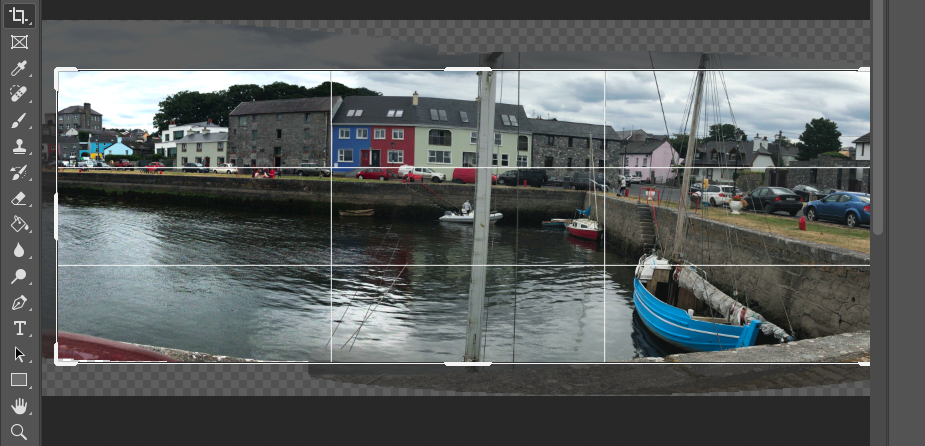
When you have reached the desired size, hit Enter on your keyboard.
When you are happy with the edits, it’s time to commit to the final image and save it.
Step 5 – Save Stitched Image
Before saving the image, we will flatten down the layers into one layer.
Head to the top menu bar and select Layer > Flatten Image.
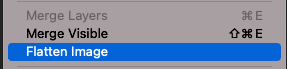
Once selected, all layers will be merged into one.
Head to File > Save a Copy. This will open the Save a Copy dialogue window.
Enter the name of the image and select the location you wish to save it to.
Select the format you wish to save the image in; if you are unsure, you can save it as JPEG.
Then click Save.
Congratulations, you have learned how to create a stitched image.
You can have fun experimenting with Photoshop’s automated Photomerge.
I hope you enjoyed this tutorial. If you’d like to learn more Photoshop tricks, check out this post: 21 Fun Photoshop Ideas to Try Today.
FAQ
Can you stitch photos together in Photoshop?
Yes, you can use Photoshop to stitch images together to create one image.
You can use Photomerge to stitch similar images together automatically.
Alternatively, you stitch images together by placing them on one canvas, arranging them, and flattening them.
How do you combine multiple photos together in Photoshop?
To combine multiple images in Photoshop, use Photoshop’s Photomerge action.
From the main menu bar, select File > Automate > Photomerge.
Select a panorama layout in the Photomerge dialogue window and upload your files.
When you click OK, Photoshop will automatically combine your selected files.
How do I manually stitch an image in Photoshop?
To manually stitch photos together in Adobe Photoshop, open the images as layers in one document.
Increase the size of the canvas if needed and arrange the images into the desired positions.
Head to the main menu and select Layer > Flatten Layers; your image will now be stitched together.
How do you stitch pictures together?
You can use Adobe photo editing software, either Lightroom or Photoshop, to stitch images together.
Both programs have an automated action to stitch images together as a panorama.
How do I combine two images seamlessly in Photoshop?
To combine images seamlessly in Photoshop, use Photoshop’s Photomerge action.
Photomerge can be found in the drop-down menu under File > Automate.
What are three ways to blend two images together in Photoshop?
There are many different techniques to blend two images together in Photoshop. Here are three options.
One way is to merge two images as if they were one by using Photoshop’s Photomerge action.
Using Photosop’s blend modes, you can easily blend two or more images together.
Layer Masks are another fantastic and very popular way to blend images together.

Judyth is an experienced studio photographer and glass artist. When she isn’t Photoshopping comedians into the bellies of sharks, you can find her cooking delicious treats for her guests.

👋 WELCOME TO SHOTKIT!
🔥 Popular NOW:
