


How to Select by Color in Photoshop (4 Ways)
Learn four effective methods for selecting by color in Photoshop, including step-by-step guides to streamline your design and editing process.
Photoshop | Software | By Judyth Satyn
Shotkit may earn a commission on affiliate links. Learn more.
This guide will give you the easiest ways to select by color in Photoshop.
I find this a really handy function to use in my Photoshop graphic design and photo editing work.
Selecting colors in photos helps you to replace the color range quickly and to match colors in a design precisely.
Let’s dive into the tutorial.

Download a free copy of Adobe Photoshop to follow along with this simple tutorial.
How to Select by Color in Photoshop: 4 Useful Options
There are different ways to select colors in Photoshop. In this tutorial, we'll walk you through four different methods.
The one you choose will depend on the design project you are working on and the reason you need to select the color.
There are various reasons why someone might need to select a color in Photoshop, such as replacing colors, matching colors, or recording a color code.
Here are some of the key reasons you might want to select by color:
- Replacing colors in images is a fantastic way to change the vibe of a design.
- When you know how to replace colors, you can experiment with photos and designs to create surrealistic images. Or simply change a dull-colored centrally placed object to a striking color.
- Online sellers who sell a product in a range of colors can use Photoshop to replace the color of a product rather than take more photos.
- Designers will select the color of an item so they can match it with other text or elements within the image. This helps to create a cohesive design.
- Artists must select a color to understand its properties and record its code. This helps them work within a specific color palette.
Different tools allow you to select colors based on different properties.
Method 1: Select Color using the Magic Wand Tool
The Magic Wand tool will select an area of colors that are similar in color or tone.
The selection of colored areas can be modified by refining the Wand tool's settings.
Step 1 – Open the Image
Head to the menu bar when Photoshop opens and select File > Open.
A dialogue window will pop up; locate your image and click Open.
Step 2 – Select the Wand Tool
When the image is open, head to the toolbar to the left of your canvas and select the Wand tool.
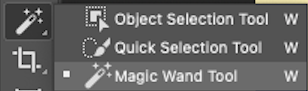
Or, for the keyboard shortcut, hit W.
Step 3 – Create the Colored Selection
Creating a colored selection using the Wand tool is straightforward; simply click on the color you wish to select.
Once you've clicked the canvas, marching ants will appear surrounding your chosen color.
The first click might not generate the exact desired selection, but this can be refined using the Magic Wand tool's options bar.
Step 4 – Refine the Selection
To refine the color selection, head to the options bar above the canvas workspace.
Here, there are a set of options.
The first option in the Magic Wand tool's options bar is a line of four square icons.

These can be used to add or subtract areas from an active selection.
Check that the first icon is selected to make a one-off selection.
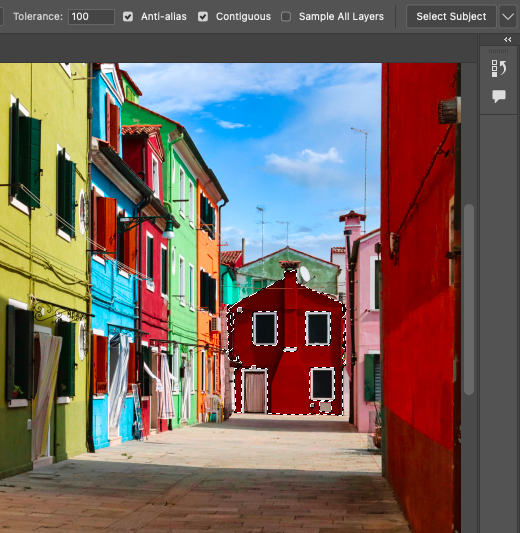
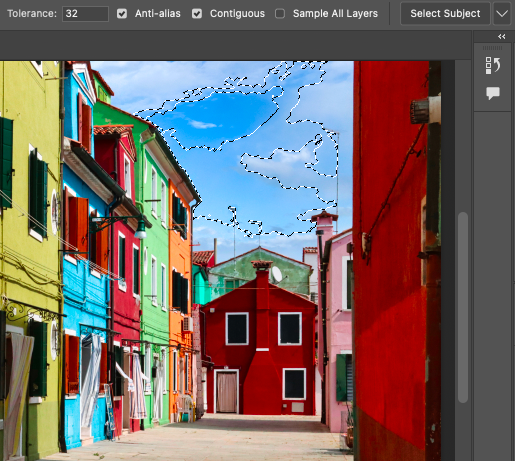
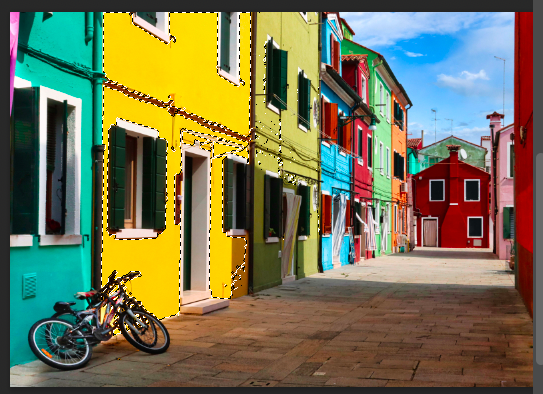
In the image below, the red building was selected by clicking on it with the Magic Wand.
The next option is Sample Size, which is similar to tolerance.

Change the value in the box beside Tolerance if you wish to select more or less of a color range.

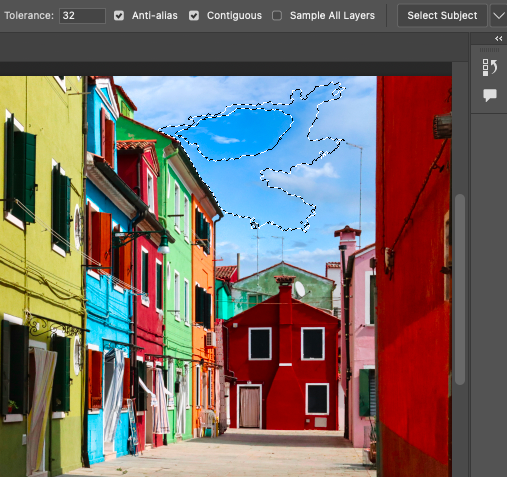
Below, the Tolerance value has been set to 32, and the blue sky has been clicked.
If the color range area selected is too small, increase the Tolerance value.
Photoshop will select colors with a numerical value to either side of the color number value of the color clicked.
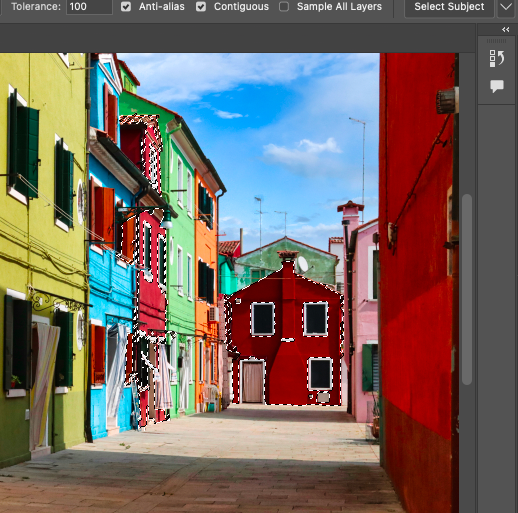
In the image below, the Tolerance value has been increased to 100. Thus, the color range has been increased and more blue sky has been added to the selection.

If you wish to decrease the range of colors selected, decrease the value in the Tolerance box.
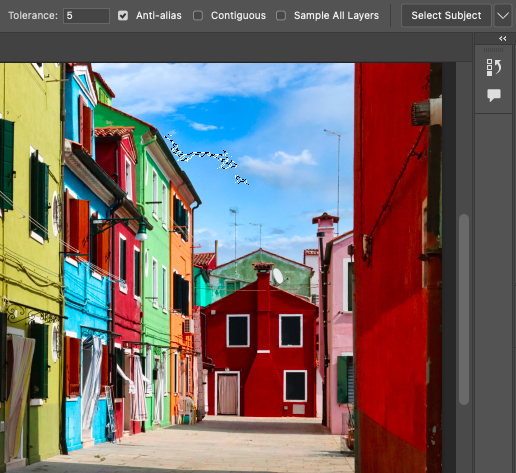
As you can see below, when the Tolerance value is changed to 5, the range of colors has been decreased, thus the selection area has been decreased.
Tick the box beside Anti-Alias if you want the jagged edges of the selection to be smoothed.

This will make it easier to merge any replacement colors with the surrounding colors.
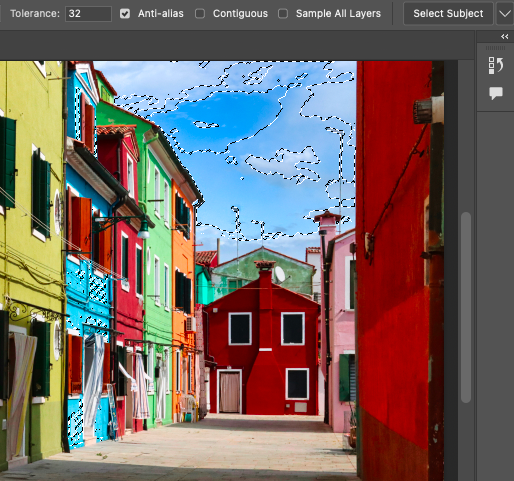
Select Contiguous if you wish to select neighboring colors.

When the box beside Contiguous is ticked, only colors that are side by side will be surrounded by marching ants, as you can see below.
Only the blue in the sky has been selected. The non of the blue building has been selected as it is not ‘touching' the blue sky.
Select non-contiguous if you wish to select all the same colors on the canvas, even if they are not adjacent.
In the image below, the Contiguous box has been unticked, and the same color in the sky has been clicked with the Magic Wand tool.
Not only has the blue in the sky been selected, but the blue building has also been selected.
For some projects, the option to select the exact same colors in the entire canvas is useful – such as if you are creating an image with an antique or retro look. Different colors were in fashion or not in use during certain eras.
Related: How to use the gradient map in Photoshop
The next option is to Sample All Layers.

Tick the box beside Sample All Layers when you are working with multiple layers, and you wish to select the same color from all the layers.
Step 5 – Add or Subtract Areas from the Selection
In some cases, you may want to unselect some of the areas of the colored selection.
To subtract areas from a selection, you can use the Subtract Selection button in the Magic Wand's options bar.
The Subtract Selection button is the third square icon, a transparent square overlapping a white square in the line of four square icons.

Activate this button, and then, using your cursor, click on the selection in the canvas that you wish to deselect.
Once clicked, the selection will disappear.
If you wish to add more areas to a color selection, activate the Add Selection button.
This will allow you to add more areas to a selection even if the areas are not connected.
The two images below demonstrate what happens when the second button is clicked, and a new area of the canvas is selected.
The image below shows the first selection of the red-colored building.
The next demonstrates what happens when the second icon is activated and a new area of the canvas is selected.
As you can see, the second selection has been created, and the first has not been affected.
Use this method when you want to add more areas of the same color to a selection without selecting every single area that is the same color. As you can see, the red wall on the right-hand side of the image is not selected.
However, bear in mind when you use this method that it will be highly unlikely that the new source color clicked to make the selection will be the same in every selection.
Thus, each selection will have a slightly different range of color tones.
To deselect an active selection, using the Wand tool, click within the active selection.
Or head to the top menu bar, and from the drop-down menu under Select, click Deselect.
When clicked, the marching ants will disappear, and the area will no longer be selected.
Step 6 – Replace the Color
Now that you've created a precise selection, it's time to replace the colors.
There are different options to replace colors in Photoshop. The one we are going to use for this tutorial is the Hue/Saturation tool.
Head to the top menu bar and select Image > Adjustment.
When the Adjustment drop-down menu opens, select Hue/Saturation.
For the keyboard shortcut, hold down the Command key and hit U (for Macs), or hold down the Ctrl key and hit U (for Windows).
The Hue/Saturation dialogue window will open.
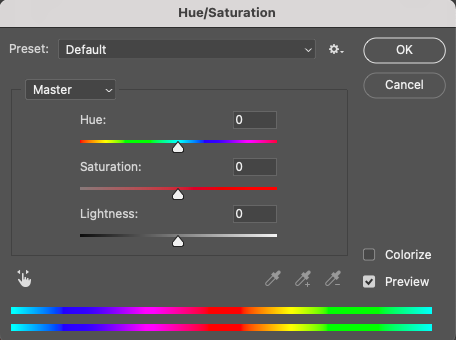
To change the color in the active selection, simply slide the Hue, Saturation, or Lightness sliders to the left or right.
Photoshop will generate a preview of the color changes in the canvas workspace when the box beside Preview is ticked.
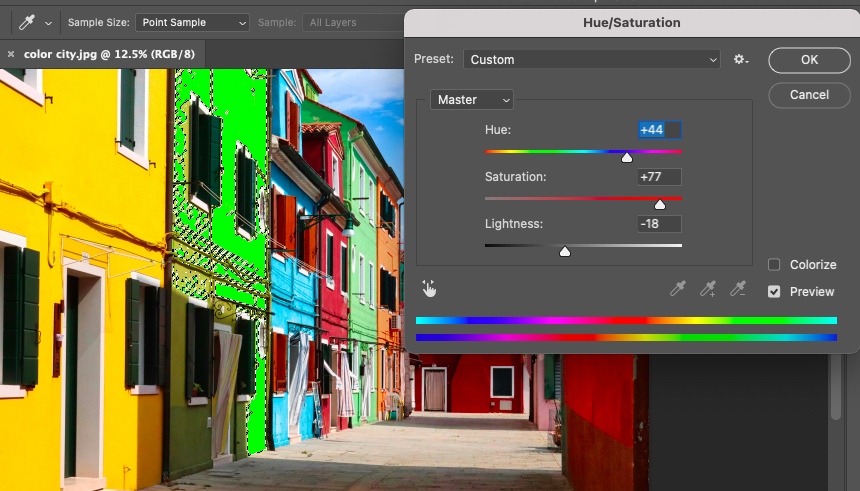
When you are happy with the alteration, click OK in the top right-hand corner of the Hue/Saturation dialogue window.
Step 7 – Save the Image
Now you have the final image – the colors have been successfully selected and replaced. You will want to save your work.
Head to the top menu bar and select File > Save a Copy.
The Save a Copy dialogue window will open.
Enter a name for the image and choose a location for the new image.
Select your preferred image format from the drop-down menu beside Format.

Click Save in the bottom right-hand corner of the dialogue window.
Your image will now be saved.
You now know how to select by color in Photoshop using the Magic Wand tool.
This is useful when you wish to edit a color range, to replace the color with a new color or to alter the color's saturation or lightness.
Method 2: Select a Color using the Eyedropper Tool
The Eyedropper is the perfect tool for selecting a color sample. It allows you to select a sample as a single pixel or a group of pixels.
This color sample can be used to record a color's code for future reference or to color match.
Graphic designers color-match elements within an image, such as when adding graphics, text, or objects to an image using the same color to create a harmonious design.
Knowing a color's properties is also helpful when you want a color in a set of images to be identical.
Step 1 – Open the Eyedropper Tool
Head to the toolbar, select the Eyedropper tool or hit I for the keyboard shortcut.

If the Eyedropper doesn't open when you click I, hold down the Shift key and hit I until the Eyedropper tool icon appears.
Step 2 – Adjust the Eyedropper Tool's Settings
When the Eyedropper tool opens, its options bar will open above the canvas workspace.

The first option is the Sample Size. By default, Photoshop is set to Point Sample, which means one single pixel will be selected.
This is useful if you wish to collect a color code for one particular color or if you want the color match to be one pure block of color.
However, when working on projects where you need to match areas of color, you will find that it's made up of more than one color.
Instead, it will be made up of a range of colors of a similar hue.
Therefore, the best method for matching color areas is to collect a larger sample area. This way, the color sample will contain a range of the colored pixels in the area.
Click on the arrow on the Sample Size box, and a drop-down menu will be presented.
From here, you can select the size you would like your sample to be. In other words, how many color pixels you would like included in the sample selected.
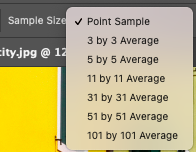
The options range from ‘3 by 3 Average' if you want a condensed sample size up to ‘101 by 101 Average' if you want a broader sample size.
Click on the sample size you need for the current project.
In the box beside Sample, select Current Layer. This means the color sample will be taken from the visible layer.
Tick the box beside Show Sampling Ring if you wish to see a preview of the color sample taken.
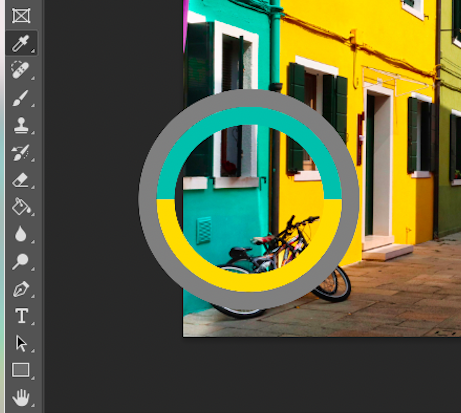
A ring displaying the past (bottom color) and current (top color) samples will appear when you click on the canvas.
The sample ring will disappear when you release the cursor.
Step 3 – Select Color Sample
When you have set the specifics for your color sample in the Eyedropper tool's options bar, you're ready to take a sample.
Click on the color or colored area you wish to sample.
Once clicked, the circle icon in the Color Pallete will jump to indicate the color clicked.
The Color Pallet will indicate the chosen colors, lightness, and saturation. The Hue slider on the right side of the Color palette will indicate where the color is positioned in the hue range.
Step 4 – Use the Selected Color to Paint
Now that the color is selected, you can use it to paint using the Brush tool or to fill an active selection with the color.
To paint using the Brush tool, head to the toolbar and select the Brush tool, or click B for the keyboard shortcut.
The Brush tool's options bar will open above the workspace.
Click on the downward arrow beside the brush tool size icon in the option tab. Here, you can set the size and feather of the brush tip to suit your design.
For this tutorial, the brush size has been set to 100 px, and the hardness (or feathering) has been set to 56%.
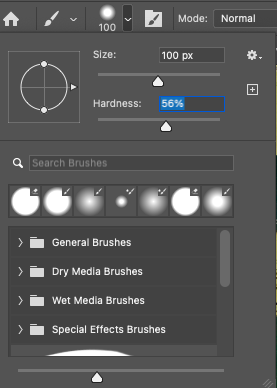
Add another layer by clicking the Add Layer button (the square with the plus symbol inside) at the bottom of the Layers panel.
This keeps your drawing separate from the background layer, making it easier for editing.
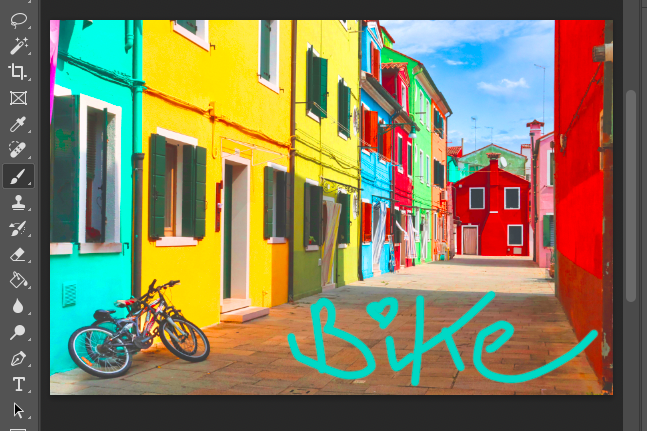
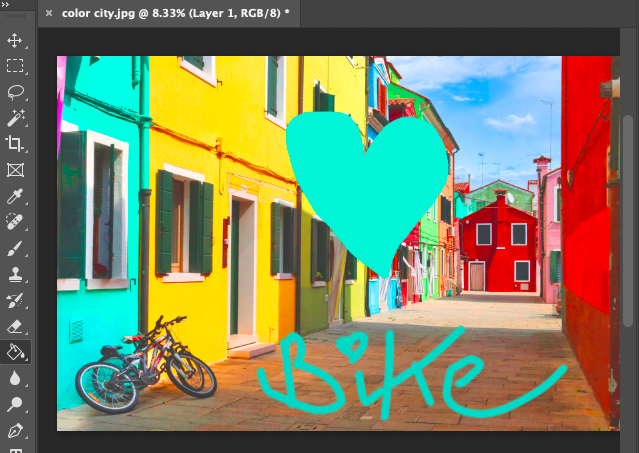
As you can see below, a sample from the building on the left was used to draw the word ‘Bike.'
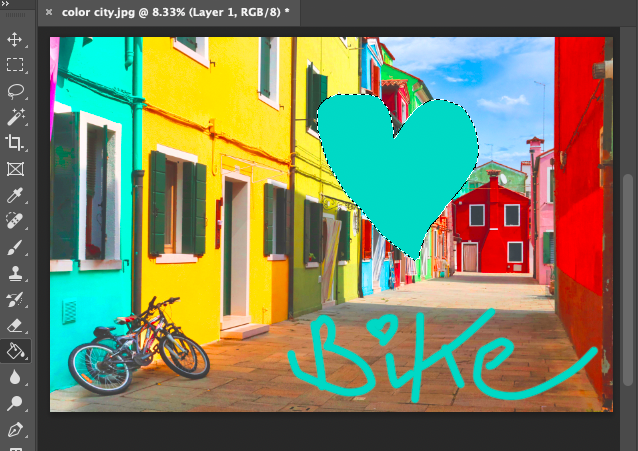
You can also use the sample taken to fill an active selection.
You can use any Selection tool to make an active selection. For this tutorial, we will use the Lasso tool.
Select the Lasso tool from the toolbar, or hit L for the keyboard shortcut.
Now, using your cursor, draw a shape on the canvas; when you release the cursor, an active selection of your drawing will be created.
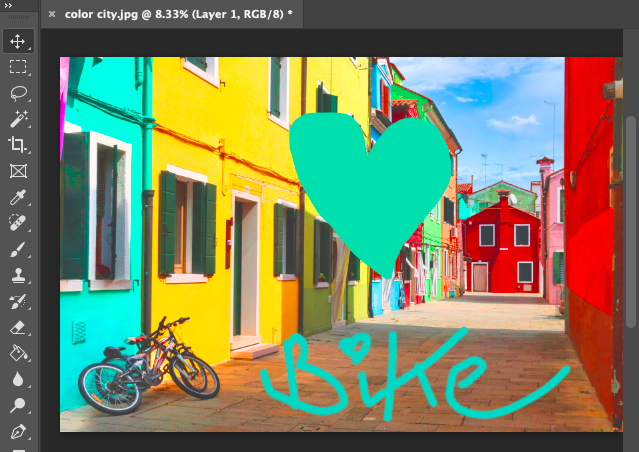
Head back to the toolbar and select the Paint Bucket tool. Click within the active selection, and it will be filled with the color sample.
As you can see below, the active selection is instantly filled with the sample color.
The Text tool and Shape tool do not record the sample color.
Step 5 – Finding the Correct Color Sample
You might notice that the color used to draw and to fill the selection are not exactly the same as the color of the building.
So what happened? You clicked the building. Surely it will be the right color.
One thing to note when using the Eyedropper is that if you have selected a sample based on one pixel, that is exactly what you will get – that single and solitary color pixel.
A single color pixel, isolated on its own, will not represent the overall color of a group of color pixels.
We can see this when we zoom in at 3600% on the color area sampled.
We can now see clearly on the pixel level. Each one of these pixels used on its own will not look the same as the collection of color pixels.
![]()
Luckily, the Eyedropper tool can select the one-pixel color that best represents an area of color.
To do this, the Eyedropper tool makes a calculation of a combination of all the colors in a sample area.
To obtain the most accurate color sample, you will have to tweak the settings in the options bar.
In the image below, the ‘101 by 101 Average' was selected from the box beside Sample Size.
A color sample was taken of the left-hand building
Using the Paint Bucket tool, the love heart area was filled with the new sample color.
As you can see, the new sample color has more yellow tones than the color of the building.
The reason for this is that the 101 by 101 sample area was too large. Thus, it also added colors to the sample from the adjacent yellow building.
The sample area was adjusted to '31 by 31 average', and a new sample was taken of the left-hand building.
The love heart shape is filled with the new sample color.
As you can see from the image below, this new color is a more accurate representation of the building's color.
In the image below, the three color samples can be compared side by side.
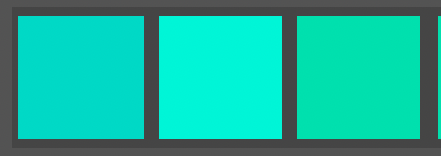
The difference between the three colors is subtle, but it is enough to be noticeable.
Step 6 – Record Selected Color
The Eyedropper tool allows you to record the color code, either as HTML or Hex Code.
This is useful when you wish to keep a copy of the color for future reference or to use for a color match.
To copy the color code, first select the Eyedropper tool and take a color sample from your canvas, then right-click with your cursor.
A drop-down menu will appear; scroll down the options to the last two.
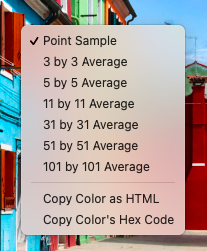
The last two options are Copy Color as HTML and Copy Color's Hex Code.
You can use either of these options to record the color code, which you can then paste into a Word document, email, or for printing purposes.
Simply select one of the two options, and the color code will be copied.
This code can also be pasted back into Photoshop's Color Picker dialogue box to use in a PSD file.
To paste the color code back into the Color Picker, open the Color Picker dialogue box.
At the bottom of the dialogue box, you will find a box beside a # symbol containing a set of numbers and letters.
Click inside this box. On your keyboard, hold down Command (for Macs) or Ctrl (for Windows) and hit Z.
The color's Hex Code will be pasted into the box beside the # symbol.
Hit Enter on your keyboard, and the color will be ready to use in conjunction with the Brush tool or Paint Bucket tool.

Method 3: Select a Color using the Color Range
To select an area of color, you can use the Color Range tool. In effect, it generates the same outcome as the Eyedropper tool – an active selection of a chosen color.
However, it gives you more control over the selection.
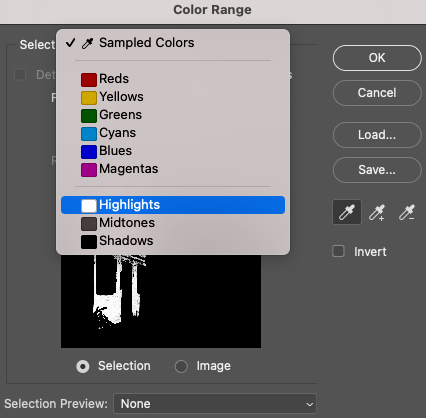
You can select colors based on their hues, such as Red, Yello, Green, Cyans, Blues, or Magentas.
If they are highlights, midtones, shadows, or out of Gamut.
Therefore, the Color Range tool allows incredible precision, with the capability of honing in on colors based on very specific characteristics.
Step 1 – Open the Color Range tool
Head to the top menu bar and click Select. From the drop-down menu that opens, select Color Range.
The Color Range dialogue box will pop open.
Step 2 – Select by Color
The first option in the Color Range box is Select. Click on the arrow at the end of the box, and a drop-down menu presenting choices will appear.

Select any of the choices from the menu, and a preview of the selection based on this color will be generated.
As you can see in the image below, Reds has been chosen from the drop-down menu. In the small preview box, the areas that will be selected using this choice are highlighted.

In the image below Yellows has been selected, and the preview highlights the areas of yellow color that will be selected.
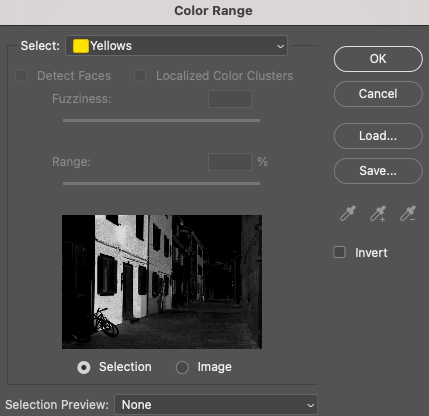
When using the choices, from Red through to Magentas, there will be no option to adjust the Fuziness or Range of the selection made.
Simply click OK at the top of the dialogue box, and the selection will be created.
As you can see below, the yellow hues have been selected.
To manually pick a color from the canvas using an eyedropper, you need to instead select the first option in the drop-down menu, Sampled Colors.
Click on the color in the canvas workspace that you wish to select.
Once selected, the designated selection will appear in the preview window.
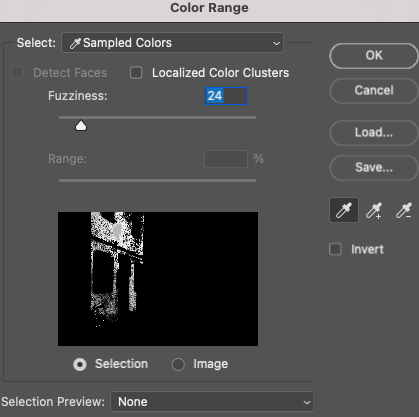
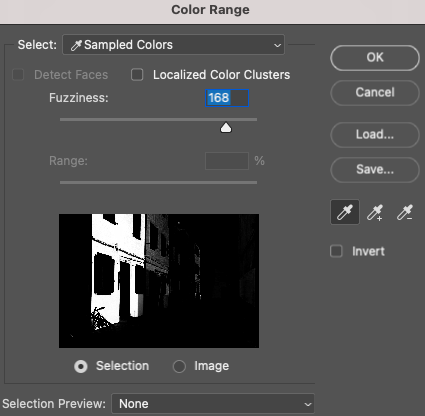
You can use the Fuzziness slider to adjust the range of colors included.
Slide the bar to the left to decrease the range, as in the image below.
Or slide the Fuzziness slider to the right to increase the range of colors included.
You can add or subtract from the selection of colors by clicking on one of the eyedropper icons on the right-hand side of the dialogue window.
The first eyedropper icon is used to make the initial selection, and the second eyedropper icon with the plus symbol is used to add to the selection. The third eyedropper icon with the minus symbol is used to subtract from the selection.
You can invert the selection by ticking the box beside Invert.
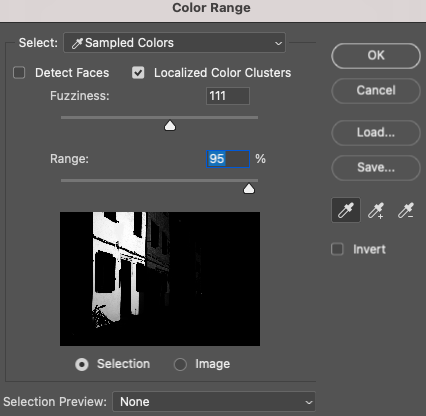
Click the box beside Localized Color Clusters, and the Range slider will be activated.
You can now alter the color selection based on the location where the color picker selected the color.
Below, the Range slider has been set to 13%; thus, the selection of colors will be located around the initial click.

When the Range is increased to 95%, almost all of the yellow in the image has been selected.
The next options in the Color Range box are to select colors based on grades of lightness, highlights, midtones, or shadows.
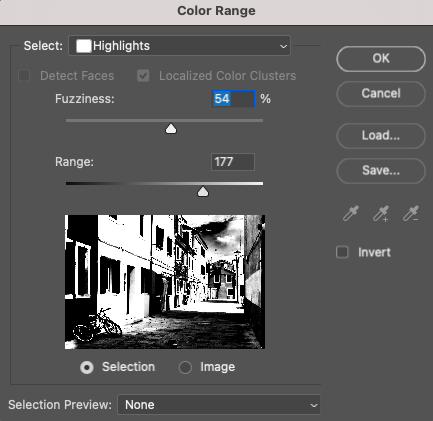
When working with a color selection based on lightness, the Fuzziness and Range sliders can be adjusted to edit the default selection.
To select colors based on skin tones, select the Skin Tones option.
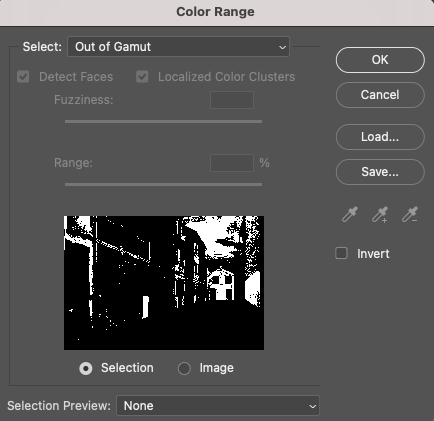
The last option is very useful if you intend to print an image. It is the Out of Gamut choice.
A color that is considered ‘out of gamut' is not in the CMYK range. This means the print press can't reproduce the color exactly.
If you want complete control over the printed process, use the Out of Gamut option to select and then edit the colors.
As you can see in the image below, many of the colors are considered Out of Gamut.
Having Out of Gamut colors is likely when the image is in RGB mode.
Change the image mode to CMYK, and the Out of Gamut option will be removed from the list of choices, as seen below.
Step 3 – Edit the Color Selection
When you're happy with the selection of color in the Color Range preview window, click OK.
An active selection will now appear in your canvas workspace.

You can now use the active selection to edit the colors.
Method 4: Select a Color using the Color Picker
The color picker is useful if you wish to select a color based on its relationship with other colors.
For instance, if you want to use colors that are similar in saturation, lightness, or hue.
This is relevant when creating images within a specific color range. To generate a mood, for example, like upbeat, happy, or subdued.
To generate a sense of celebration within a design, colors with a high saturation tone are used.
In contrast, to generate a somber look, desaturated tones are used.
With the use of the color picker, a designer has a tool to keep the color range consistent.
Step 1 – Open the Color Picker
There are a few ways to access the Color Picker dialogue box. The most commonly used is through the Color panel.
In the top right of the Color panel are two squares. They represent the background and foreground colors.

The top square is usually filled with the color last used in the Photoshop document.
Double-click on either of these squares, and the Color Picker dialogue window will open.
Step 2 – Using the Color Picker
Depending on which square is clicked, either the Color Picker (Foreground Color) or the Color Picker (Background Color) will open.
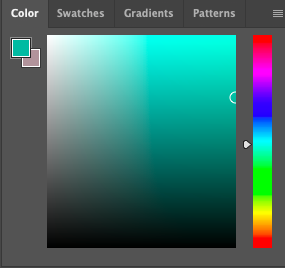
The color will be represented in the color square box by the circle icon.
The color's Hex code will be displayed down the bottom in the box beside the # symbol.
The properties of the color will be displayed in the value boxes above the Hex code.
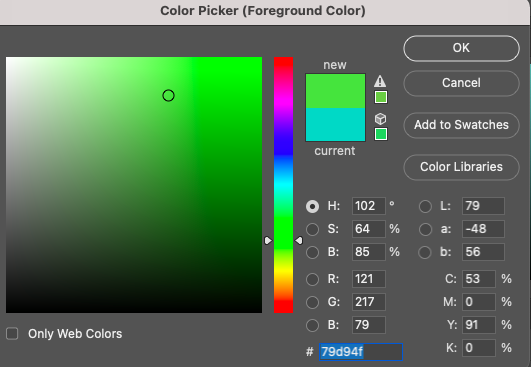
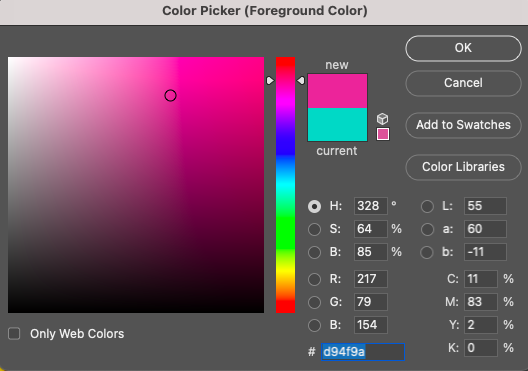
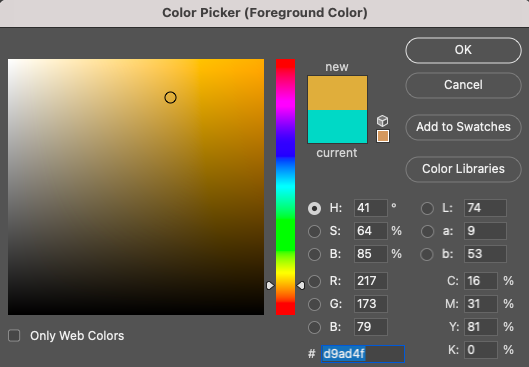
As you can see in the image above, the circle icon's position visually represents the placement of the selected colors by Light, Saturation, and Hue.
To select another color with the same saturation and lightness, slide the hue slider to the right of the color box.
Below, you can see the slider has been moved to a redder hue, but the saturation and lightness of the color are identical to the first green color.
Again, the color slider has been moved towards a yellow hue, but the lightness and saturation of the color are the same as the first color.
Using the color picker, color swatches can be taken to create a color palette based on saturation, lightness, or hue.
To save a color as a swatch, simply click the Add to Swatches button on the right-hand side of the Color Picker box.
Once clicked, the Color Swatch Name dialogue box will open.
Enter a name for the swatch, and tick the box beside ‘Add to my current library‘ if you want to save it to your library as well.
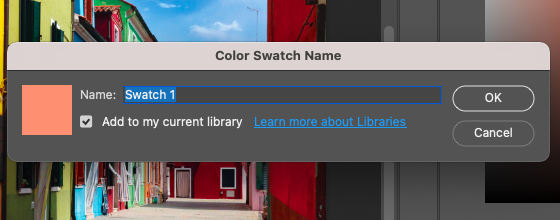
Then click OK.
The color will now be saved to the Swatch panel.
In the Swatch panel, click the Add Folder button (a folder icon) to add a new folder for your swatch collection.
A pop-up window will open where you can add a name for the new folder, then click OK.
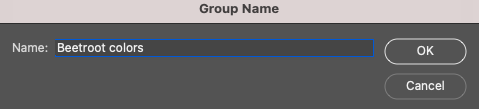
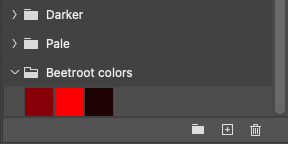
As you can see, the new folder was added to the Swatch panel, ready to be filled with a selection of colors.
To add colors to a folder, simply click on them and drag them into the folder.

As you can see below, color swatches have been added to the new folder by using the Color Picker to select them.
Keeping a collection of colors is incredibly useful when you are working on graphic designs. It gives you easy access to the correct colors for the design material, helping to keep color selections consistent.
You can delete the folder anytime by clicking on it and dragging it into the trash at the bottom of the Swatch panel.
And there you have it – four methods for selecting colors in your photos and designs.
I hope this tutorial helps you select by color using Photoshop to give you extra editing freedom.
If you like this Photoshop tutorial, you will enjoy – How to use the Warp Tool in Photoshop (3 Ways).
FAQ
How do you make a selection based on a color range in Photoshop?
You can use the Color Range tool to select based on a color range in Photoshop.
Head to the main menu, open the drop-down menu under Select, and click Color Range.
The Color Range dialogue window will open. Click the eye dropper on the color range in the canvas to select it.
How do I isolate one color in Photoshop?
To isolate one color in Photoshop, you can use the Magic Wand tool.
Select the Magic Wand from the toolbar. In the Magic Wand's option bar, change the Tolerance value to 1 and untick the contiguous box.
Now, when you click on a color in the canvas workspace, only this color will be selected.
How do I target one color in Photoshop?
To target one color within an image in Photoshop, use the Magic Wand tool.
Select the Magic Wand from the toolbar. In the Magic Wand's option bar, change the Tolerance value to 1 and untick the contiguous box.
Now, when you click on the target color in the canvas workspace, this color, and only this color, will be surrounded by marching ants.
What is the select by color tool?
The select by color function in Photoshop allows users to select areas of an image based on color similarity, enabling quick selection and manipulation of specific color ranges within the image.
To select by color in Photoshop, use the Color Range tool.
Head to the main menu bar in the drop-down menu under Select, pick Color Range.
The Color Range dialogue window will open. In the drop-down menu beside Select, you can choose to make selections based on color.

Judyth is an experienced studio photographer and glass artist. When she isn’t Photoshopping comedians into the bellies of sharks, you can find her cooking delicious treats for her guests.
👋 WELCOME TO SHOTKIT!
🔥 Popular NOW:
