


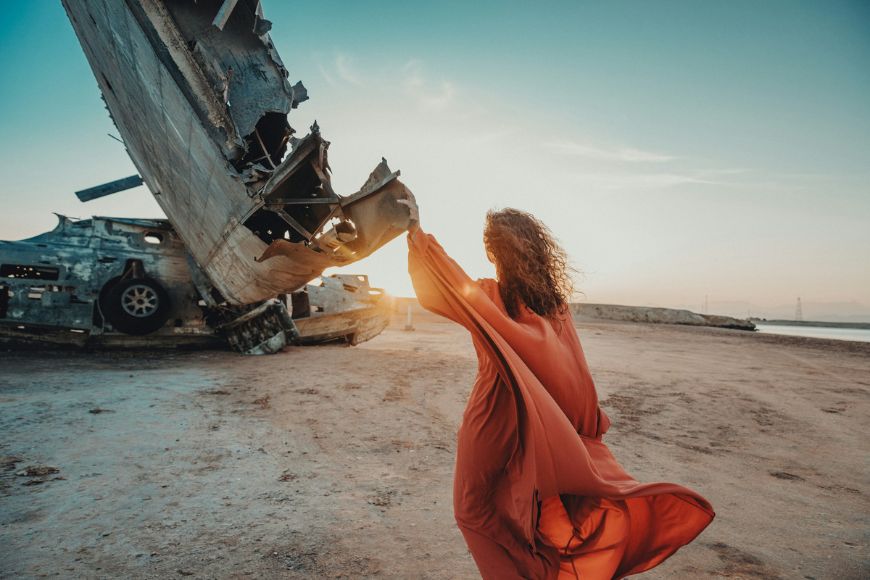
How to Use The Gradient Map in Photoshop
Discover how to harness the power of the Gradient Map in Photoshop, transforming your images with precise color and tone adjustments.
Photoshop | Software | By Yatharth Gupta
Shotkit may earn a commission on affiliate links. Learn more.
If you wish to learn how to use gradient maps in Photoshop, this post is for you.
Gradient maps are one of the most useful tools in Photoshop that can be used in various ways to enhance your photos.
You can use gradient maps to color-grade and recolor your photos and create duotone and dramatic black-and-white effects.
In this guide, you'll find step-by-step instructions on various ways of using gradient maps in Photoshop to enhance your photos.
So, let's get started.
What are Gradient Maps?
Gradient Maps in Photoshop is a useful tool for manipulating the colors and tonality of an image.
It works by mapping the tonal values of a photo to a gradient, which by default is pure black to white but can be any other color of your choice.
With the default black-to-white option, the darkest parts of the image correspond to one end of the gradient and the lightest to the other.
Unlike regular gradients, which are applied over an image, gradient maps replace the image's original colors.
This tool is most useful for color grading, converting photos to monochrome with more control, or creating unique and artistic color effects.
Gradient maps offer an easy way to control and play with the color palette of your photos.
How Do Gradient Maps Work?
Gradient Maps work by assigning colors from a gradient to the luminance values of an image.
Behind the scenes, the image is temporarily converted to grayscale to understand the luminance (or brightness) levels.
Then, each luminance value is mapped to the color corresponding to the same luminance on the gradient.
The darkest parts (shadows) are mapped to the left end of the gradient, and the lightest parts (highlights) are mapped to the right end.
Midtones are mapped to colors in the middle part of the gradient. This process allows for a nuanced recoloring of the image based on its luminosity, creating striking and creative effects in your photos.
What Are Gradient Maps Used For?
Color Grading: Gradient maps are often used for color grading to add a specific mood or atmosphere to a photo. They can help you create vintage looks, cinematic tones, and other artistic color styles.
High Contrast Black and White Conversion: For converting images to black and white, gradient maps offer more control than simple desaturation, allowing photographers to influence the tonal relationships and contrasts.
Creative Effects: Artists and designers use gradient maps for creative effects, like duotones or false-color looks, which are popular in graphic design and digital art.
Selective Color Adjustments: By using gradient maps with layer masks, photographers can make selective color adjustments to specific parts of an image, enhancing the overall visual impact of a photo.
How to Use the Gradient Maps Tool in Photoshop
Photoshop's Gradient Map is a versatile feature that offers various applications, including color grading, black-and-white conversion, and generating other creative effects.
In this section, we'll take a look into some of the most common ways you can use Gradient Maps in Photoshop.
Color Grade using gradient maps in Photoshop
Using Gradient Maps in Photoshop is one of the easiest ways to color grade your photos.
Color grading is the process of creating a mood or atmosphere in an image by manipulating the color palette.
However, the process isn't that straightforward; it's a combination of Gradient Maps and Blend Modes.
Below are the step-by-step instructions to color grade your photos using gradient maps:
Step 1- Open your image
The first step is to load your image in Adobe Photoshop; if you're working with a RAW file, make basic adjustments and load it into the workspace for further processing.
You can open the image using your file explorer or from the Adobe Photoshop menu.
Step 2- Create a Gradient Map adjustment layer
Once you open the image, it will show up as a Background layer in the layers window.
Before moving to the next step, make sure your foreground and background colors are set to default in the left toolbar. You can set it to default by pressing the letter D on the keyboard.
Then, click the Adjustment Layer icon at the bottom of the layers panel or by going to Layer > New Adjustment Layer > Gradient Map.
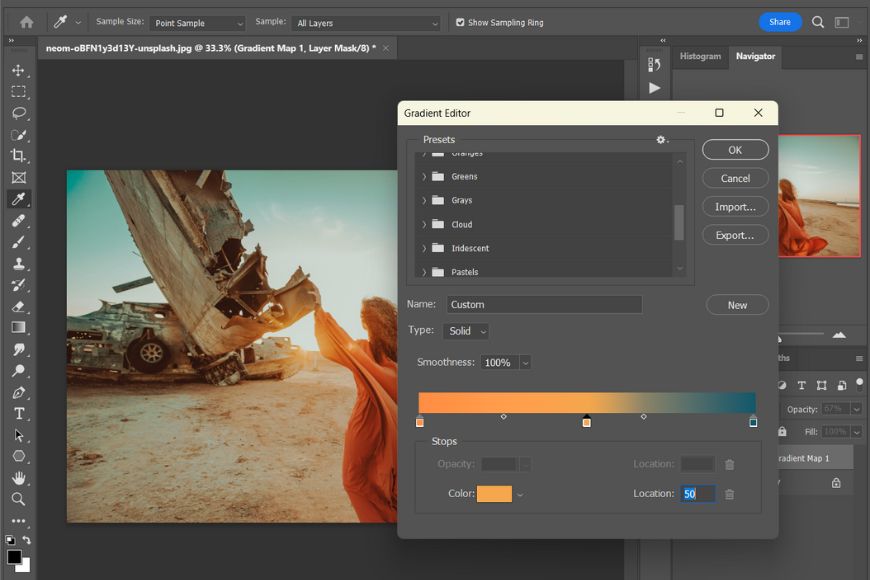
Step 3- Choose the gradient you wish to use
The next step is to edit the gradient with the colors of your choice to grade your photo.
You can do that by double-clicking the gradient icon on the gradient map adjustment layer.
However, make sure you're not clicking on the layer mask icon.
This would open up the Properties dialog box showing the gradient in use.
The default gradient is a basic pure black to pure white one.
You can change the colors by selecting another gradient from the dropdown menu on the gradient bar.
It offers many interesting gradient presets in various categories to suit your vision.
However, there are times when you would want to choose your own colors.
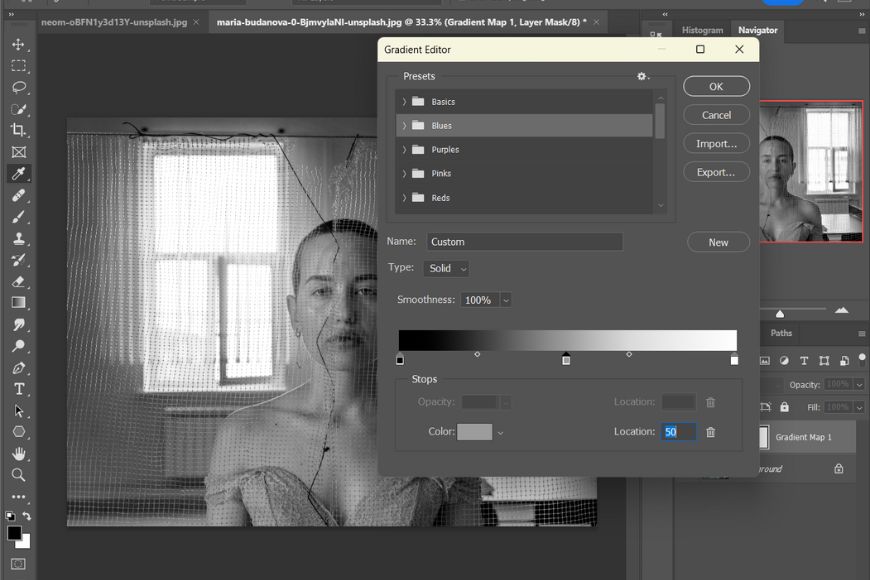
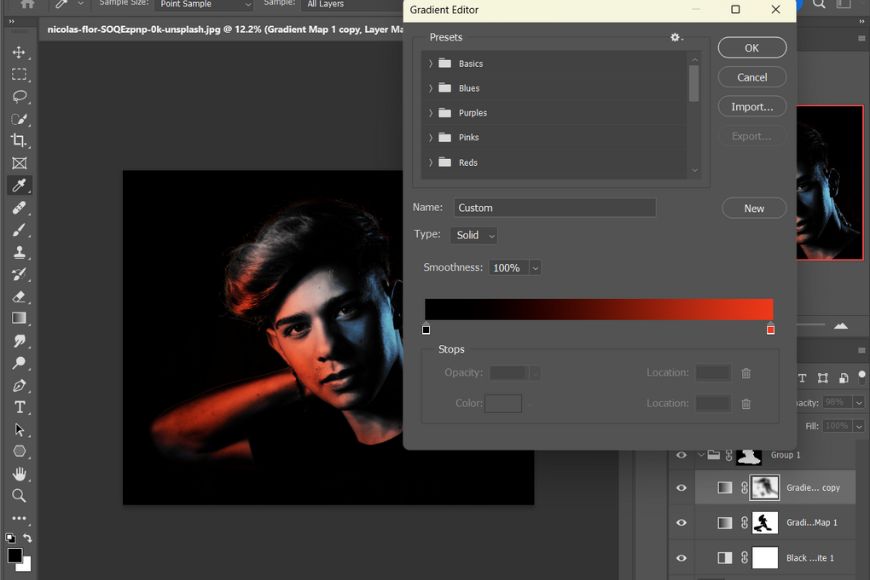
To create a custom gradient, double-click on the gradient bar, which will open the Gradient Editor dialog box that allows you to choose the colors for different luminance values.
By default, the small boxes are placed on each end of the gradient, representing the color of the shadows and highlighting from left to right.
Clicking one of these boxes would activate the Color option, which would allow you to choose a custom color for that particular luminance value.
When working with a custom gradient, you'll notice the midtones are a dull middle-grey tone.
You can eliminate this by clicking below the middle point on the gradient bar.
Make sure you don't click on the gradient bar itself, but below it where hovering the mouse would show a finger pointer.
Additionally, adjust the Location to 50 to ensure your new pointer is right in the middle.
Clicking the color box under this new pointer would allow you to choose a custom color for midtones.
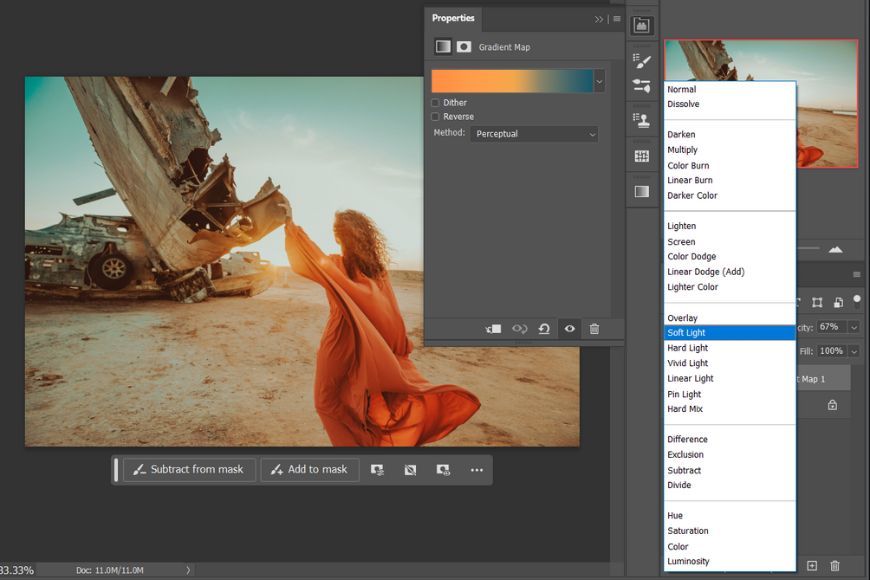
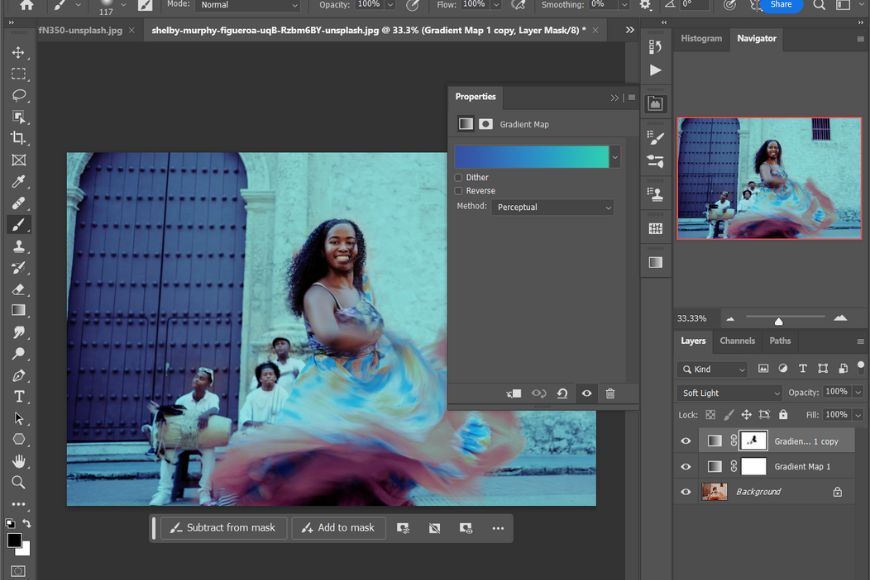
Step 4- Play with blend modes and opacity to fine-tune the effect
Choosing the right colors is one part of the color-grading process with gradient maps.
Often, these colors come out very strongly in the photo and are not usable without blending the effect.
Blend modes control how the effect in a particular layer blends with the underlying layers.
You can find the blend modes in the dropdown in the top section of the layers panel.
The default blend mode is Normal, which essentially means there would be no blending, and the effect would appear as it is.
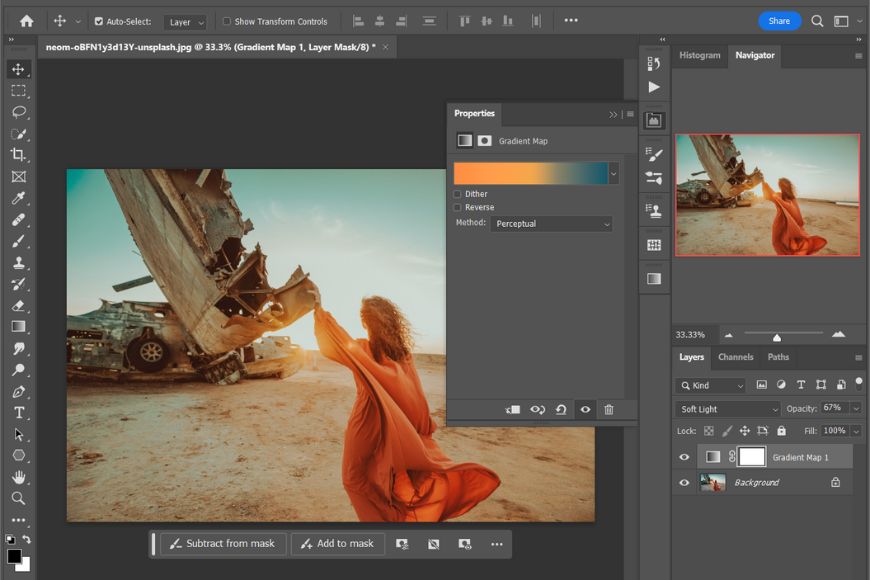
For the purpose of color grading, I would recommend using Soft-Light or Overlay blend mode.
Soft light produces a subtle effect and is mostly the preferred one in my workflow.
Another thing that can help you regulate the effect is the opacity slider.
Reducing the opacity of the adjustment layer would further reduce its effect. However, you should make sure the opacity of one of the underlying layers is 100%.
I recommend playing with blend modes and opacity until you get the desired color grade.
With opacity and blend mode set, you can retry various color combinations on the gradient.
Dramatic Black and White using Gradient Maps in Photoshop
Even though turning your colored images into black and white is an easy job in Photoshop, the results are often not that great.
That's where Gradient Maps allow you greater control over the output by letting you choose the desired tone for each luminance value.
Let's look at how we can create a dramatic black and white using gradient maps in Photoshop.
Step 1- Open your photo and create a Gradient Map adjustment layer
The first step is to open the image you wish to turn into black and white by dragging on the workspace or going to File > Open and selecting your photo.
If you're using a RAW file, make sure to make the RAW conversion and basic adjustments before opening it in Photoshop.
Once the file is opened, click on the adjustments button on the bottom of the layers panel and choose Gradient Map.
Step 2 – Customize the Gradient Map for Black and White Conversion
After selecting the Gradient Map adjustment layer, your image will initially appear in a default black and white gradient.
To enhance the contrast and detail, double-click on the gradient map in the layers panel, then single-click on the gradient to open the Gradient Editor.
Select a Black and White gradient or choose the default Foreground to Background one.
This preset provides a good starting point for high-contrast black-and-white images.
Step 3 – Adjust the Gradient to Control Tonal Range
In the Gradient Editor, you can fine-tune the black-and-white points to control the tonal range.
Slide the color stops inward at each end of the gradient to make the shadows darker or the highlights brighter.
This step is crucial for achieving the dramatic effect – deeper blacks and brighter whites leading to higher contrast.
Step 4 – Experiment with Midtone Adjustments
For more control over the midtones, add a new color stop in the middle of the gradient bar by clicking below the midpoint on the gradient bar where the mouse pointer turns into the finger.
To effectively target the midtones, make sure your location is set to 50. Additionally, you can add a middle grey color to the midtones stop to control the effect further.
You can then adjust this stop to darken or lighten the midtones. This helps bring out or soften details in the image, depending on your desired look.
Step 5 – Save Custom Gradient Preset (Optional)
If you've created a gradient that you particularly like and might want to use again, you can save it as a preset.
Click the ‘New' button in the Gradient Editor to save your customized gradient. Name it appropriately for easy recall.
Step 6 – Apply and Fine-Tune the Gradient Map Layer
Once you're satisfied with the gradient, click ‘OK' to apply it to your image.
You can further fine-tune the black-and-white effect by adjusting the opacity of the Gradient Map layer or by changing its blending mode (try ‘Soft Light' for a more subtle effect).
Step 8 – Finalize Your Photo Review your image, making any final adjustments to ensure it meets your artistic vision.
This could include overall brightness and contrast adjustments or further tweaking to the gradient map settings.
Please note, in this case of creating black and white images using Gradient Maps, it's important to avoid changing the blend mode and reducing opacity.
This is because changing the blend mode would revert the image back to color, and reducing opacity would reveal the underlying color layer, thereby diluting the high-contrast black-and-white effect you're aiming for.
By following the above steps, you can transform any color photo into a dramatic black and white with precise tonality.
Creative Recolor using Gradient Maps in Photoshop

Recoloring images in Photoshop using gradient maps is a great technique to easily alter the colors within a photo.
This method is particularly useful when you want to change specific areas of an image or apply unique color schemes.
Gradient maps work differently and give you more control over the color compared to the Hue/Saturation adjustment layer.
Let's dive into the steps to effectively use gradient maps for recoloring.
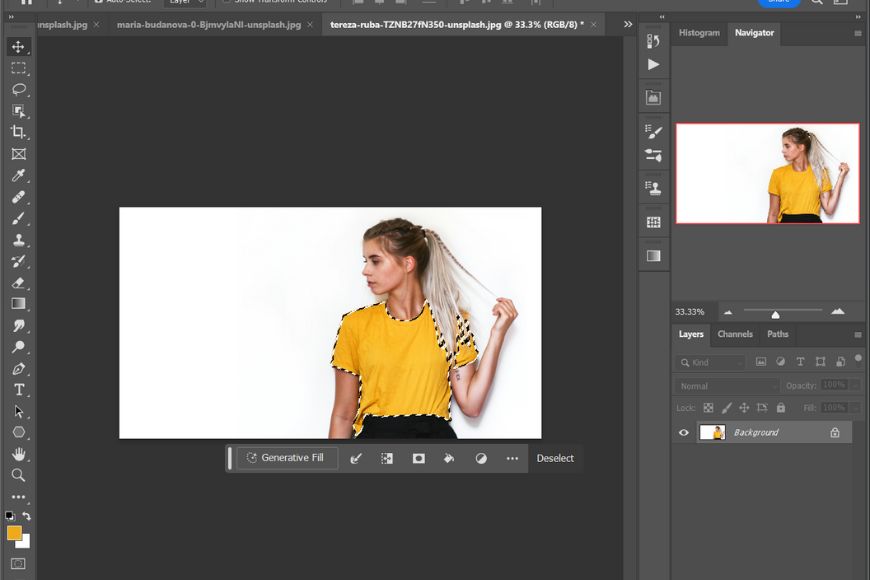
Step 1: Select the Area to Recolor
Begin by using the Quick Selection Tool (or any other selection tool) to select the area of the image you want to recolor.
This could be an object, a piece of clothing, or any other part of the image.
Make sure your background and foreground colors are set to default by pressing D on the keyboard.
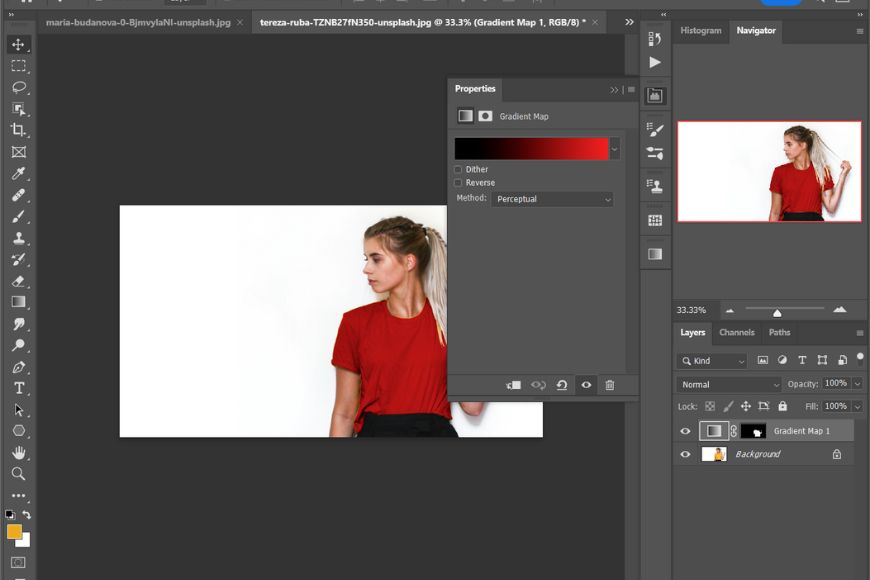
Step 2: Create a Gradient Map Adjustment Layer
With your area selected, add a Gradient Map adjustment layer.
Adding a gradient map this way would mask out the areas that are not part of the previous selection.
Initially, this will turn your selected area into a grayscale image based on the default black-and-white gradient.
Step 3: Adjust the Gradient Map
Double-click on the gradient in the Properties panel to open the Gradient Editor.
Here, you'll adjust the gradient to change the colors in your selected area.
The left side of the gradient bar represents shadows, and the right side represents highlights.
Step 4: Choose Your New Colors
In the Gradient Editor, click on the color stops and select new colors in the activated dropdown below.
You can choose any color you like, and this will be applied to your selected area.
However, if you're working with pieces of clothing that are well-lit in the photo, I recommend keeping the shadow color to black and changing the highlight and midtones color.
Step 5: Fine-Tune the Gradient
You can add new color stops to the gradient bar for more nuanced control over how colors transition in your image.
Also, try sliding the diamond-shaped stops between the color stops to tune the blend further.
This step is not essential but is recommended for creating a natural and seamless transition.
Step 6: Adjust Blending Modes (Optional)
For clothes, you should stick with the Normal blend mode as you're trying to change the color and not blend with the underlying layer.
However, if you're trying to change the color of your eyes, you should experiment with different blending modes for a natural look.
Overlay or Soft Light can often yield more integrated and realistic results.
Step 7: Final Adjustments
After applying the gradient map, you might need to make additional adjustments.
Play around with the layer's opacity or add a layer mask to further refine the effect on specific parts of your selection.
By following these steps, you can effectively change the colors in your images, opening up many creative possibilities.
Create Dual Color Lighting using Gradient Maps in Photoshop

Creating a dual-color lighting effect in Photoshop can dramatically change the mood and feel of your images.
This technique, which utilizes gradient maps, layer masks, and blending modes, is perfect for adding a creative and dramatic touch to your portraits or other subjects.
However, this technique works best with studio portraits that are shot using a two-light setup.
Let's look at how you can achieve this effect:
Step 1: Select Your Subject
After opening your photo in Photoshop, the first thing is to create a selection of the parts where you wish the color light to fall.
Go to the menu Select > Subject to make an automatic selection of the subject in your photo. This tool uses AI to detect the subject and make a selection.
Alternatively, you can use the Quick Selection Tool or the Object Selection Tool to make the selection manually.
Step 2: Create a Gradient Map Adjustment Layer
With your selection done, create a new layer group and add a layer mask to this group.
You can create a layer group by clicking the folder icon at the bottom of the layers panel.
This would create a mask based on the current selection made in the previous step.
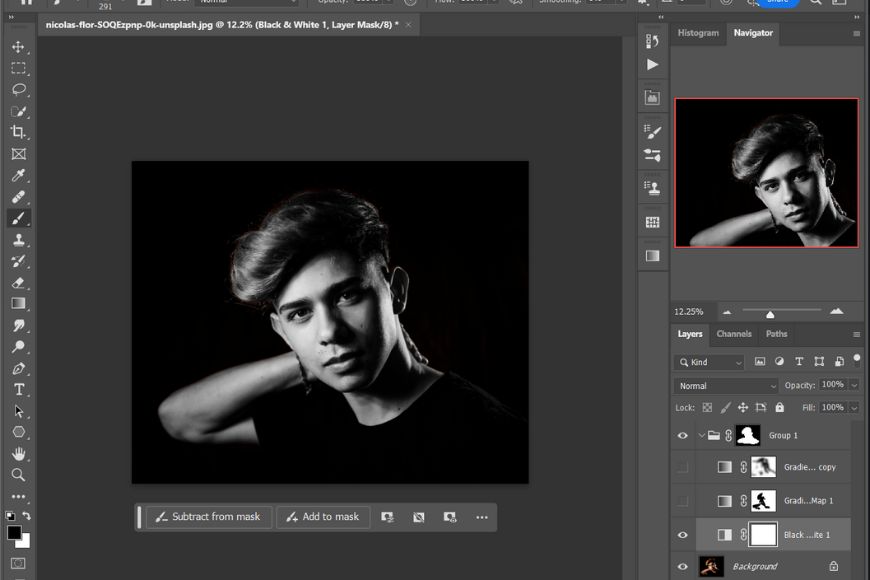
Step 3: Create a black & white adjustment layer
Before we create the dual-color light effect with a gradient map, we need to create a black-and-white base.
Create a black and white adjustment layer by going to the adjustment layers control at the bottom of the layers panel.
This would remove the original colors; it's a crucial step for the dual-color effect to stand out.
Step 4: Create a Gradient Map
Set your foreground and background colors to default (black and white) by pressing D on the keyboard.
Double-click the gradient on the adjustment layer and then click on the gradient bar to adjust the Gradient Map to apply the first color.
One thing to note here is that if your subject has light falling on his face, you should change the color of the highlights to see the effect.
For instance, I chose a blue hue in this example for one part of the gradient.
Step 5: Adjust Blending Modes and Opacity
Change the blending mode of the Gradient Map layer to ‘Hard Light‘ to make it more realistic and adjust the opacity to soften the effect to your liking.
With this step, we've created the first lighting effect. However, we need to make some adjustments for the second light.
Step 6: Paint the Layer Mask
Use a soft brush to paint on the layer mask of the Gradient Map with the black color selected to reveal where you want the first color (e.g., blue) to appear on your subject.
Step 7: Create a new gradient map and Modify it for Second Color
Create a new Gradient Map layer, make a selection on the layer mask where you'd want the second color using the brush tool, then change the color of the gradient (highlight side) to your second choice (like red).
Use hard light blend mode for the color effect to be more prominent. This will apply the second color to the selected areas of your subject.
Step 8: Fine-Tune Your Image
Finally, refine your mask edges and adjust the gradients as needed to perfect the dual lighting effect.
This method provides a great way to simulate a dual-tone lighting setup and can be customized with different colors and blending modes to achieve interesting effects.
Getting the Right Look Using Photoshop Blend Modes
Blend modes in Photoshop can significantly enhance various types of photos like portraits, landscapes, and more, especially when used with gradient maps.
Here's a detailed look at some of the key blend modes and their best usage scenarios:
- Multiply: This mode works by multiplying the pixel value of the base layer with those of the top layer, which results in a darker final image.It's effective when you want to darken the image without affecting the pure white.It's great for adding depth to landscapes or intensifying shadows in portrait photography. With gradient maps, Multiply can create a moodier atmosphere.
- Screen: This mode lightens images, making it ideal for brightening underexposed shots or adding highlights to landscapes. When combined with gradient maps, it can add a soft, dreamy look to your photos.
- Overlay: This mode combines Screen and Multiply, resulting in higher contrast. Overlay is good for enhancing depth and detail in different types of photos.With gradient maps, it can bring a balanced contrast without increasing the saturation too much.
- Soft Light: Offering a subtler effect than Overlay, Soft Light is useful for gentle contrast enhancement. It can be useful when you're color grading your portraits or landscapes with gradient maps as it results in a more natural-looking effect.
- Hard Light: This mode creates a high-contrast effect, making it useful for dramatic color effects or bringing out details in macro photography. With gradient maps, Hard Light can add a stark, graphic look.
- Color Dodge and Linear Dodge (Add): These modes brighten and saturate colors. They're great for creating high-key portraits or landscape photos with a vibrant, lively feel. In gradient maps, they can intensify color transitions for a more dynamic effect.
- Color Burn and Linear Burn: These modes deepen shadows and are great for creating low-key portraits or moody landscapes. When used with gradient maps, both these modes can add rich, deep colors to the photo.
- Hue, Saturation, Color, Luminosity: These modes maintain the hue and saturation of the base layer while adopting the luminance of the top layer.They are great for when you are color-grading with the help of a gradient map or another adjustment.They're excellent for adjusting skin tones in portraits or altering the color palette of a landscape.With gradient maps, these modes can nicely tone colors without affecting the image's luminance or saturation.
The choice of blend mode in Photoshop greatly depends on the goal and the type of photograph you're working with.
I recommend experimenting with different blend modes in conjunction with gradient maps to get unique visual effects.
How to Protect Skin Tones with Photoshop Blend Modes
When using gradient maps for portraits, protecting skin tones can be challenging.
However, the right blend modes, along with layer masks, can ensure natural-looking skin while applying creative color effects.
Here's how to protect skin tones with blend modes:
- Apply Gradient Map: The first step is to choose your gradient colors and apply the gradient map to your portrait.
- Select the overall blend Mode: Depending on the look you're after, choose the appropriate blend mode for the photo. At this stage, don't mind the skin tones and focus on other parts of the image. In the next step, we will create a duplicate of this layer specifically for skin tones.
- Create a layer stack: The best way to keep the tones consistent in the skin tones is to duplicate the effect layer and blend using the right mode. You can duplicate the layer by pressing Ctrl/Cmd + J on your keyboard.With this new layer targeted at skin tones, you can use blend modes like “Soft Light” to keep the effect low and natural for the skin tones, without oversaturating the colors. This would maintain the natural color of the skin while applying the gradient map's tonal changes. Alternatively, you can experiment with luminosity and other blend modes.

- Create a layer mask for skin: To control the effect and limit it to the skin tones, open the mask and paint the skin a black color using a soft brush, and then invert the layer mask by pressing Ctrl/Cmd + I on the keyboard.Make sure you're not affecting parts other than skin by holding the Alt key and selecting the layer mask to check the painted area. You can revert from this view by clicking on the gradient box on the gradient map layer.
- Fine-tune the Opacity: Adjust the opacity of the gradient map layer for a more subtle effect. Lower opacity will blend the gradient map more softly with the original skin tones.
- Experiment with color range for selections: For more precision, use the “Color Range” selection tool to target skin tones specifically. This technique allows for more targeted adjustments.
By following these steps, you can color your portraits while preserving natural-looking skin tones.
How Do I Apply a Gradient Map to a Specific Part of an Image in Photoshop?
To apply a gradient map to a specific part of an image in Photoshop:
- Create the Gradient Map: Add a Gradient Map adjustment layer. This applies the gradient map to the whole image initially.
- Use Layer Masks for targeted adjustment: To target specific areas, use a layer mask on the Gradient Map layer. Paint with black on the mask where you don't want the gradient map to apply and white where you do.”
- Use blend Modes to adjust the strength of the effect: Experiment with different blend modes on the Gradient Map layer to integrate the effect naturally with the image. For instance, ‘Soft Light' or ‘Overlay' can give a more subtle, natural look.
- Refine the selection with brushes: Use soft brushes on the layer mask for a more gradual transition between the gradient map effect and the original image.
By following these steps, you can selectively and seamlessly apply gradient maps to edit specific parts of your image.
How Do I Create Custom Gradients for Gradient Maps in Photoshop?
Creating custom gradients for gradient maps in Photoshop allows for personalized color effects in your images. Here's a step-by-step guide:
- Open the Gradient Editor: Create and select the Gradient Map adjustment layer. In the Properties panel, click on the gradient preview to open the Gradient Editor.
- Create a New Gradient: Click on the ‘New' button to start a custom gradient.
- Modify Color Stops: Click below the gradient bar to add color stops. Click on each stop to select a color from the Color Picker.
- Adjust Location and Midpoints: Drag the color stops and midpoints (the small diamonds between color stops) to adjust the transition between colors.
- Save the Gradient: Name your gradient and click ‘New' to save it to the Presets.
- Apply the Gradient: Close the Gradient Editor. Your custom gradient is now applied to the image.
- Adjust Blend Modes and Opacity: Experiment with blend modes and opacity on the Gradient Map layer for different effects.
The above steps let you create custom gradients for creative control over your images' color grading and styling.
How Do I Save and Load Gradients in Photoshop?
To save and load custom gradients in Photoshop:
- Create a Gradient: Open the Gradient Editor, create your gradient, and adjust the color stops and midpoints.
- Save the Gradient: Click the ‘New' button in the Gradient Editor to save your gradient. Make sure to name it for easy identification.
- Export Gradients (Optional): To save gradients for future use or to share, go to the Gradients Panel, right-click your custom gradient, and choose ‘Export Selected Gradients.' Save the .GRD file in your desired location.
- Load Gradients: To load gradients, go to the Gradients Panel, click on the menu icon, and choose ‘Import Gradients ‘and Select the .GRD file you want to import.
This process allows you to personalize and reuse gradients across different projects and Photoshop installations.
Where Can I Find Gradient Maps Online?
You can find gradient maps online from various reputable sources, often available for free or for purchase:
1. Adobe Exchange: A platform by Adobe that offers a range of gradients compatible with Photoshop.
2. DeviantArt: An online community where artists share resources, including gradient packs.
3. Graphic Design Websites: Sites like Freepik and Vecteezy offer free and premium gradients.
4. Creative Market: A marketplace for creative assets, including gradients for Photoshop.
5. Pinterest: A resourceful platform for finding creative gradient inspirations and links to downloadable resources.
6. Design Blogs and Forums: Many design blogs and forums periodically share free gradient resources.
Make sure to check the usage rights and licenses when downloading gradients from these sites, especially for commercial use.
FAQ
How do I get the gradient tool in Photoshop?
You can access the Gradient Tool in Photoshop from the toolbar, typically located on the left side. It's represented by an icon resembling a rectangle filled with a gradient.
Why is the gradient map tool not working in Photoshop?
If the Gradient Map tool isn't working, ensure the layer you're working on is not locked or hidden. Also, check if you're working in a compatible color mode, such as RGB or CMYK.
Why is my default gradient not black to white?
The default gradient might change if Photoshop settings were altered or a different preset was saved.
Resetting Photoshop preferences or selecting the black-to-white gradient manually can revert this.
What's the difference between color grading and color correction?
Color correction adjusts images to appear as natural as possible, fixing issues like exposure or white balance, while color grading applies creative color tones to convey a specific mood or style.
How do I use gradient maps for black-and-white conversion in Photoshop?
To convert an image to black and white using gradient maps, add a Gradient Map adjustment layer and select a black-to-white gradient.
This maps the image's luminance to the grayscale gradient, creating a monochromatic effect.
Yatharth Gupta is a seasoned portrait and travel photographer based in India. He is also a writer and a blogger and loves to explore new places.

👋 WELCOME TO SHOTKIT!
🔥 Popular NOW:
