


How to take a Picture of a Picture without Glare
Need to photograph art in a frame? Or maybe just a quick snap of an old photo? Here are my tips for getting the shot without any pesky glare or reflections.
Learn | By Stephan Jukic | Last Updated: December 20, 2023
Shotkit may earn a commission on affiliate links. Learn more.
How do you not get glare when taking a picture of a picture?
I was wondering this the other day when I needed to take a picture of an old photo of my parents.
Try as I might, I couldn't work out how to take pictures of pictures without glare and to position my light source in a way that it didn't reflect off the photo.
After some research and experimenting, I nailed it!
So, here are some ways how to avoid glare when taking a picture of a picture, as well as my tips on shooting reflective objects.
(I like to call it, my photography solution to shiny object syndrome….!)
How to take a Picture of a Picture without Glare
Here's the best way to take a picture of a picture.
If you've ever tried to take a picture of art, these are the steps to avoid the glare of the reflection from the glass in the frame.
This process will also work when photographing shiny objects.
Some people like to use a polarizing filter, which helps to cut through glare, but I've written these steps assuming you don't have one.
Below is a step-by-step guide on how to take a picture of a picture without reflection.
Step 1: Find the Right Light Source
The first step in this mission is all about finding the right lighting.
You'd want to avoid direct sunlight or bright lights shining directly onto your photo as they can cause a ton of glare. This is how to avoid glare in photos right off the bat.
Try shooting in a room with soft light, or diffused lighting or near a window with indirect light or natural lighting from the afternoon sun.
Step 2: Angle is Everything
Next up, you gotta get the angle just right.
You see, if you try taking the photo head-on, you're just asking for glare to ruin your day.
So, you'll need to experiment with different angles.
Try shooting from the side or from above – basically any angle that doesn't reflect light back into your lens.
Step 3: No Flash, Please
When you're ready to take the shot, make sure the flash is turned off on your camera.
Flash is pretty much glare's best friend, and we don't want that if we need to eliminate glare from the final photo.
On your iPhone, you can do this by tapping the lightning bolt icon and choosing ‘Off'.
Step 4: Tap to Focus
On your iPhone, make sure to tap on the photo on your screen.
This will focus the camera on the photo and also help to get the exposure just right.
If it's too dark or light, you can swipe up or down on the screen to adjust the exposure.
Step 5: The Big Moment
Now, you're all set for the big moment.
Hold your breath, steady your hand, and snap the picture.
If it still doesn't look quite right, don't sweat it.
Keep playing around with the lighting and angle until you get a shot you're happy with.
Step 6: Edit to Perfection
Learning how to take a photo of a photo without glare would be incomplete without this step.
Don't forget that you can use your camera's editing features to tweak the final image – remember: post processing isn't cheating!
This might help to reduce any minor glare that made it into your shot.
In the Photos app on your iPhone, tap ‘Edit' in the top right corner, and you can adjust things like contrast, saturation, and brightness until your photo looks perfect.
Otherwise, try any popular photo editor and do the same thing.
The above steps would be a great help, if you've been trying to understand how to take a picture of a picture without glare on iPhone.
That's how to take a picture without glare.
See also: How to fix bad lighting in photos
How do you take pictures of old photos?
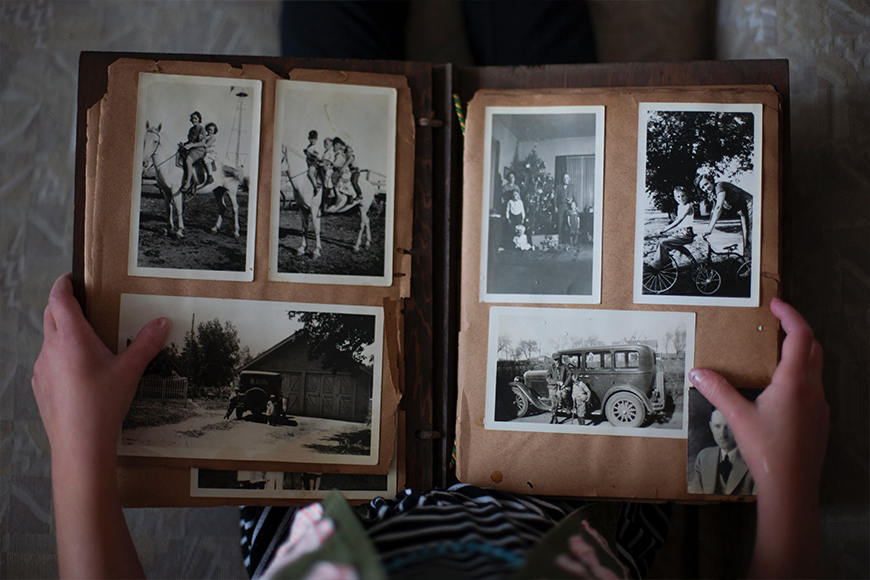
Laura Fuhrman
Glossy surface of the old photos make it challenging to capture them digitally. Here's how to take a picture of a glossy photo without glare. These tips will also be useful if you've ever wanted to scan old photos using your iPhone camera.
Step 1: Clean Your Photos
Start by cleaning your old photos. Use a soft cloth or brush to remove dust and dirt.
Be gentle, we don't want to damage those precious memories.
Step 2: Find Good Lighting
Next, find a spot with lots of soft, diffused light.
Avoid harsh lights or direct sunlight, they can create unflattering shadows and reflections.
Try near a window with indirect sunlight or in a room with even lighting.
The light source can be ‘manufactured' too if you're handy with off-camera flash photography or using an LED panel.
Just watch for lens flare when placing the light source too close to your camera's lens.
Step 3: Set Up Your Photo
Place your photo on a flat surface. You could use a table or the floor, as long as it's flat.
If your photo doesn't want to lay flat, you might need to place some weights on the corners. Just be careful not to damage it.
Step 4: Turn Off the Flash
Now, it's time to get your iPhone or camera ready. Make sure the flash is turned off. This is how to reduce glare in photos easily.
The flash could create glare or wash out your photo, which is a no-go for this mission.
Step 5: Position Your Camera
Hold your camera directly above the photo.
Try to fill as much of the frame as you can with the photo, but don't worry if there's some space around the edges. You can always crop it later.
Step 6: Focus and Snap
Tap your screen to focus if you're using an iPhone.
If you're using a regular camera, half-press the shutter button to focus.
Once you're sure the photo is in focus, go ahead and take the shot. Take a picture of it multiple times doing small adjustments and pick the best one.
Step 7: Edit Your Photo
Your photo might look great straight out of the camera, but you can always make it look even better with a little editing.
You can crop out any excess space around the photo, adjust the brightness and contrast, and even fix minor blemishes.
Step 8: Save and Share
Finally, make sure you save your digitized photo in a safe place. You could also share it with family or friends, or upload it to a cloud service for extra security.
Is it better to scan or photograph old photos?
Personally, I prefer to use a photo scanner when I have to digitize several old photos as it's quicker and the results are much better.
There's also no need to worry about the reflective surface of the photo, or reducing camera glare.
However, if you don't own a scanner, taking photos of old photos is fine (as long as you avoid the glare).
| Scanning | Photographing | |
|---|---|---|
| Pros | High resolution and color accuracy. Can handle different photo sizes. Many scanners have built-in software to remove dust and scratches. | Faster than scanning, especially for a large number of photos. Good for very large photos, albums, or framed photos. |
| Cons | Can be expensive and time-consuming. Very large or mounted photos might not fit. | Lighting and glare can be tricky. Likely need to do some post-shot editing to crop and adjust colors. |
| Best for | High-quality digitization, especially if you have the time and the right equipment. | Large volumes of photos, large-sized photos, or when faster digitization is needed. |
If you want to go the iPhone route, check out the Photomyne app which handles the post-processing of the photo and make it easier for you.
That's everything you need to know about how to take a picture of a photo without glare.
See also: How to scan a document
How To Photograph People with Glasses (And Avoid Reflections)
Aunnop Suthumno
1. Position the Subject Wisely
The direction your subject is facing can make a huge difference.
Try to avoid light sources directly in front of them as this is a surefire way to catch reflections.
Ask them to slightly tilt their head or adjust the angle of their glasses, but remember to keep it natural-looking.
2. Control Your Lighting
When using artificial lighting, try to position your light sources at a 45-degree angle, slightly above the person's eye level.
This should help to reduce reflections.
If you're outdoors, try to place your subject in a shady area where the light is more diffused.
3. Use a Polarizing Filter
If you're shooting with a DSLR, a polarizing filter can help reduce reflections. You can also get these lenses for iPhones too.
You just rotate the filter until the glare disappears.
It's not a perfect fix for all situations, but it can definitely help in many cases.
I use my polarizing filter when photographing fish from above the water in my kayak.
You can also use them to photograph people behind glass, like someone in a car, for example.
4. Shoot from an Angle
If the light is reflecting off the glasses into the lens, changing your position can help.
Try moving a bit to the side or shooting from a slightly higher or lower angle.
5. Ask Them to Push Their Glasses Down
Another simple trick is to ask the person to push their glasses down their nose slightly.
Be careful though, you don't want it to look unnatural. Just a tiny adjustment can sometimes do the trick.
6. Edit in Post-Production
Even with all these tricks, you might still get some minor reflections in your shots. That's where editing comes in handy.
Tools like Photoshop or Lightroom can help you minimize or remove those reflections in post-production.

Check out these 8 essential tools to help you succeed as a professional photographer.
Includes limited-time discounts.
Stephan Jukic is a technology and photography journalist and experimental photographer who spends his time living in both Canada and Mexico. He loves cross-cultural street photo exploration and creating fine art photo compositions.
👋 WELCOME TO SHOTKIT!
🔥 Popular NOW:
