


Soft Proofing in Lightroom, Photoshop & Other Software
Learn the steps to soft proof in Lightroom, Photoshop, Affinity Photo, Capture One and RawTherapee, including solutions to common mistakes amateurs make.
Learn | By Yatharth Gupta
Shotkit may earn a commission on affiliate links. Learn more.
If you wish to learn how to soft-proof your photos in Lightroom, Photoshop, and other popular software, you're in the right place.
In this guide, you'll learn all the steps involved in soft-proofing a photo with various popular photo editing software.
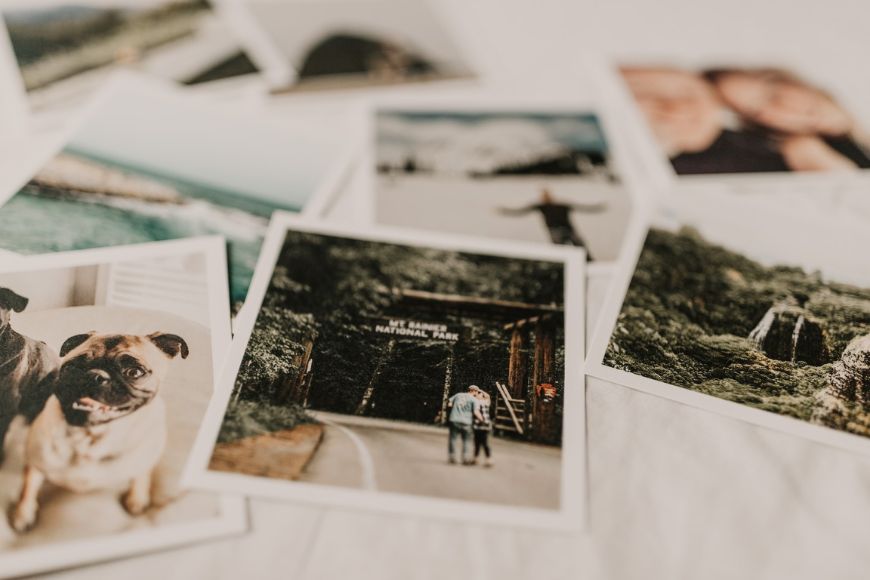
As photographers, we all love to see our work in a physical form; there's something special about the tactile feel of holding our photos in hand.
But we often end up disappointed seeing our printed photos as they lack the punch and details in the digital files.
That's where soft-proofing your photos before printing can be a game-changer for your photography and save you time and money.
In the sections below, I'll tell you everything you need to know to soft proof your photos.
So, let's get started.
What Is Soft Proofing in Photography?

Soft-proofing is like having a sneak peek into your final print before printing it. It's a crucial step in the photographic printing process that allows you to see how your image will look when printed.
In the current times, when most of the media is consumed on a screen where the [colors, contrast, and brightness can differ from device to device, maintaining consistent results while printing photos can be a challenge.
Imagine you've spent hours perfecting colors, tone, and details in your photo on your computer. The picture looks fantastic on your screen, and you send it to get printed.
When the print arrives, you're shocked that it doesn't look anything like how it looks on your computer- colors are all wonky, and everything looks duller than you remember.
Such situations can occur when you skip soft-proofing your photo before printing.
Every printer and printing surface can reproduce colors differently, so the image you see on your screen might not match what you get in your print.
It can result in inaccurate colors and tones, which is not what you want.
That's where soft proofing lets you anticipate how your image will appear in print form, helping you make necessary adjustments to ensure your print matches your digital file.
In simple terms, soft proofing prevents those “print surprises” and ensures you get the best quality printed images.
Now, let's dive deeper into how soft-proofing benefits your photographic printing.
What are the benefits of soft proofing?
Soft-proofing is an important part of the printing process, ensuring your beautiful photos turn into stunning prints.
It's a valuable method to help you consistently create predictable results by preserving the rich colors and details in your photos.
Here are some key benefits of including soft-proofing in your workflow:
- Accurate color representation: Soft-proofing ensures that the colors you see on your screen match what appears in print. No more unexpected hues or faded tones.
- Predictable results: Soft-proofing lets you fine-tune your images, so what you see is what you get.
- Saves time and money: Soft-proofing reduces the need for repeated test prints and adjustments, saving both your time and printing costs.
- Control over quality: It gives you better control over the final output, so your prints reflect your artistic vision accurately.
- Professional printing: If you're a professional photographer looking to print your photos, soft proofing is a must for maintaining high standards.
- Creative Control: You can fine-tune your images during soft proof to achieve the exact look you want in print, preserving your artistic vision.
Creating good photo prints depends greatly on the process you follow to prepare your photos, including processing and proofing.
However, the alternative approach of hard-proofing photos can also be useful in certain scenarios.
Let's take a look at the key differences between soft and hard photo proof.
Soft Proof vs Hard Proof: What's the Difference?
Soft Proofing:
Soft proofing is a digital preview of how your image will look when printed.
It's done while you're still working on your image using software like Lightroom, Photoshop, or other photo editing tools.
Soft proofing provides visually represents the final print but on your screen.
The key advantage of soft proofing is that it allows you to adjust your image in a controlled digital environment.
You can experiment with various settings to achieve the desired result without printing a physical copy.
It happens in the early stages of image editing before any physical printing takes place. It's a way to visualize and make adjustments before the ink hits the paper.
Hard Proofing:
Hard proofing is another way to proof a photo before making the final print; however, this process involves making a physical test print of your image.
A test print would give you a real-world preview of how your photo would look when finally printed in your chosen dimensions.
In most cases, such test prints are of smaller sizes to keep the costs low; however, the materials such as paper, printer, and ink used are the same as those you'll want for the final print.
The purpose of hard proofing is to ensure that your final print matches your digital file in terms of color reproduction, tone, and overall feel.
If you're going for bulk printing, hard proofing serves as the last checkpoint to make sure what you see on the screen matches what you get out of the printer.
In simple words, soft proofing enables you to visualize your print without incurring any costs; however, hard proofing gives you validation of color and other characteristics in the form of a physical print.
In many scenarios, soft proofing significantly minimizes the necessity for hard proofing.
Having a digital representation of your photo print on your screen can save you a lot of time, resources, and materials while reducing the number of physical test prints.
If you love printing your work, soft proofing can be a great tool for you as it gives you control over the final output without any additional costs.
How to Calibrate Your Display (and Why it's Important for Soft Proofing)
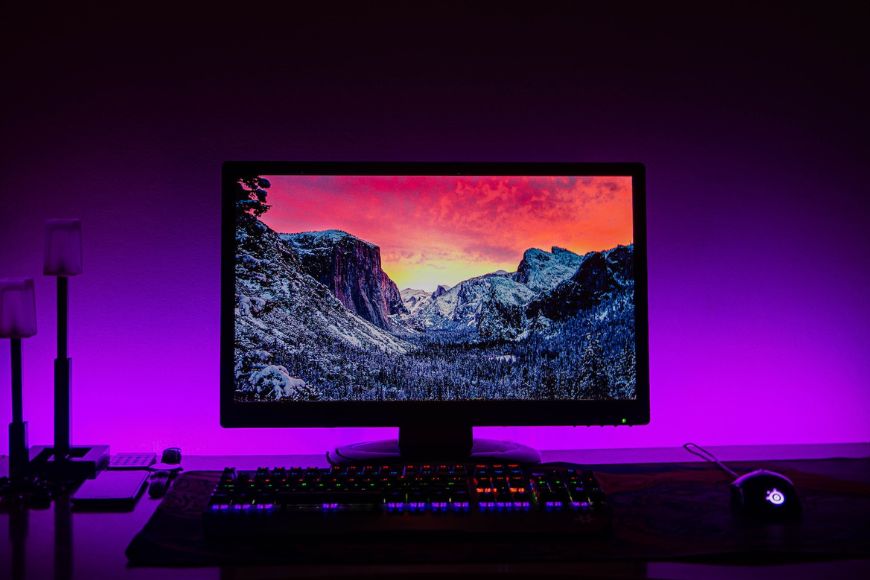
Display calibration is the process of adjusting your computer monitor or laptop display settings so that they represent the colors accurately in your photos.
Calibration is done by comparing the colors of your screen to a color standard and making them look the same.
Even though you can expect accurate colors from a calibrated display for a long time, you may still need to repeat the process.
With time, monitors also go through general wear and tear of electronic components, including those in the display.
Therefore, it's a good idea to calibrate your monitor display periodically.
Why is display calibration important for soft proofing?
Display calibration is important for soft proofing because it ensures that what you see on your monitor matches the actual colors of your photographs.
Monitors can change over time, with shifts in brightness, color accuracy, and contrast.
Without calibration, the colors you see might not match those of your photos, which can be problematic for soft proofing, where precise color representation is essential.
How to calibrate your monitor display
Without proper calibration, you may face color accuracy, brightness, and contrast issues, especially when editing photos; you might overdo certain effects.
One of the best ways to calibrate your screen colors is by using a display calibrator. However, there are some alternative methods to achieve reasonably accurate colors.
In this section, I'll guide you through the process of calibrating your display to achieve optimal results.
- Calibrate using a Colorimeter
A colorimeter is a device designed for display calibration. It's the most precise and efficient way to achieve accurate colors on your screen.
It measures and adjusts your monitor's colors to match the industry standards, making it ideal for photographers aiming for color perfection.
A colorimeter would be a great investment if you're a photographer who often prints his work.
The calibration process is a mix of both hardware and software. You need to download the manufacturer's utility on your computer to get started.
Next, connect the device via a USB port, place it on the screen as the calibration software indicates, and follow the instructions.
After you adjust the required settings, the software will calibrate and create a color profile for your monitor, which you'll need to load in your system's display settings.
Each operating system's steps for implementing a color profile system-wide would differ.
You can learn in detail about the color calibration process in our in-depth guide and explore the top colorimeters available in the market.
I'll share some free ways to achieve color accuracy in the following section.
- Using free tools for color calibration
If you're looking for free online calibration tools, two handy options are Calibrize and Photo Friday Monitor Calibration Tool.
These tools provide a simple way to measure and improve your monitor's color accuracy.
Calibrize offers a user-friendly interface that guides you step-by-step through the calibration process, which involves adjusting brightness, contrast, and gamma values. However, it's only available for Windows.
On the other hand, Photo Friday is a web application that works on all browsers.
Photo Friday's calibration tool shows various values between pure black and pure white and asks you to adjust monitor settings until you see each value distinctively.
While these tools may not match the precision of a colorimeter, they're useful for basic calibration and can be a great starting point for photographers on a budget.
Remember, the method you choose for display calibration depends on your specific needs and the level of color accuracy required for your work.
Whether you opt for a professional colorimeter or the convenience of free tools, calibrating your display is a step toward ensuring your images are presented accurately for soft proofing.
What is the best monitor for soft proofing?
Selecting the right monitor for soft proofing is an important decision for any photographer.
A high-quality monitor with a wide gamut coverage, such as full sRGB or AdobeRGB, is ideal to ensure you get the best out of the soft proofing process.
That's where the Eizo monitor models stand out for their photography-specific features, outstanding color accuracy, and built-in calibration tool.
Here are some of the top monitor models known for their performance when it comes to photography-specific tasks:
Eizo ColorEdge CG319X: This model is a standout choice for professional photographers. With a built-in color calibration sensor, 4K resolution, 99% AdobeRGB, 99% DCI P3, and full sRGB coverage, it ensures precision and accuracy in soft proofing.
Dell UltraSharp U2719DX: Dell's UltraSharp series monitors are popular among photographers and artists, and the U2719D is no exception.
This monitor offers a great balance of affordability and performance, with a coverage of 99% sRGB, making it a solid choice for soft proofing without costing too much.
BenQ SW2700PT: This BenQ model combines affordability with impressive features. It offers accurate color reproduction, covering 99% of AdobeRGB and 100% of sRGB, making it a reliable choice for soft proofing.
For a more detailed analysis of these and other top monitors ideal for photo-editing and soft proofing, check out our article on the best monitors for photographers.
When it comes to proofing for a print, there's another important consideration: the printer's ICC profile. Let's see what an ICC profile is and why it matters.
What is the printer's ICC profile, and why does it matter?
The appearance of your final print depends a great deal on how the printer perceives the colors.
Photo printers can have different color gamut coverage, such as RGB or CMYK, which you need to match while proofing your photo for printing.
A printer's ICC profile is a file that helps simulate how the printer would render the colors and tones in your photos.
Most professional printing services provide you with the ICC profile ideal for the printer and paper combination they will use.
Printing is costly, and soft proofing using the color profile ensures you don't get surprises after the print.
Let's dive deeper into the soft processing process for different editing software.
How to Soft Proof in Lightroom Classic
Lightroom is one of the most popular photo-editing tools used by both professional photographers and hobbyists.
However, there are two versions of Lightroom- Classic and Cloud. The cloud version supports storing and processing files on the cloud, whereas the classic version allows for processing photos locally on your computer.
The soft proofing feature is available only on the Lightroom Classic version.
Let’s take a look at the step-by-step process of soft proofing in Lightroom Classic:
Step 1- Calibrate your monitor
The first step in the soft proofing process is calibrating your monitor, ideally using a colorimeter such as Datacolor Spyder.
It’s important to ensure your monitor displays accurate colors, as uncalibrated screens would affect your editing decisions in post-processing and lead to inaccurate colors in the final print.
However, if you’re in the habit of regularly calibrating your monitor, you can skip this step.
Step 2- Prepare your photo for soft proofing
Soft proofing is often the last step in your workflow before sending your photo for printing.
That means whatever adjustments you wish to make in your photo should be done before this step.
This step would include raw conversion and all other adjustments, including color, exposure, and selective touchups using masks.
In other words, whatever processing you would make before saving your photo for digital use should be completed before moving on to the next step.
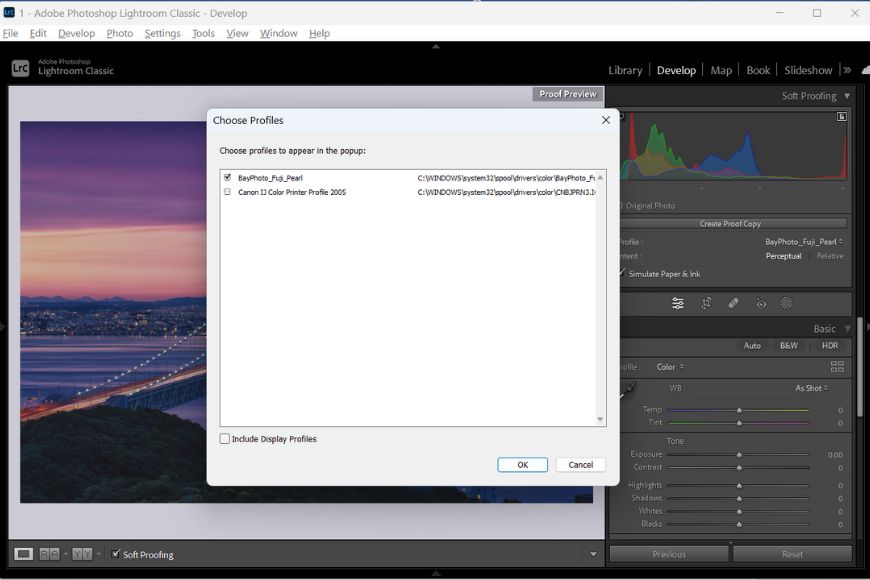
Step 3- Install the printer’s color Profile
When you’re soft-proofing your photo for printing, one of the most important steps is to edit the image after installing your printer’s ICC profile.
Most printing services provide color profiles specific to different paper options; for example, I’m using BayPhoto’s ICC profile for Fuji Pearl paper in this demo.
You can download the required file from your printer's website or ask for it if your printing service operates offline.
You can load the profile by right-clicking the file and clicking Install Profile on a Windows PC or by moving the file into /Library/ColorSync/Profiles folder on a Mac.
You can open Lightroom Classic once you’ve installed the profile. You may need to restart Lightroom to load the newly installed profile if it's already running.
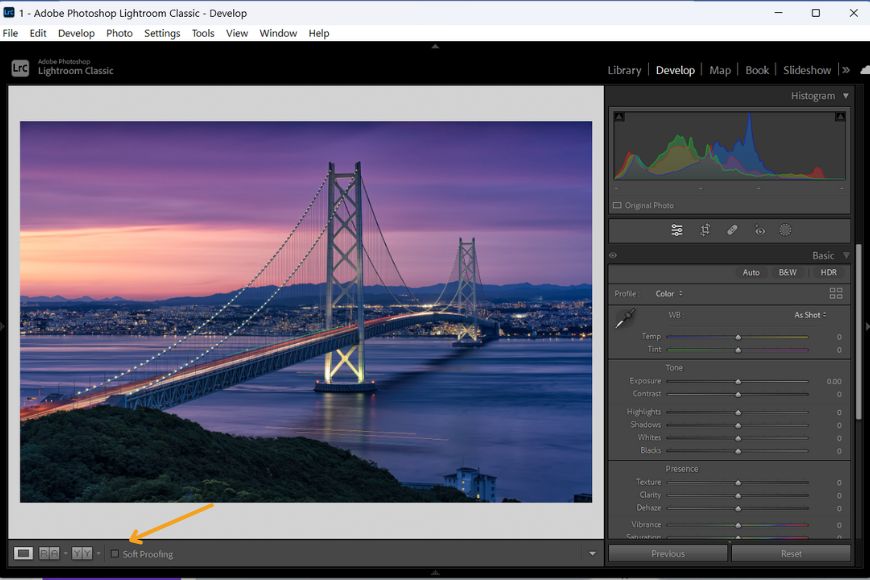
Step 4- Activate soft proofing option in Lightroom Classic
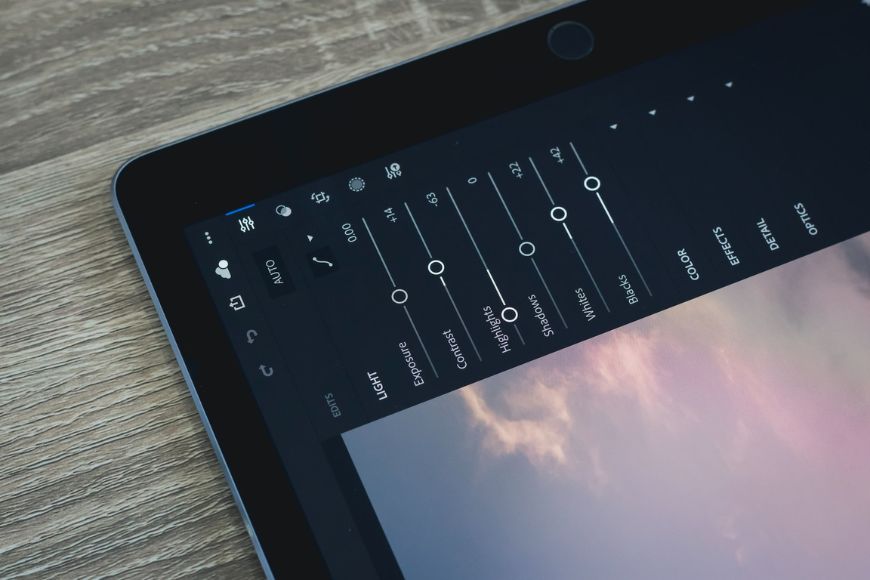
Most of the edits and adjustments to your photo would be made in the Develop module of Lightroom Classic.
The Develop module also features a soft-proofing option, which can be toggled on or off via the Soft Proofing checkbox at the bottom left of the screen, right next to the before and after toggle.
When you turn on the Soft Proofing option, your photo turns dull and loses the punchy colors it originally had.
Turning soft proofing on, also enables a few additional options that we will discuss in the steps below.
You should also select the previously installed color profile at this step by going to the Profile option under the histogram in the left panel.
The profile dialog box would show your installed profile in the options by default.
Step 5- Create a proof copy of the photo
Soft proofing adjustments to the photo to make it look perfect for printing.
For that reason, it’s advisable to create a proof copy of the photo so that the changes you make to your image don’t affect the original file you edited to be viewed on a screen.
You can do that by clicking the Create Proof Copy button below the histogram.
Another way to do this is to slightly move any of the adjustment sliders, as it would pop up a warning box that lets you choose to create a copy, continue with the same file, or undo the changes you made.
If you have another copy saved of the photo, you can skip creating additional files; however, if not, it is recommended to create a copy.
Step 6- Select the Intent and paper & ink simulation
The Intent option button is under the histogram on the adjustments panel of Lightroom.
Rendering intention or Intent is how colors are adjusted to match the target color profile.
Lightroom offers two Intent options, Relative and Perceptual, both of which are useful in different scenarios.
The choice of Intent depends on what you’d want to do with the colors that are outside the range of the printer’s ability to print.
Relative works best for most images where colors are within the target color gamut.
This option focuses on maintaining the accuracy of the colors within the profile's color range.
In most cases, you’d face no issues with the Relative Intent setting; however, if you see banding in your photo with Relative, you should switch to Perceptual.
Perceptual rendering intent prioritizes maintaining the relationship between colors and is helpful in dealing with issues such as banding.
With the Perceptual setting, you might see a shift in the colors in your photo, especially for pictures that show banding with the Relative option.
That happens because perceptual rendering adjusts the colors to what is available within the ICC profile you loaded.
I recommend starting with the Relative option, as it usually produces better results with accurate colors.
However, you can change the Intent to Perceptual if your photo has colors that are out of the color gamut you’re using.
Another important setting is Simulate Paper & Ink, which captures information on the paper and ink from your printer’s ICC profile to replicate it on screen.
It uses the white point and black density data available in the ICC profile to generate a near-accurate representation of the paper and ink you will print on.
Step 7- Make necessary adjustments and save the photo
Soft proofing mode introduces new options to the histogram; it shows icons for monitor and paper where normally overexposure and underexposure warning buttons are present.
These buttons help you see over and underexposure warnings for paper and screen.
While soft proofing, it’s a good idea to keep toggling both buttons to see the effect of adjustments on the simulated paper as well as on screen.
You should keep in mind the difference between screen and paper- screens have a backlight that brightens and saturates the colors in a photo, but the same image may lack punch and brightness when printed.
Your workflow may start with the exposure and contrast sliders, move on to color settings, and end with masked adjustments to preserve the desired details and vividness.
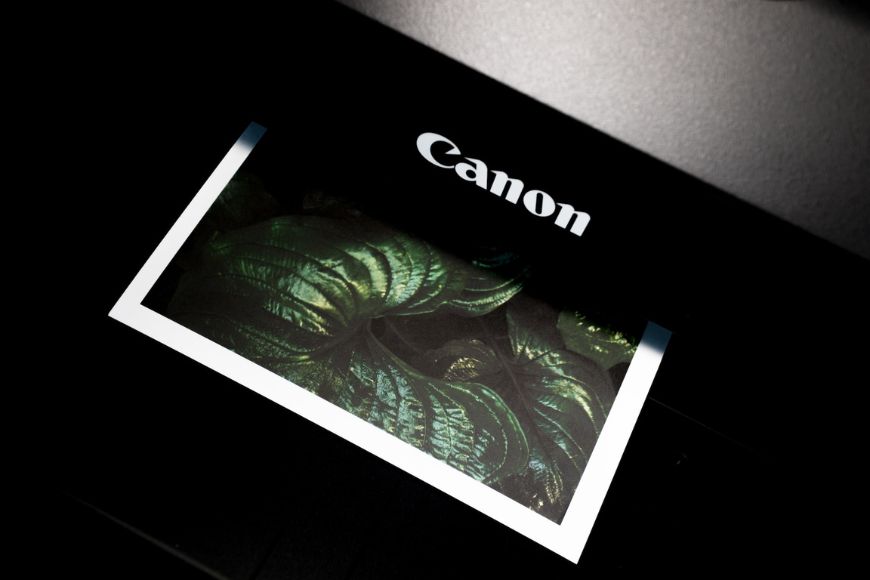
Once you’re satisfied with how the photo looks with your adjustments, the only thing left is to export the photo and send it for printing.
FAQs on Lightroom Soft Proofing
How do I turn on soft proofing in Lightroom?
You can turn on soft proofing in Lightroom by going to the develop module and toggling the Soft-Proofing checkbox at the bottom of the screen.
How do I get out of soft proofing in Lightroom?
To get out of the soft proofing mode, you can undo the Soft Proofing checkbox located at the bottom right of the screen on the Develop module.
How do I choose a printer profile for soft proofing?
The first step is installing the printer profile by right-clicking and selecting Install Profile on Windows or moving the file into the /Library/ColorSync/Profiles folder on a Mac.
Once installed, you can choose it by going to the Profile dropdown under Histogram section in Soft Proofing mode.
How do I know if Lightroom's soft proofing is accurate?
Color accuracy in soft proofing depends on many factors, such as the gamut coverage of your screen, display calibration, and the printer profile.
If the screen covers a wide range of colors, such as 100% sRGB, and is recently calibrated using a colorimeter, you can expect reasonably accurate results with the correct ICC profile.
How to Soft Proof in Photoshop
Photoshop is one of the best photo editing tools when it comes to flexibility and functionality.
Even though Lightroom and other new tools have somewhat simplified photo processing, nothing can match the versatility of Photoshop.
You can understand the vastness of Photoshop’s utility by the large number of photographers, graphic designers, and other creative artists using it.
Like other tools, photoshop also allows Soft Proofing photos for printing. The process may look a bit complex initially, but it’s not that hard once you understand the concepts.
One big reason to use Photoshop is Lightroom’s lack of support for ICC profiles based on non-RGB color gamut such as CMYK, which Photoshop supports.
Let’s take a look at the step-by-step process of soft proofing in Adobe Photoshop:
Step 1- Calibrate your monitor & install the printer’s ICC profile
The goal of soft proofing is to get the most accurate representation of the printed photo on your screen.
Therefore, before editing your photo, you should color-calibrate your display if you haven’t done that in the last few months.
Monitors change over time and require frequent calibration to represent accurate colors, especially when soft-proofing your photos for print.
Another critical step is to download the ICC profile from your photo lab’s website and install it on your computer, so it is available in Photoshop.
You can do that on Windows simply by right-clicking on the file and clicking Install Profile.
On a Mac, you’ll need to drop the file in the color profile folder located at Library/ColorSync/Profiles.
Once done, you must restart Adobe Photoshop to populate the newly added color profiles.
Step 2- Finalize your edits
Before moving forward with the soft proofing process, you should finalize all the edits you wish to make.
Soft Proofing is often the last step in your workflow. That’s why I'd recommend processing, enhancing, and editing your photo before running a soft proof on it.
When you’re satisfied with the final look of your photo, you can save it and open it in a fresh instance of Adobe Photoshop.
Opening a new window is not required but is ideal to keep things simple and speedy.
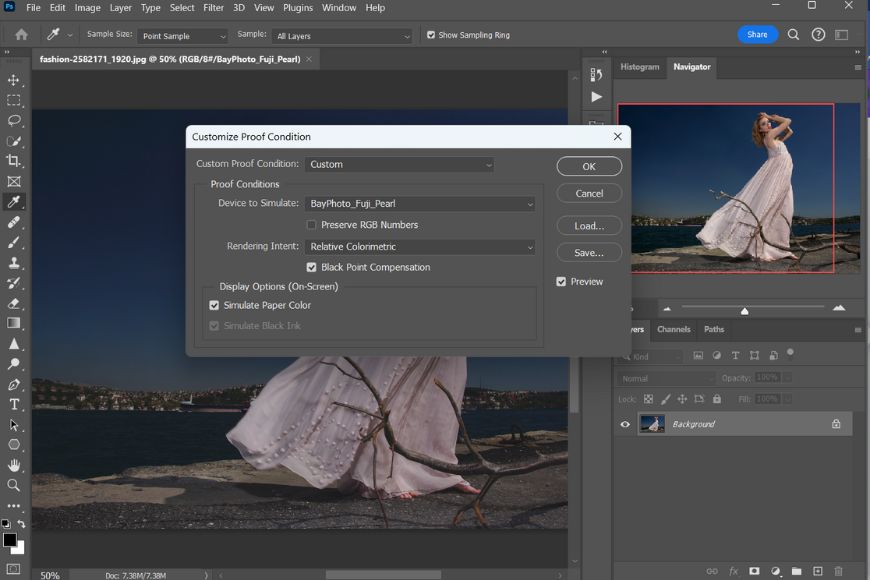
Step 3- Select a Custom Proof setup
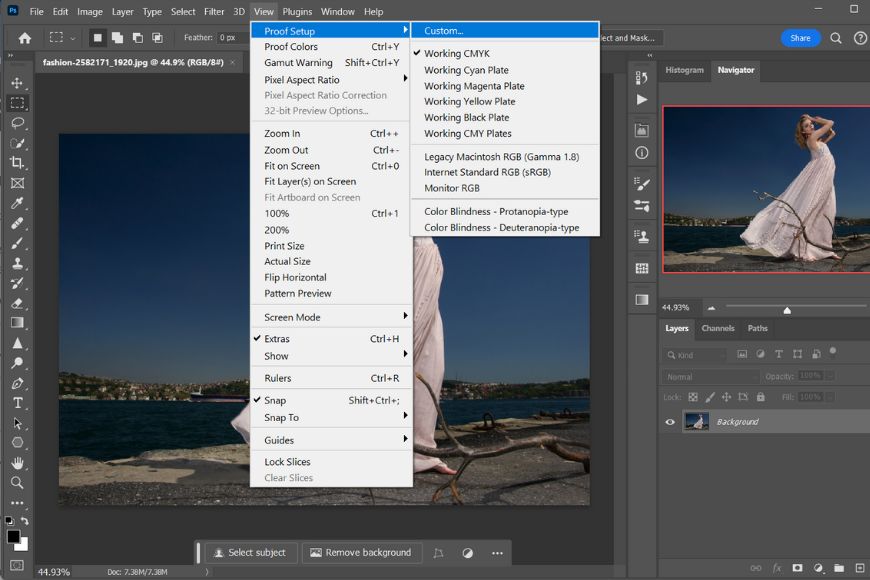
Once you’ve opened the image in Photoshop, the next step is configuring and using the custom proof setup.
You can do that by going in the menu to View> Proof Setup > Custom.
In the Customize Proof Condition box, you’ll find various options to set it up for proofing.
Start by selecting the profile in the Device to Simulate dropdown box and choose the previously installed ICC profile.
Under the device selection box, you’ll find the Preserve RGB Numbers or Preserve CMYK numbers checkbox that, when ticked, simulate how your photo would appear without being converted to the output device’s color space.
You should keep it unchecked unless you wish to preview your print in the original color space.
The next dropdown, Rendering Intent, offers four options: Perceptual, Saturation, Relative Colorimetric, and Absolute Colorimetric.
Perceptual settings simulate the colors as the human eye perceives them. It leaves out colors that don’t fall within the output device's color space, which may result in a washed-out look in your photo.
Relative Colorimetric tries to match colors precisely and often maps the colors that are out of the output device's color space to the nearest available color variant.
This setting might result in banding in some areas of the photo, especially those with a gradient of various colors, often found in sunrise and sunset photos.
The Saturation option prioritizes maintaining the vividness of colors in your photo; however, it often compromises color accuracy.
Absolute Colorimetric is usually not ideal for photographers as it aims to reproduce the colors as they are. This mode can be useful for printing color-specific things like logos, etc.
You’ll find yourself using the Perceptual or Relative Colorimetric option as they work best for most photos.
The next option is Black Point Compensation, which simulates the output device's full dynamic range.
It’s a common practice to keep this option checked while proofing a photo for print, as it helps yield a realistic representation of the final photograph.
You can check the Simulate Paper Color option to simulate the paper on display.
It often makes your photo less bright to compensate for the backlit screen and gives you a preview of how it would look on the paper of your choice.
Checking the above box would automatically grey out and enable the Simulate Black Ink option, which makes your blacks look as close to how your printer perceives the black color.
It’s a good idea to keep both these options selected to get a more accurate proof.
The next step is turning on soft proofing by going to the menu View > Proof Colors or pressing Ctrl+Y on Windows or Cmd+Y on Mac.
Another useful option is Gamut Warning, which highlights the areas falling outside the printer's color gamut.
It can be enabled in the menu by toggling View > Gamut Warning or pressing Ctrl+Shift+Y on Windows or Cmd+Shift+Y on Mac.
Step 4- Make necessary adjustments for the print
Now that you’ve configured the soft proofing setup with the right profile for your printer and chosen paper, the next step is to make the soft proof copy look as close to your vision as possible.
You can also use adjustment layers as well as other powerful tools like Camera Raw Filter or third-party filters such as Topaz AI and Luminar.
The adjustment layers like Exposure, Curves, and Levels give you control over the overall exposure value of the photo.
You can also use masks to selectively apply your edits to the image.
It’s a good idea to keep toggling Gamut Warning on and off to see how your edits are affecting the colors in your photo.
Step 5- Save your photo
Once you’ve made the necessary adjustments to your photo, you can go ahead and export it for printing.
However, if your photo lab requires specific sizing, you can resize the photo before saving it.
Also, consider the file format, as some printing services support high-quality formats like TIFF and HEIF, whereas some services only allow PNG and JPEG.
Using high-quality format wherever possible is recommended to get the best results for your prints.
How to Soft Proof in Affinity Photo
Affinity Photo is another popular photo editing software that is liked by beginners and professionals alike.
It offers a wide range of features specific to photo processing, many of which are not readily available in some common editors, such as Lightroom and Photoshop.
Like other software, Affinity Photo offers Soft Proofing tools that allow you to prepare your photo for print.
Let’s take a look at the step-by-step process of soft-proofing a photo in Affinity Photo:
Step 1- Install the ICC profile and calibrate your monitor
Before diving into the soft proofing process, the first thing to do is calibrate your monitor- preferably using a colorimeter- to get the highest color accuracy possible.
Monitors go through wear and tear over time and require frequent calibration to keep a consistent color accuracy, which gets even more important when printing your photos.
The purpose of soft proofing is to prepare your photo to look good on the paper and printing method of your choice.
Therefore, you should always use the custom ICC profile to proof your photo for your paper selection.
Most online printing services provide paper and printer-specific color profiles on their websites; however, if you’re going with an offline lab, you can request them for the file.
You can install an ICC profile on Windows by clicking Install in the right-click menu or placing the file into the /Library/ColorSync/Profiles folder on Mac.
Installing the profile before you open the software to make it available for soft proofing is important.
Once you’ve installed the file, you can open your photo in Affinity Photo.
Step 2 – Open your photo & create a soft-proof adjustment layer
You can open your photo by going to the menu File > Open and navigating to the location of your photo.
Affinity Photo also allows processing with layers similar to Adobe Photoshop, and the layers panel is where you’ll find the Soft Proof option.
Unlike other tools, soft proofing is available as an adjustment layer in the Affinity Photo.
You can create a new soft proofing layer by going to the adjustments button in the layers panel and selecting Soft Proof from the list.
It will open a new dialog box containing soft proofing options and create a new layer called Soft Proof Adjustment in the panel.
You can select your desired ICC profile in the dialog box. The Profile section contains a long list of color profiles, including your previously installed profile.
The next option is Rendering Intent, which offers four options: Perceptual, Saturation, Absolute Colorimetric, and Relative Colorimetric.
Perceptual and Relative Colorimetric are often the best options for proofing your photography.
Perceptual tries to maintain the colors as our eyes perceive them; however, it can eliminate certain colors that are not available in the ICC profile.
On the other hand, the Relative Colorimetric setting maps the available colors exactly but chooses the closest version of the unavailable colors.
The next option is the Black Point Compensation checkbox, which helps simulate the black point or the whole available dynamic range of the printer. It’s a good idea to keep it checked for most photos.
Gamut Check lets you keep an eye on the areas that are falling out of the color gamut range of the output device (paper and printer combination) by highlighting them with grey color.
There are two more options: Opacity and Blend Mode, which should be kept to 100% and Normal, respectively, for the purpose of Soft Proofing.
Step 3 –Edit your photo for print
By this point, you’d be able to see a visual representation of your print on your screen with all the flaws, such as banding, out-of-gamut colors, etc.
The next step is to adjust your exposure, color, contrast, and other things to fix the photo so that it looks good in print.
You can use the various adjustment layers, live filters, and other tools available in Affinity Photo.
However, while using adjustment layers, make sure to keep the Soft Proof Adjustment layer on top of all other layers.
Once you have finished the final edit and your photo looks good for print, the next step is to save a copy of the file.
Step 4 – Delete the Soft Proof Adjustment layer and export your photo
Unlike other tools, Affinity Photo recommends you delete the Soft Proof Adjustment layer before saving your file.
You must save the adjustments you made to the file you export; however, the soft-proofing layer is a simulation and should not be included.
For exporting the photo, go to File > Export, select the desired output settings, and click Export to save a copy of the file.
How to Soft Proof in Capture One
Capture One is an advanced photo processing software by Phase One, the brand well-known for its medium format cameras.
Over the years, it has gained popularity due to its unique features, such as tethering support, GPU-accelerated workflow, and more.
However, Capture One takes a different approach when it comes to soft proofing.
Let’s first understand how color management works in Capture One.
Understand Color Management in Capture One
Before starting with soft proofing, we must understand how color management works in Capture One.
Capture One allows you to choose the color space you want to use while editing, proofing, or printing your photo.
Unlike Lightroom, where by default, you have ProPhoto RGB when processing your photos, you can create a custom preset of color settings called Recipe.
A recipe contains your target color profile and settings related to dimensions, quality, and more.
Soft Proofing in Capture One is not straightforward like other software, and we need to make a few small tweaks to the workspace to make the process fast.
It may seem complex at first, but I’ve created a step-by-step approach to do soft proofing easily in Capture One Pro.
So, let’s get started.
Step 1 – Download & install your printer’s ICC profile
Like any photo editing software, the first step in soft proofing is to download the right profile for your chosen paper and printer combo from your lab’s website.
To install the file, you can simply right-click and select Install on a Windows PC or double-click the file on a Mac.
At this stage, color calibration of your monitor is a must to get the most accurate colors in your photos.
Once the file is installed, open the photo you want to soft-proof in Capture One.
Step 2 – Setup Capture One for soft proofing
Capture One allows you to create various recipes with color, sizing, and quality to suit your specific needs.
However, this is also why soft proofing is a bit complex with this software.
We need to do three things to set up the workspace for effective soft proofing.
- Right-click on the adjustment toolbar and select Add Tool Tab -> Export. Once added, click on theExport tool table to reveal the recipe options.
- Click on the “+” icon located at the bottom of the Export Recipes box and select New Recipe.
- Give the new Recipe a suitable name, scroll down to the Export Forrmat & Sizebox, and select your previously installed ICC profile in the dropdown.
- You can choose the desired file format; I chose Jpeg for this photo.
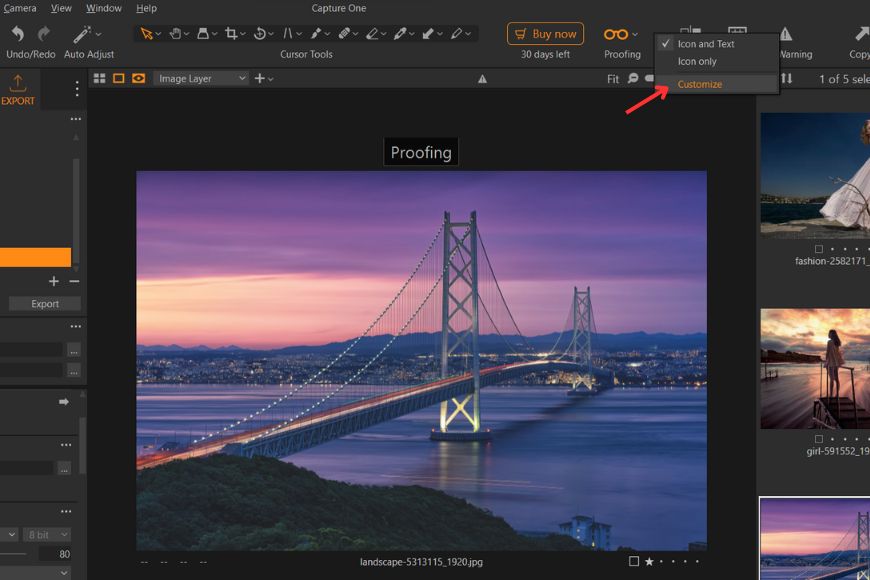
- Right-click on the empty space on the top toolbar, click Customize and select Proofing.
I recommend the above steps to soft proof in an organized way in Capture One.
Step 3 – Separate proofing and processing recipe
Now that we’ve enabled the soft proofing toggle, you should be able to click and see the difference; however, that wouldn’t work for some reason.
Let’s see why that is happening and how to separate recipes for processing and proofing.
If you navigate to View > Proof Profile in the menu, you will see a tick next to Selected Recipe.
This is why you will not notice any difference in the soft proofing vs normal mode even when toggling the button.
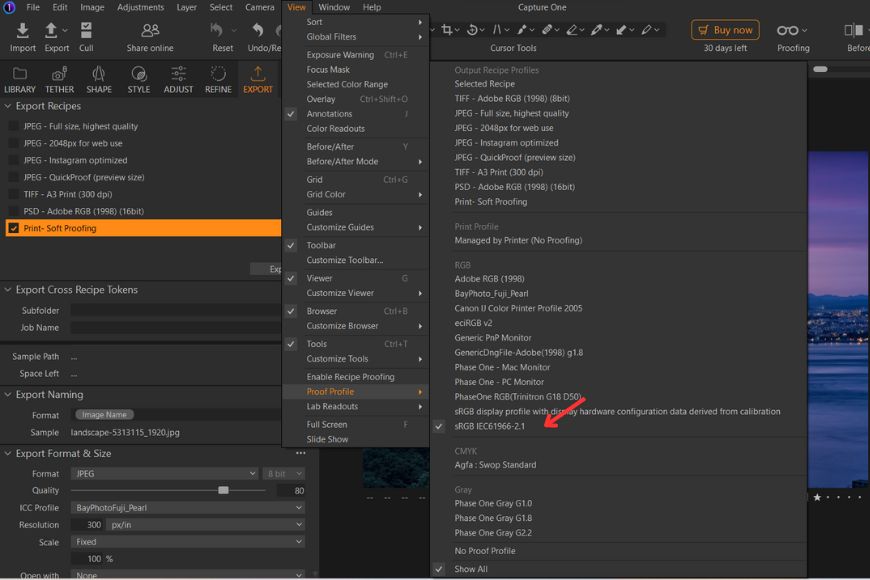
By default, Capture One is using the same Recipe for processing and proofing; here’s how to fix that:
- Go to the Export tab in the Adjustments toolbar.
- Navigate to the Export Recipesbox and tick the Recipe you created in the last step
- Navigate to View > Proof Profile in the menu and select sRGB, as shown in the screenshot
The above steps would use sRGB as the profile for processing and the custom-created Recipe for soft-proofing your photo.
If you wish, you can choose any profile like ProPhotoRGB or AdobeRGB in the proof profile section. However, it should not be the Recipe you created earlier.
Another setting that is not easily available is Rendering Intent, usually present in soft proofing setups of other photo editors.
Here’s how to find and change the rendering intent in Capture One:
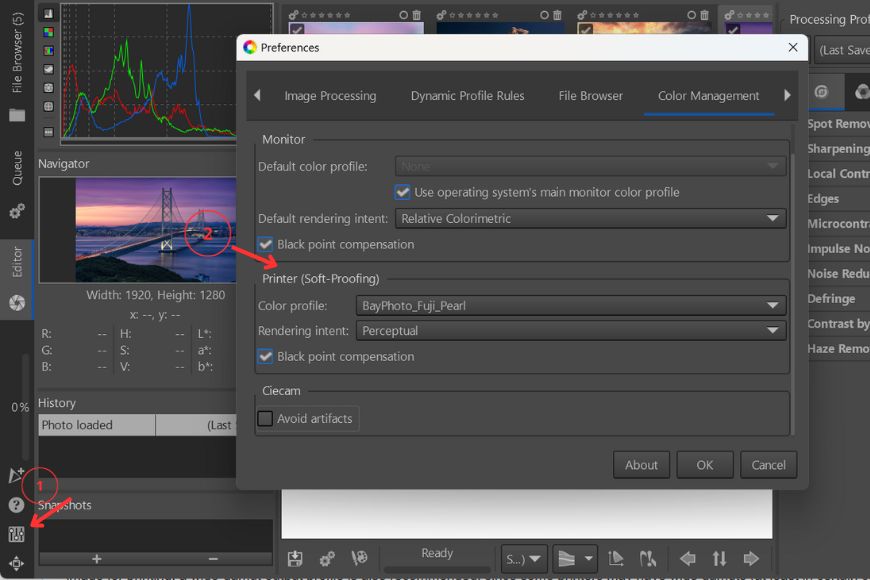
- Navigate to Edit > Preferences in the menu and select Color tab
- Choose the rendering intent from the four options available: Relative Colorimetric, Perceptual, Saturation, and Absolute Colorimetric.
Perceptual and Relative Colorimetric are usually the best options to choose from for photography.
In my case, I’ve kept it to the default value, which is Perceptual.
After the above steps, the next thing is to proof and edit your photo for printing.
Step 4 –Make edits for print and export your photo
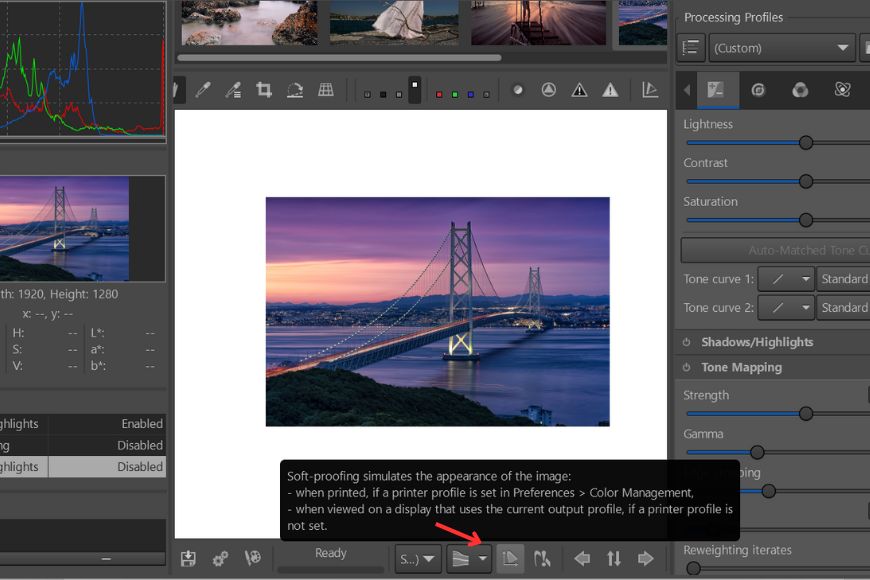
After setting up the workspace for soft proofing, toggle on the Proofing button on the top toolbar to see a simulation of how your print would look.
You should also occasionally turn on Exposure Warning by clicking on it on the same toolbar. It would help you see the areas that are falling out of the color gamut.
Now, you can go ahead and make desired edits to your photo to make it look great in the final print.
Once you’re satisfied with how your image looks, you can save the photo in your desired format.
However, at this stage, the current Recipe is used to simulate how your photo would look on print.
For that reason, you must turn off proofing and change the export recipe before making the final export of your image.
You can do that by going to the Export tab, selecting a suitable recipe, and then clicking the Export button on the top bar to save your photo.
Please note the settings we chose for soft proofing are not ideal for processing your photos.
So, for future edits, restore the options to default or your desired values.
How to Soft Proof in RawTherapee
RawTherapee is a free photo editing software for Mac and Windows, one of the best free alternatives to Lightroom and Photoshop.
When it comes to photo processing functionality and capabilities, you’d be surprised how much value this open source editor packs.
That’s why it’s popular among photographers of all skills, from absolute beginners to professionals.
Like with most photo processing tools, you can also soft-proof your photos in RawTherapee.
Below is a step-by-step tutorial on soft proofing in RawTherapee.
Step 1- Install ICC Profile
The first step before starting the soft proofing process is to download and install the desired ICC profile from your printing service’s website.
To install the ICC profile, right-click and select Install in Windows or double-click and save in the ColorSync Utility on a Mac.
Install the profile before opening RawTherapee to make it load automatically in the menu.
At the same time, you should calibrate your monitor using a colorimeter to get the most accurate colors in your photo.
Once done, you can open the photo you wish to soft-proof in RawTherapee.
Step 2 – Setup printer profile in color management
RawTherapee does color management a bit differently from other software. It allows for three different profiles to read colors for different purposes.
First is the input profile, that often comes with the file similar to the profile embedded in your photo.
Next is the display profile, which is used to display the colors on your screen. For example, you can choose a calibration ICC profile generated by a Colorimeter.
Third is the output profile that specifies the color and dynamic range of the output device, such as a printer. It’s for soft proofing or printing your photo.
To set up color management for soft proofing, you can follow the below steps:
Click on the Preferences icon on the left side panel of RawTherapee.
- Navigate to the Color Management
- Select the previously installed ICC profile in the Printer (Soft Proofing)section
- Choose Rendering Intent as per your requirement
RawTherapee offers three rendering intent options: Absolute Colorimetric, Relative Colorimetric, and Perceptual.
For most photographs, Perceptual and Relative Colorimetric works best.
Perceptual tries to keep colors realistic and how they’re perceived by human eyes.
On the other hand, Relative Colorimetric prioritizes the accuracy of colors and maps out-of-gamut colors to the nearest possible version.
Black Point Compensation simulates the dynamic range of the output device, and hence, you should enable it.
Also, make sure to choose a monitor profile or check “use operating system’s main color profile.”
It’s important because if the monitor profile is set to None, the soft proofing option in the panel will be disabled.
Once done, you can click OK and restart RawTherapee, as it's required to put these changes into effect.
Step 3 – Turn on soft proofing & gamut warning
The next step is to turn on Soft Proofing and Gamut Warning to simulate the print on the screen.
You can do that by clicking the Soft Proofing button located at the bottom bar of the workspace, as shown in the screenshot below.
Toggling this button on would use the previously selected printer ICC profile with the chosen rendering intent.
Just next to the Soft Proofing button on the bottom bar is the button for Gamut Check warning that, when enabled, would highlight out-of-gamut pixels.
This can be useful when correcting your photo for print, as it reveals the areas that need adjustments.
Step 4 – Edit photo for print and save a copy
Now that you can see a simulation of how your print would look on your chosen paper, it's time to make corrections.
You can create exposure and color correction to your photo to make it look best for the print and, in some cases, fall within the gamut range.
RawTherapee also offers many advanced tools, such as tone mapping, dynamic range compression, LAB adjustments, etc., to help you edit your photo.
Once you've edited the photo, the only thing left is to save a copy for printing.
If your lab supports it, it’s a good idea to save your file in a high-quality format, such as .tiff.
These formats allow for more light and color data and often produce better results with prints.
To save your photo, click the floppy disk icon on the bottom bar, choose your desired location and format, and click save.
Common Soft Proofing Mistakes
Saving the file with the ICC profile embedded
One of the most common mistakes when soft proofing your photos for printing is to save the final output with the printer’s ICC profile.
The only purpose of the ICC profile is to simulate how your photo would look on a certain paper and printer combination.
But when you make adjustments based on that profile, you must revert to the original color profile, as the changes you made have prepared your photo for printing.
It’s not a problem in Lightroom and RawTherapee, but tools like Capture One Pro, Photoshop, and Affinity Photo require an additional step of reverting the color profile before saving.
Not calibrating your monitor
One of the main goals of soft proofing is to make sure you get accurate colors in the print.
But if your screen is not calibrated to produce accurate colors, you might end up with messed-up colors and weird-looking prints.
Another common misconception is that once you calibrate your monitor, you can expect accurate colors permanently.
However, that’s not the case, as monitors go through wear and tear over time and might not produce optimal colors and brightness.
That makes it important to calibrate using a colorimeter if you’ve not done it recently.
Relying too much on soft proofing
Soft Proof is not a fool-proof solution but rather a near-realistic simulation of the final print.
It may correctly represent the output in some cases and might not in others.
That makes it important not to take it as a final preview of your print.
Especially when printing a large photo with an expensive price tag, it makes sense to create a small-sized hard-proof copy of the photo and not rely solely on soft proofing.
Ignoring black point compensation
Black Point Compensation setting is available in most photo processing applications that allow soft proofing.
This setting simulates the black point of the output color profile to give you a preview of the contrast in the final print.
In a way, it represents the dynamic range, the exposure range between the pure white and pure black available in the ICC profile.
Skipping Black Point Compensation may cause you to over or under-process your photo, resulting in inaccurate colors in print.
So, don't forget to enable this setting in the menu while soft-proofing your photos.
Over-processing the photo in soft proofing
Believe it or not, we all tend to overdo certain sliders and effects while editing our photos.
Whether processing a photo to post on social media or preparing it for print, over-processing is often a mistake that can ruin your results.
However, a very thin line exists between an effectively processed photo and an over-processed one.
We usually make the mistake of over-editing when we edit a photo in one go without taking any breaks.
Make sure to look away from the screen every once in a while while editing the photo for print and take occasional breaks to see the image with a fresh perspective each time.
Choosing the wrong paper profile
The look of your final print depends as much on the type and quality of the paper as it depends on how you edit your image.
This is because every paper has a different texture and thickness that creates a difference in how it renders the colors and details.
For example, Fuji Pearl paper would have a slight sheen and muted colors, whereas High Gloss paper would render colors punchy.
Sometimes, we might soft-proof using an ICC profile for a paper different from what we eventually order.
Remember to select and use the correct ICC profile specific to your chosen paper and variant.
Ignoring ambient light while soft-proofing
Surprisingly, the ambient lighting in our workspace can influence how we perceive colors, brightness, and contrast.
If you’re working with warm lights on in your room, you may perceive the colors in your photos to be a bit cooler and vice versa.
The color temperature of the ambient light plays a vital role in your editing decisions and may cause you to wrongly adjust certain settings like white balance, saturation, and tint.
To avoid such a situation, always pay attention to the lights in your room and try switching them off and on to understand the effect on your perception of the image.
You can also try moving to another room or a different light setting to further grasp the effect before finalizing your edits.
Final Words
Printing your photos and holding them in your hands can be a wonderful experience whether you’re a beginner photographer or a pro.
However, how a printer perceives color differs greatly from how we see them on screen.
That’s where soft proofing would help you eliminate some of the guesswork and confidently go ahead with printing your photos.
I hope this guide helped you learn about soft proofing and how to perform it in different photo editing applications.
If you’ve any questions or feedback, please comment below.

Check out these 8 essential tools to help you succeed as a professional photographer.
Includes limited-time discounts.

Yatharth Gupta is a seasoned portrait and travel photographer based in India. He is also a writer and a blogger and loves to explore new places.
👋 WELCOME TO SHOTKIT!
🔥 Popular NOW:
